
Area 415 is a cyberpunk visual novel puzzle game set in a futuristic version of the San Francisco Bay Area. Deliver food, solve puzzles, and raise a cute weapon that could end humanity.
The player’s choices shape Luna’s character and influence whether she decides to return the experiment back to its tech overlord owners, or run away with it and resist.
Genre: Visual Novel
Platform: Browser
Team Size: 3-11
Timeline: 4 months
Engine & Tools: Yarn Spinner, Unity, C#, Figma, Google Suite, Discord
My Contributions: Branching Narrative, Dialogue Programming, Game Writing, Questlines, Character Bios, Worldbuilding, Storyboarding, Creating and Maintaining Asset Trackers and Narrative Documentation, Project Management, Creating and Maintaining the Game Design Document, Narrative Mechanics
About the Game and Restrictions
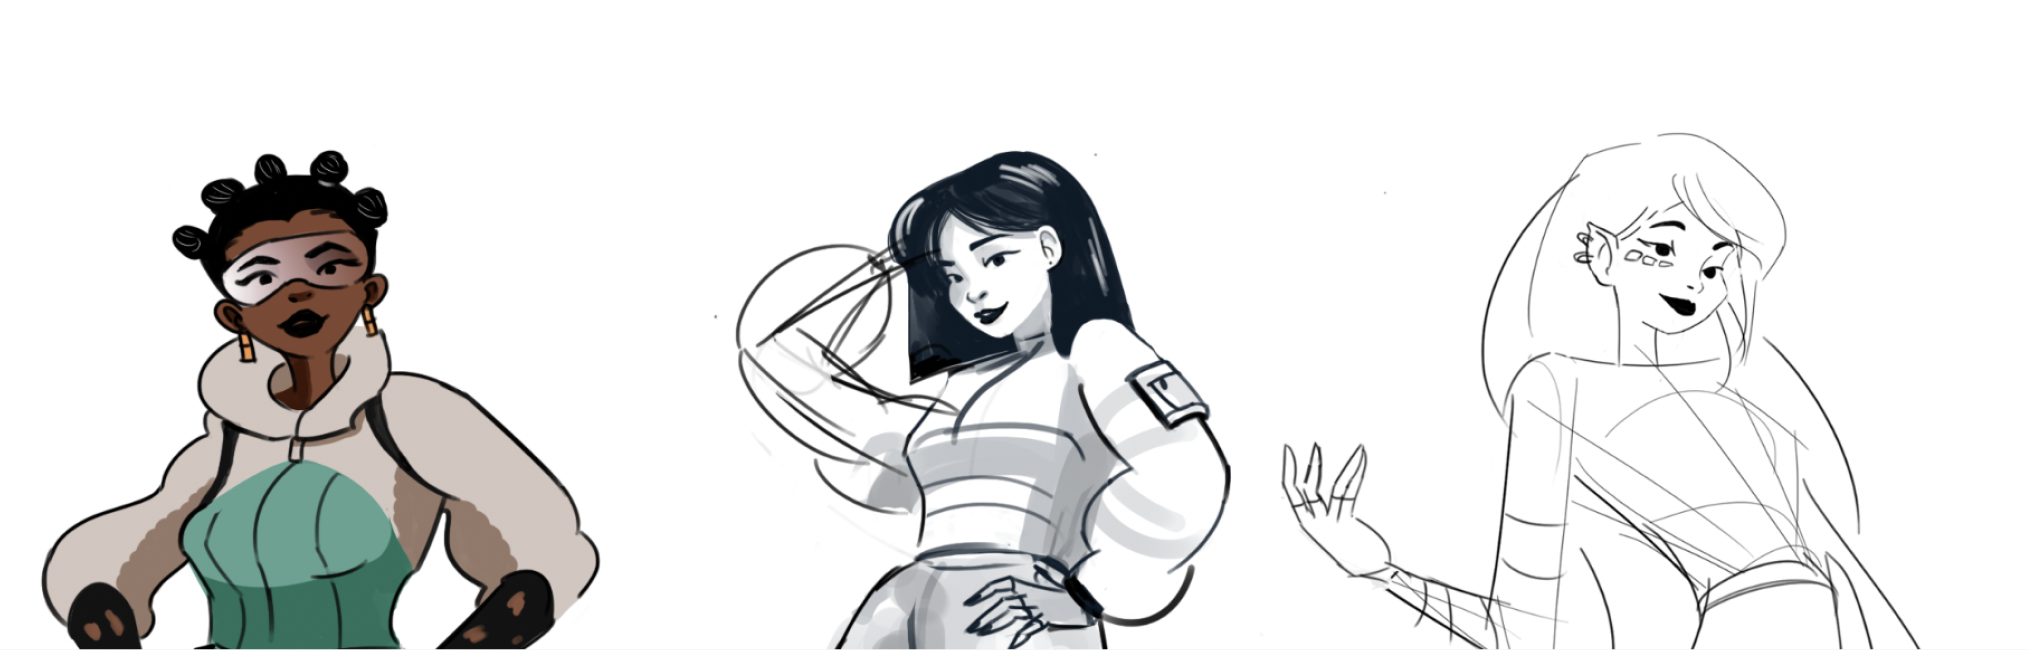
Concept art from left to right: Kaya, Luna, and Nat
The game was originally meant to be a submission to a two-month visual novel game jam called “Cute Girls Doing Cute Things” on Itch. The game needed to include a cast of cute girls, include summer blockbuster elements, and stick to narrative mechanics only. Mini-games and interactive puzzles needed to be optional, and not integral to the story. (More on that later.)
Spoiler alert: Our team did not submit in time for the jam. Instead, we downsized the team from 11 → 3 devs and spent two extra months to create a polished beta build, playtest it with friends and family, and finally launch the game on Itch.
Concepting the game
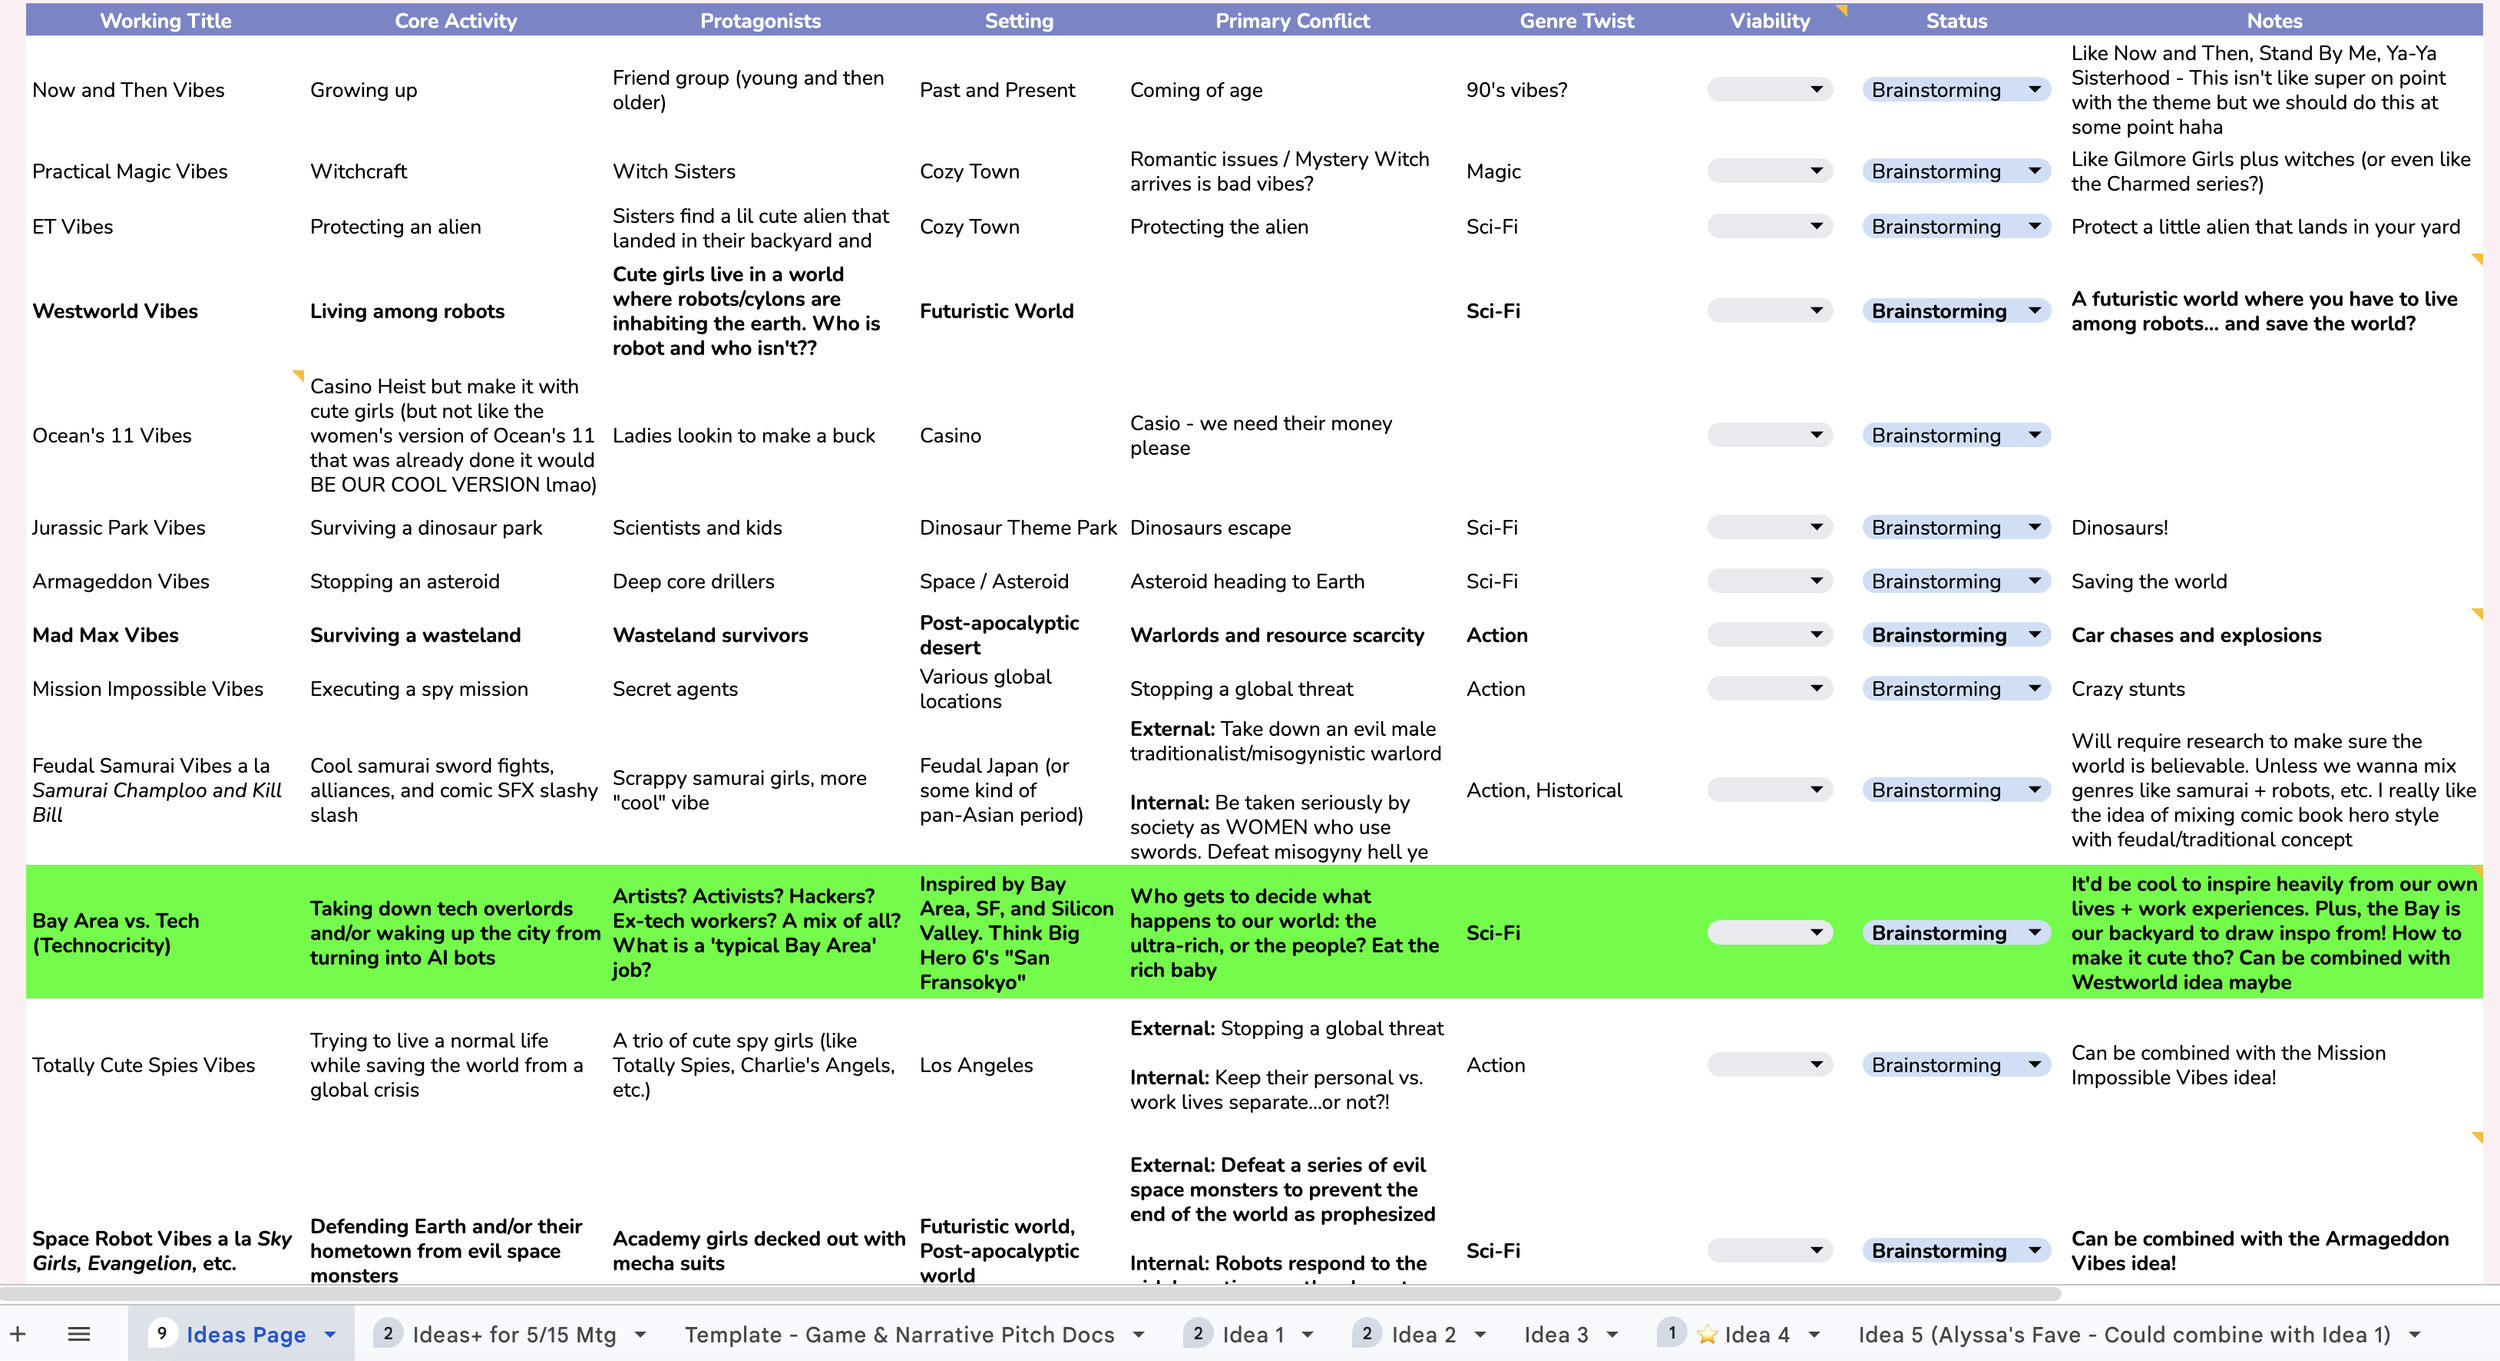
Three weeks before the jam began, Alyssa (game artist) and I wanted to come in with a solid game idea to pitch and recruit other game devs ahead of the game jam start date.
Over the course of 5 days, we rapidly concepted ideas for the theme. Genres ranged from sci-fi, to superheroes, to urban fantasy.
Some ideas felt like they’d be too big in scope or too serious for the cute girls theme, while other ideas felt overused and trite.
One theme that did stick with us was a quirky and over-the-top tone, similar to the battles and themes of the Scott Pilgrim live action movie.
Another theme that kept coming back was our mutual love for the San Francisco Bay Area, which we’re both based in. There was also the never-ending discourse of tech and AI that swirls around us, everyday.
If we wanted to stay motivated for a two-month jam, it’d better be something we truly love—so we locked in on a sci-fi concept that was based in San Francisco and addressed topics of AI through a wacky, Scott Pilgrim-esque tone.
Character Bios, Worldbuilding, and Context
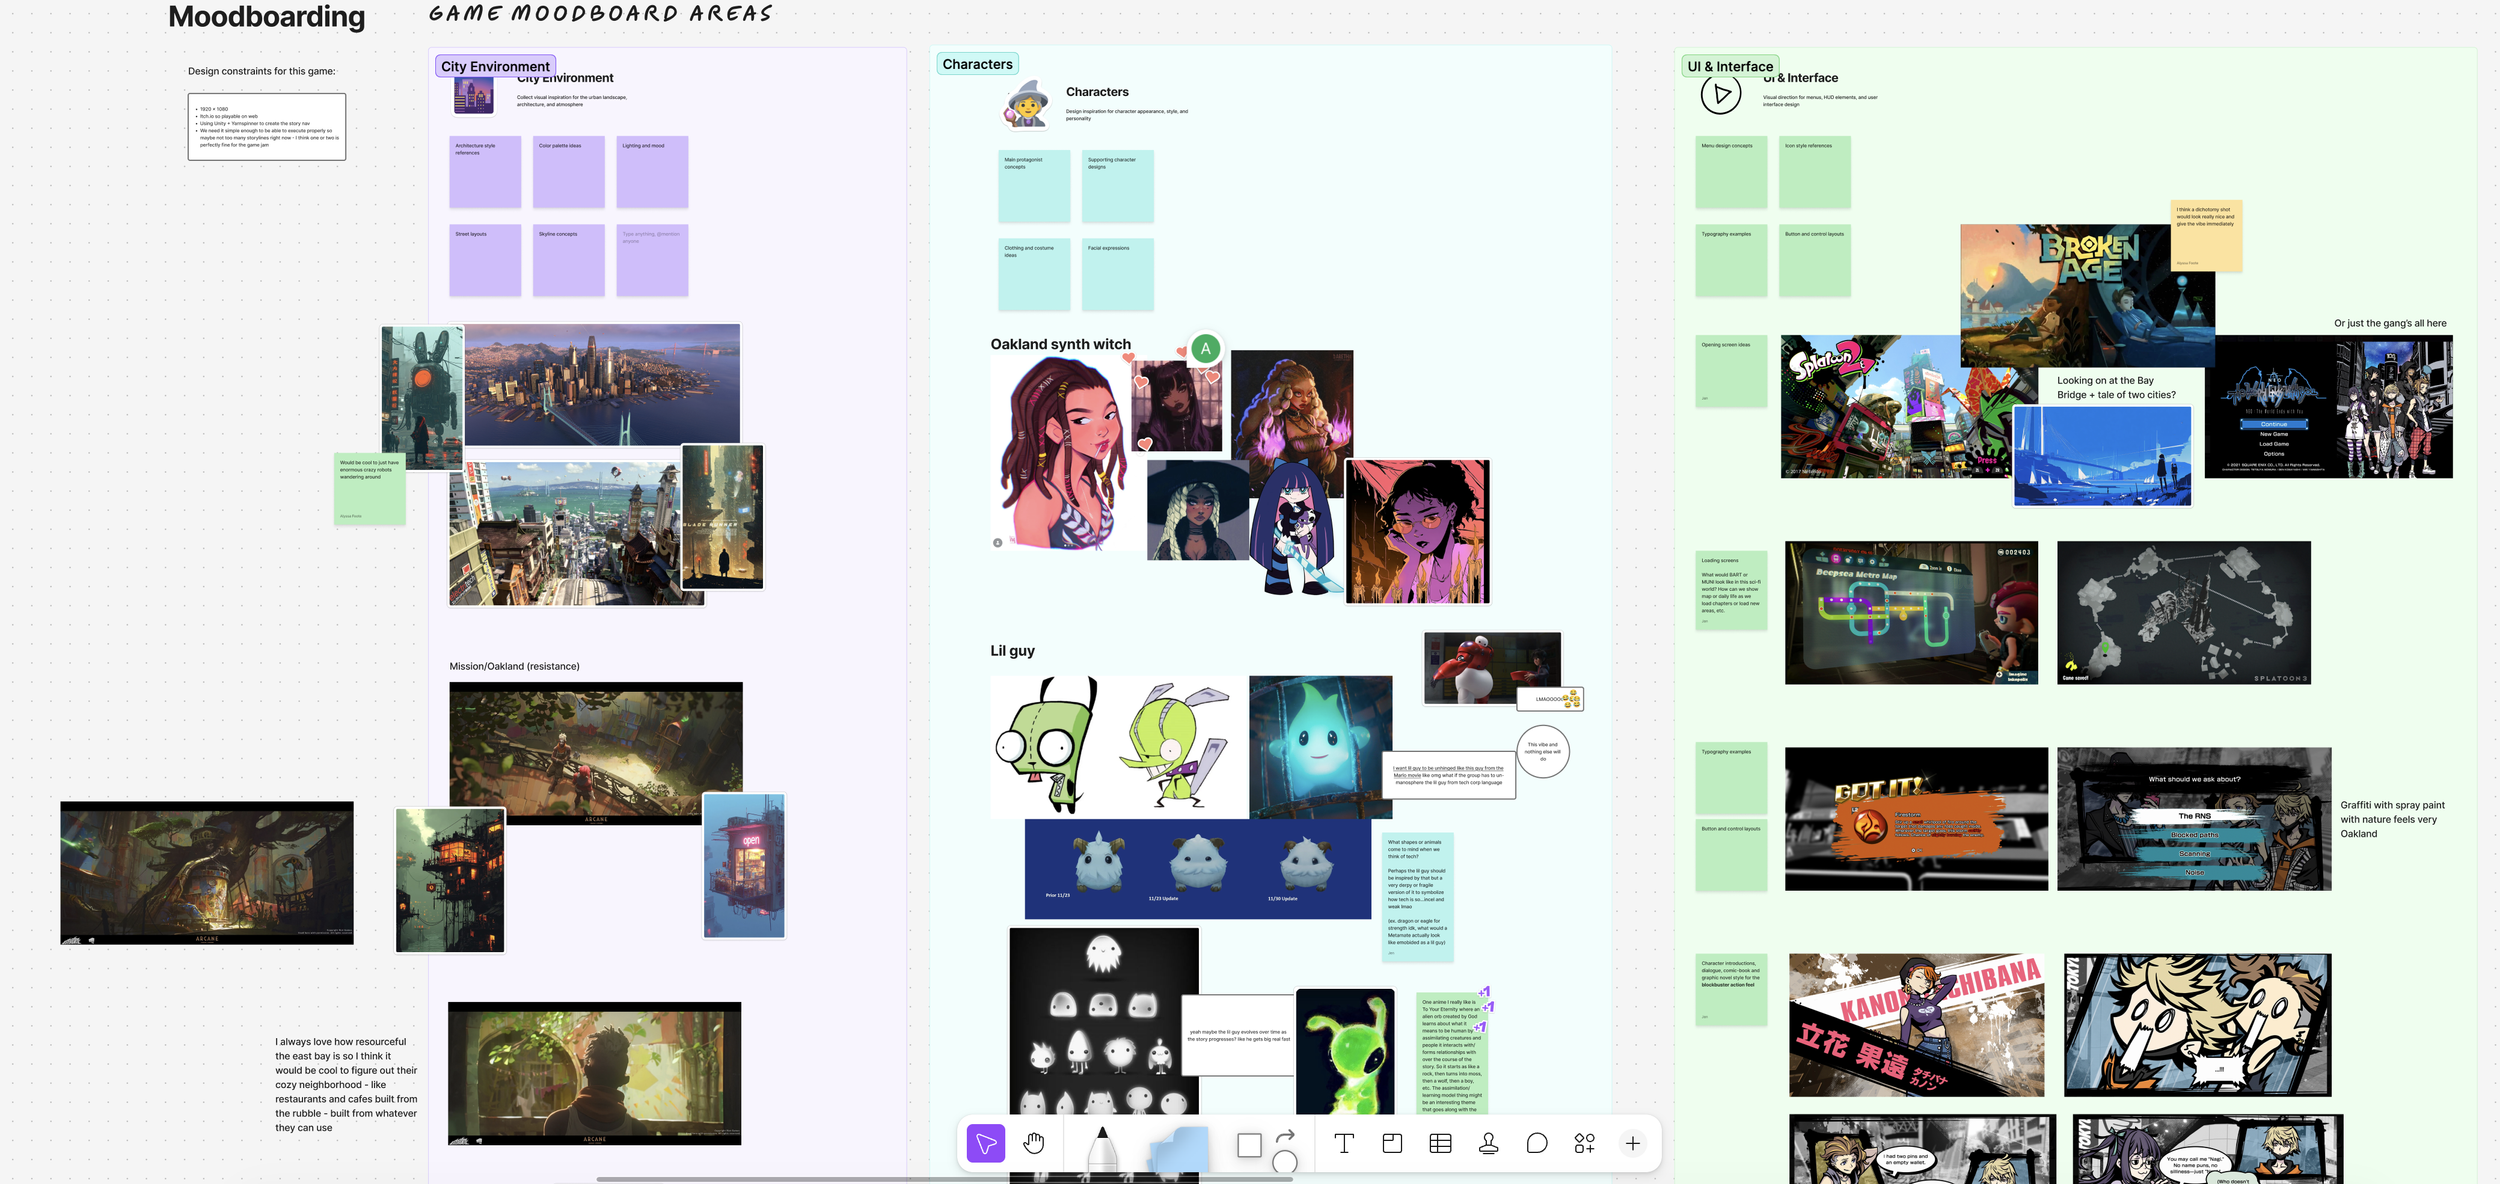
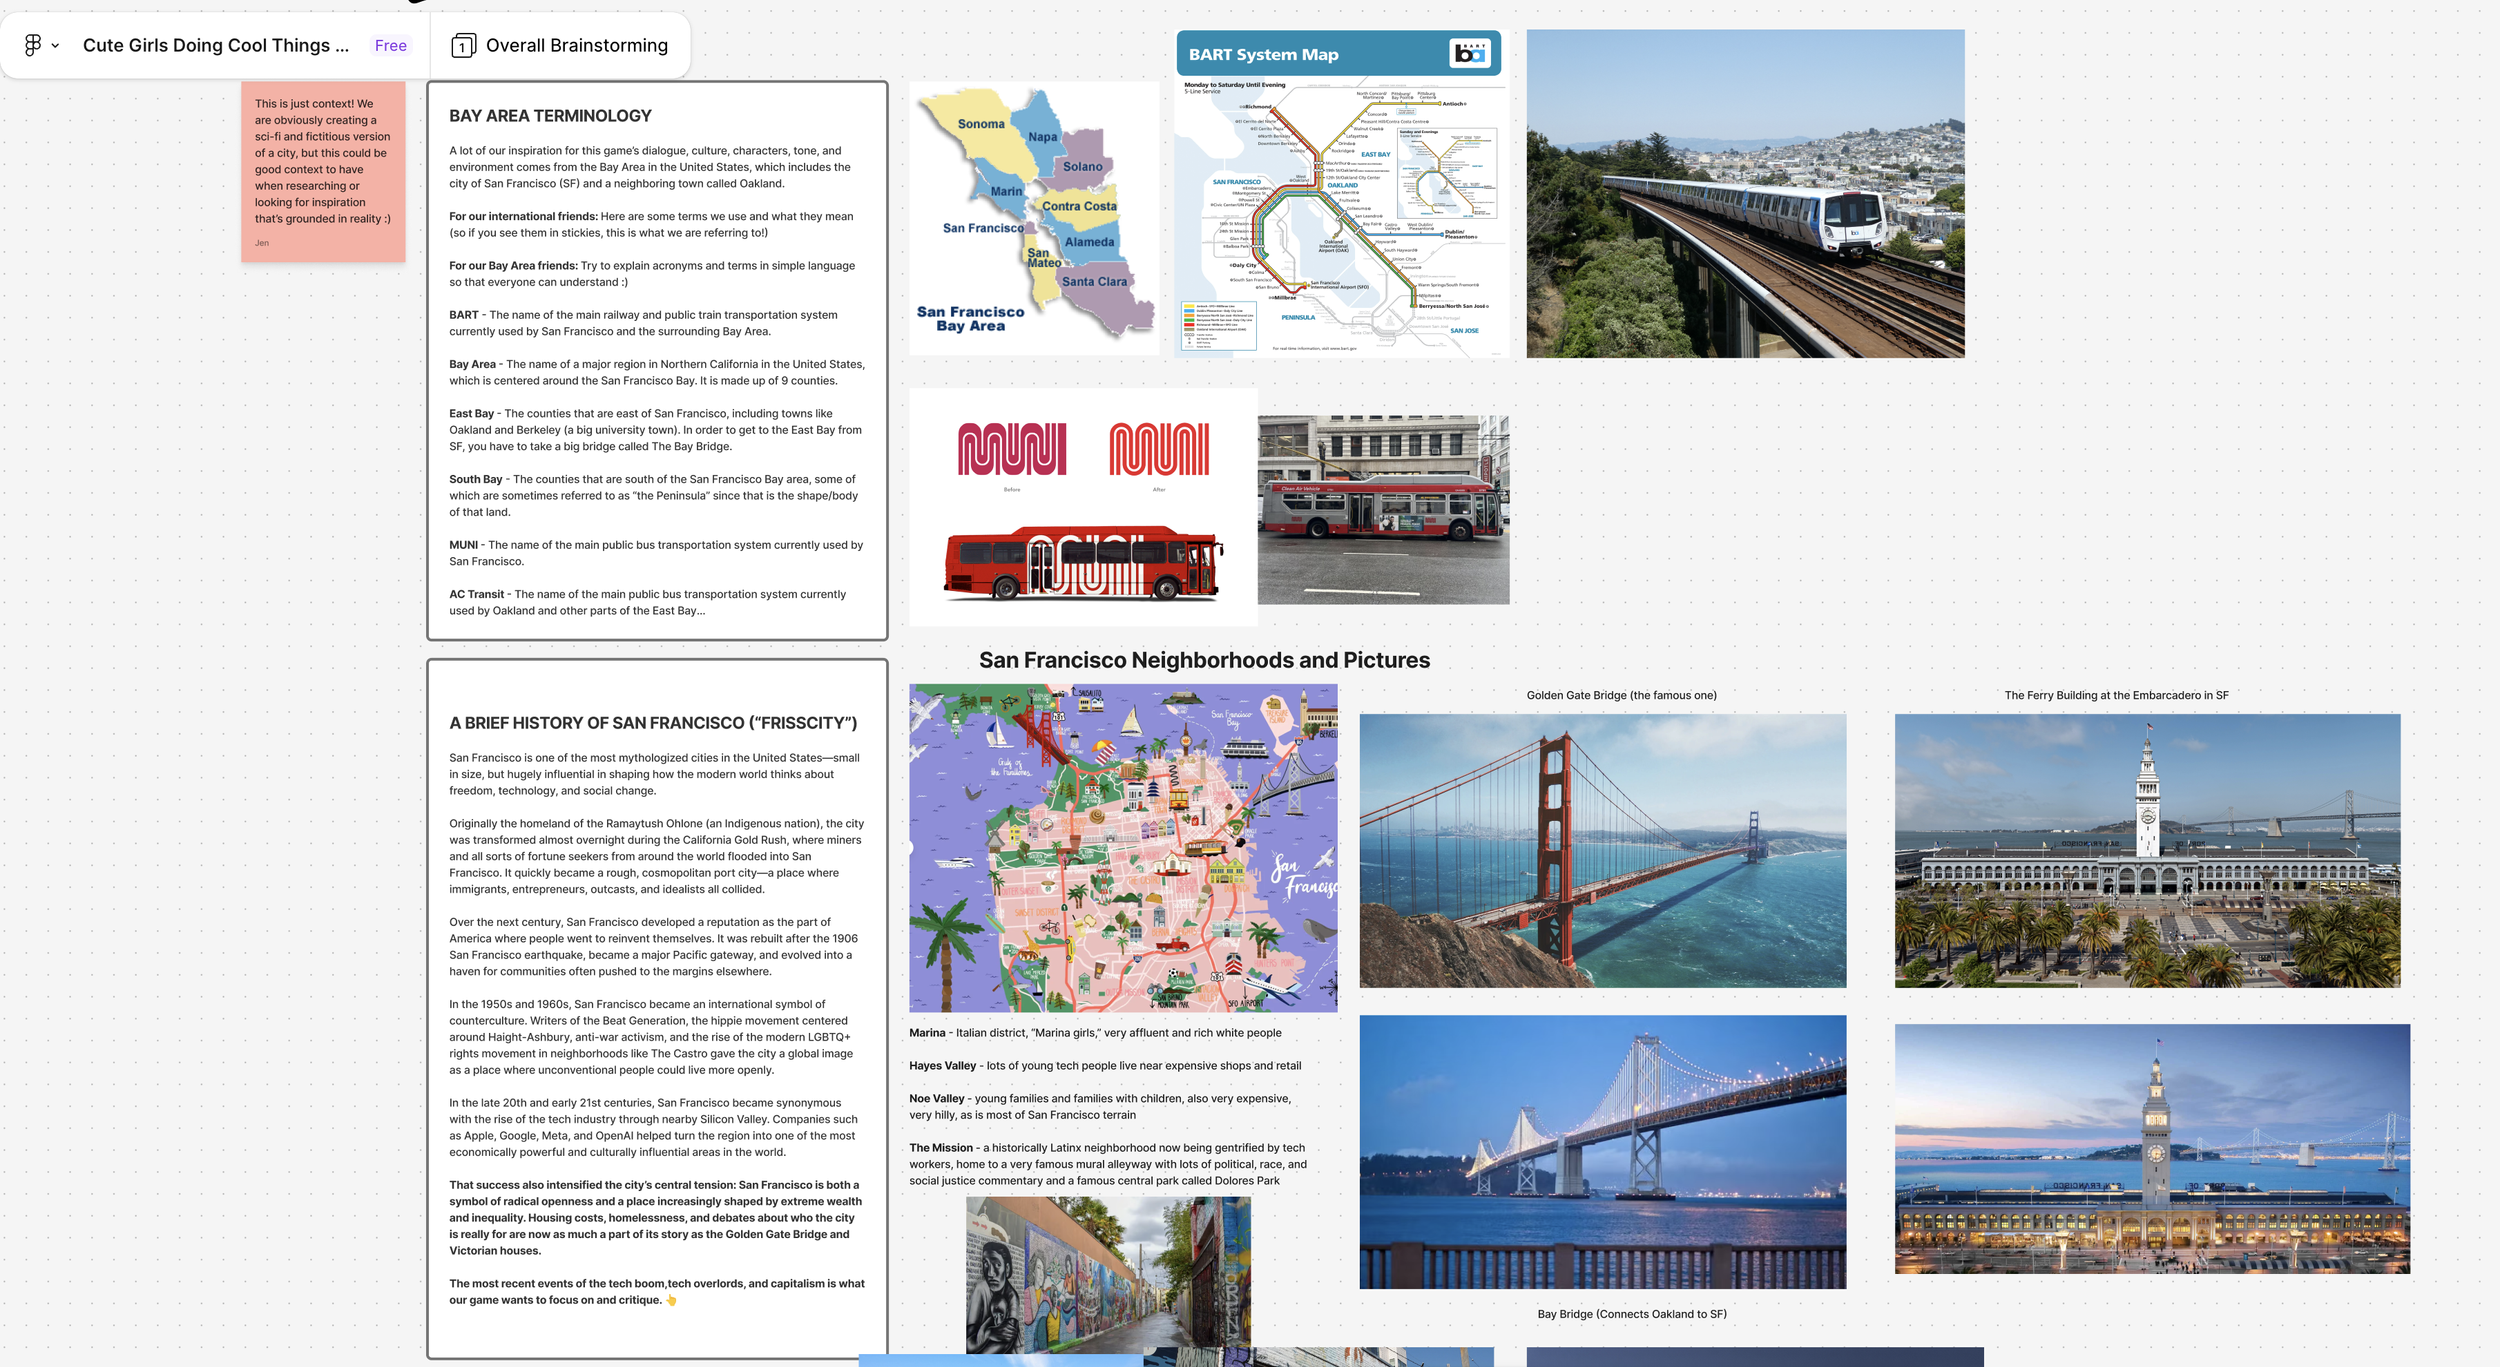
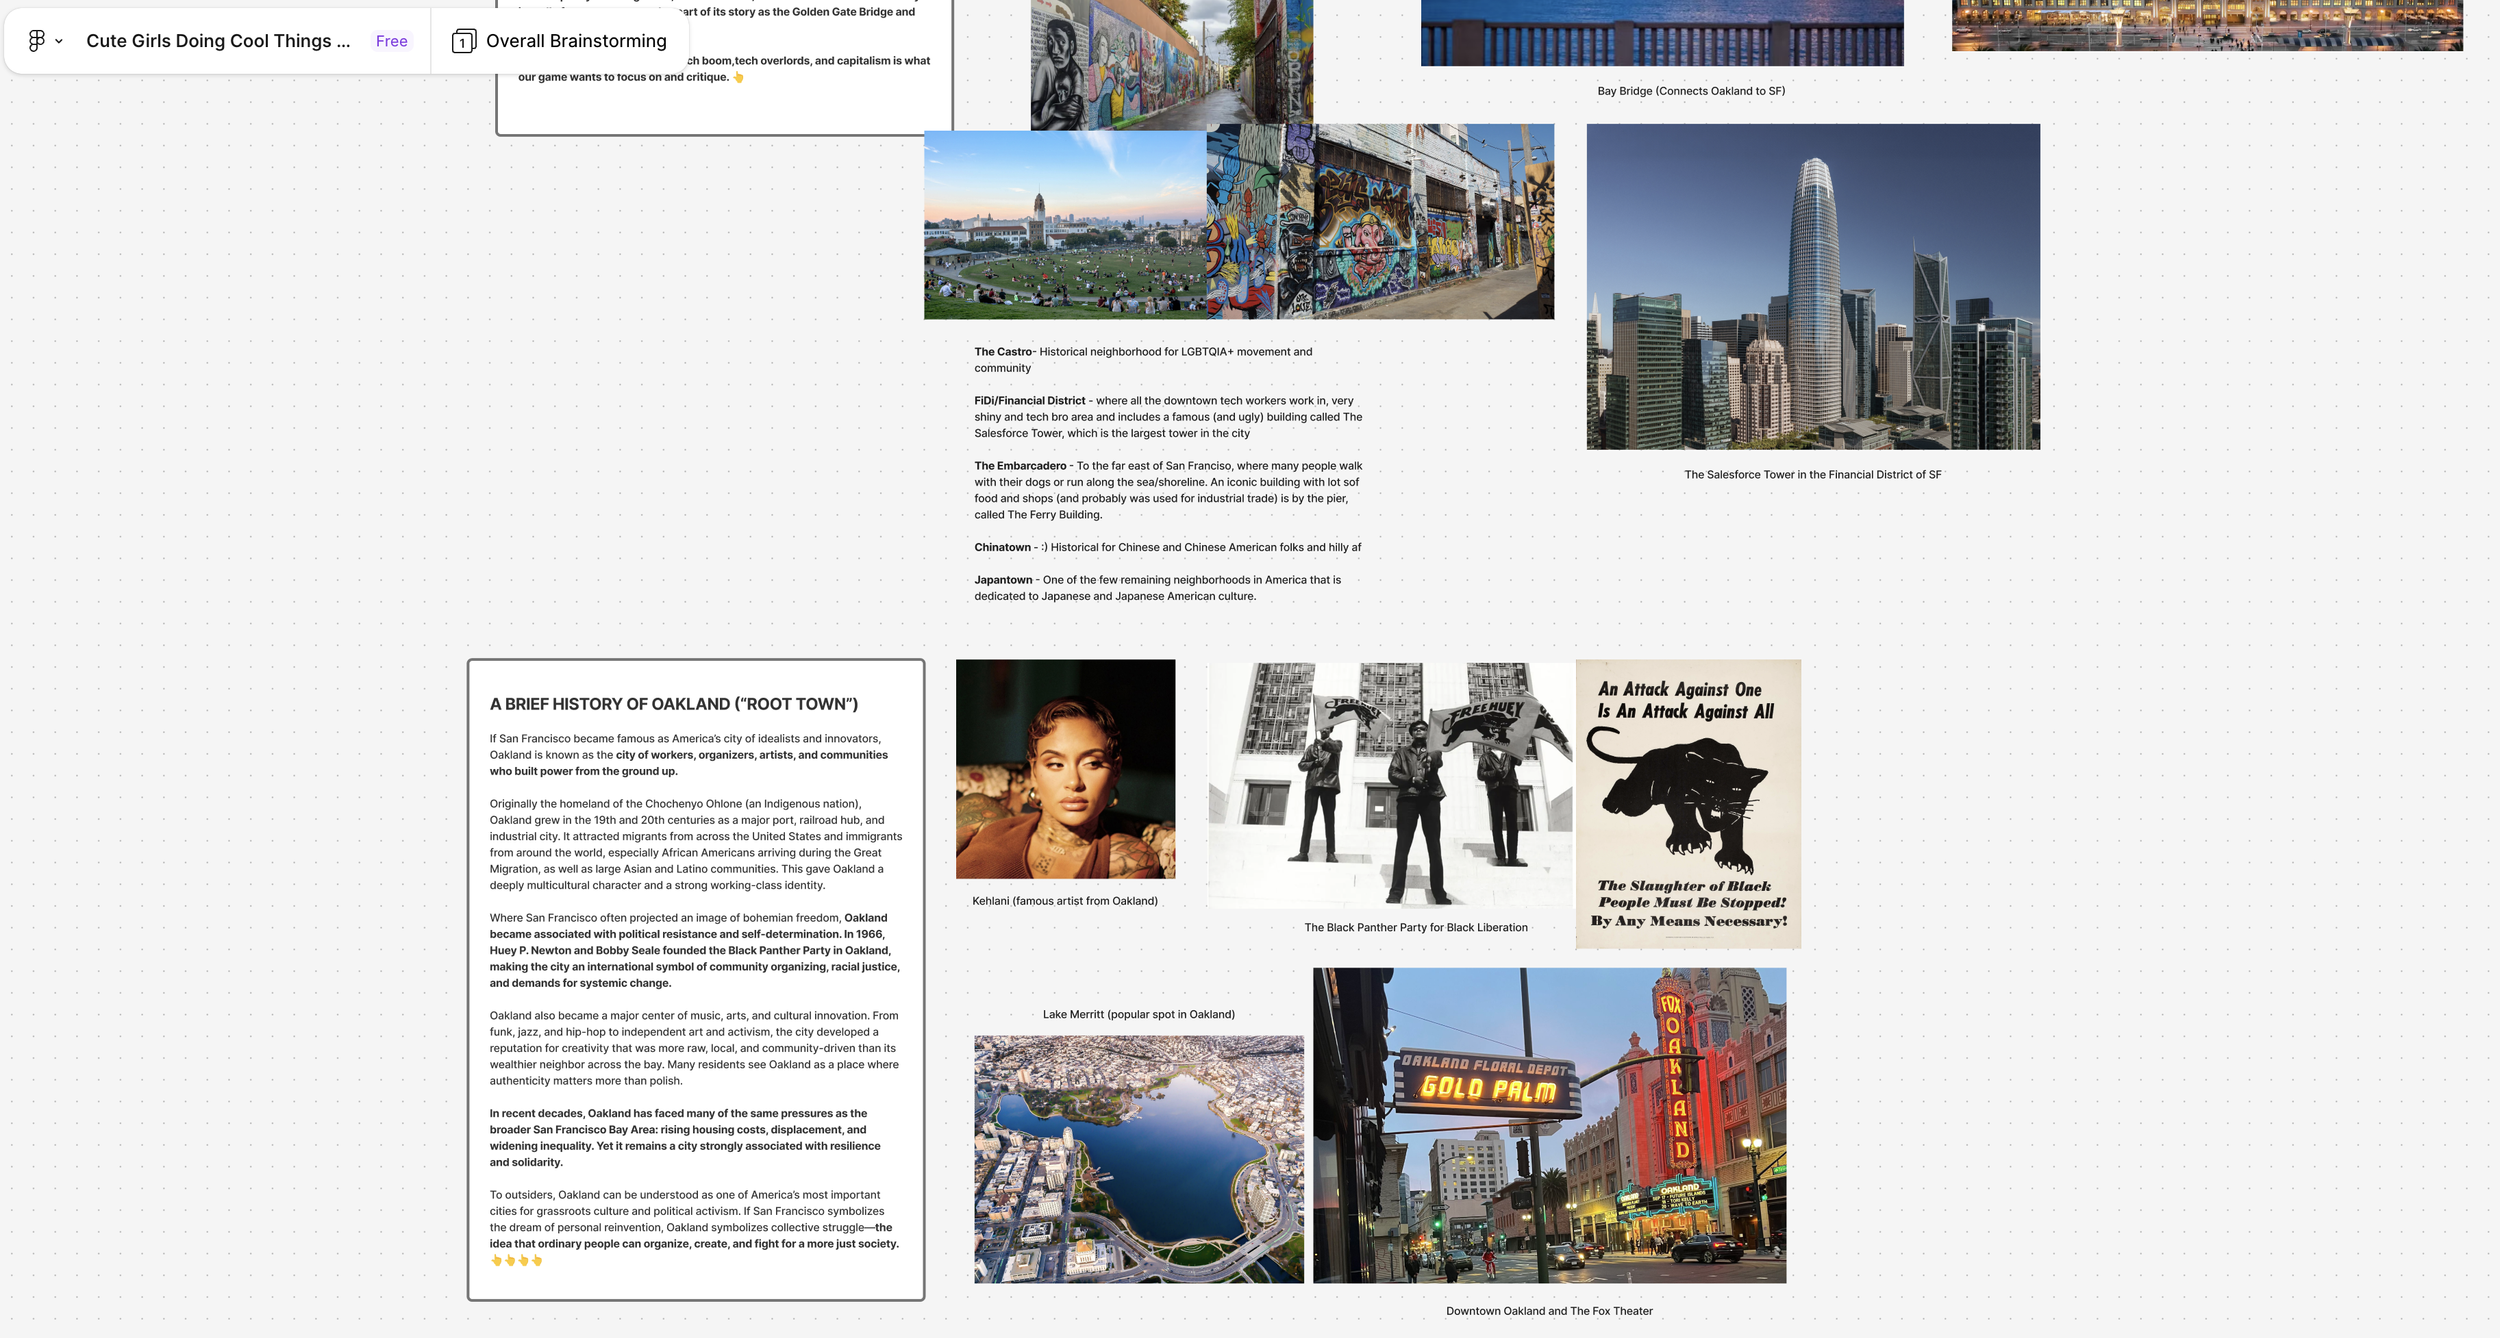
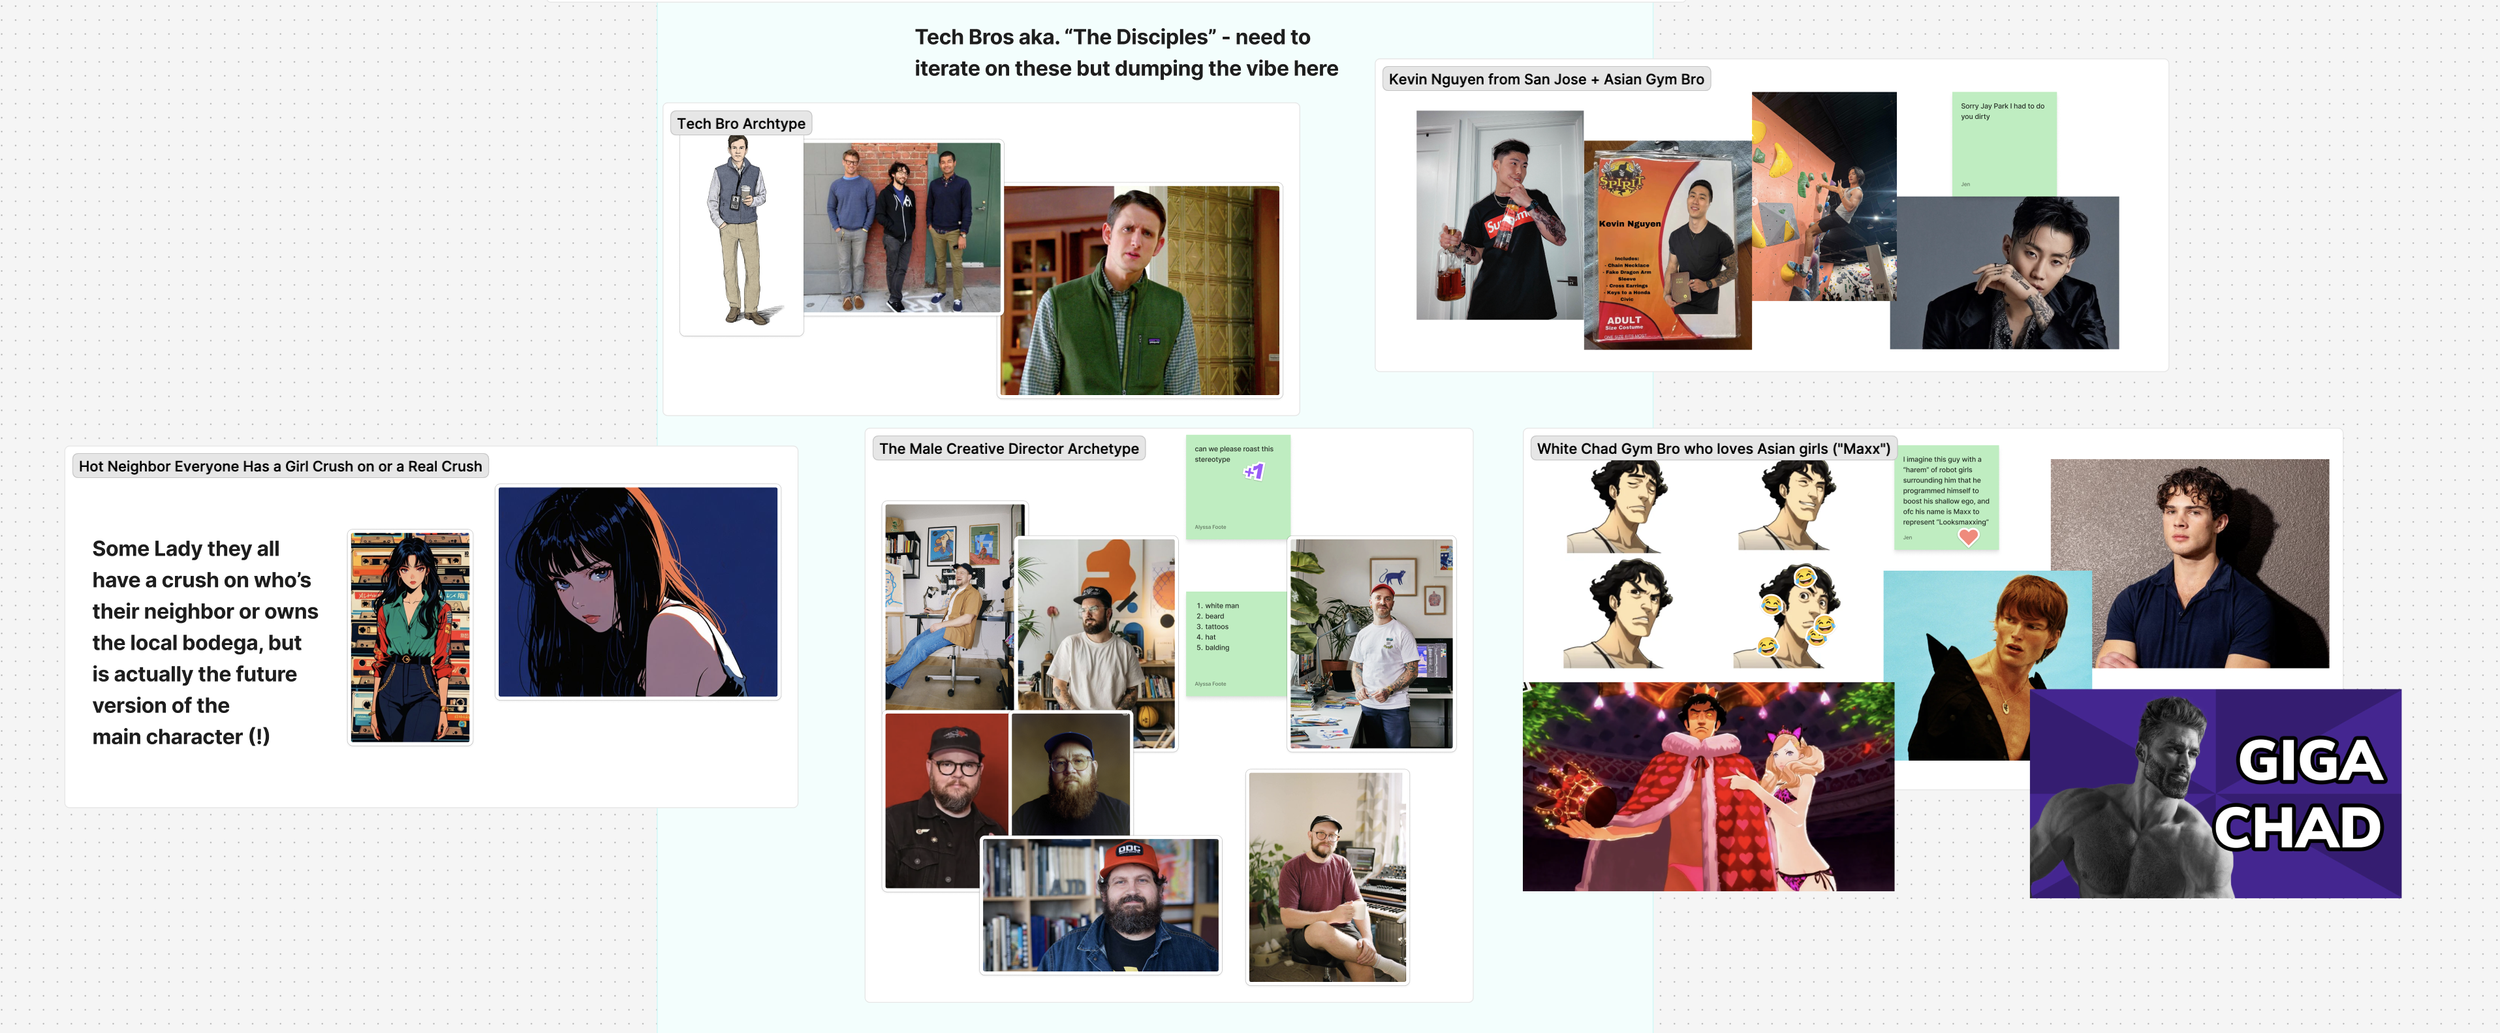
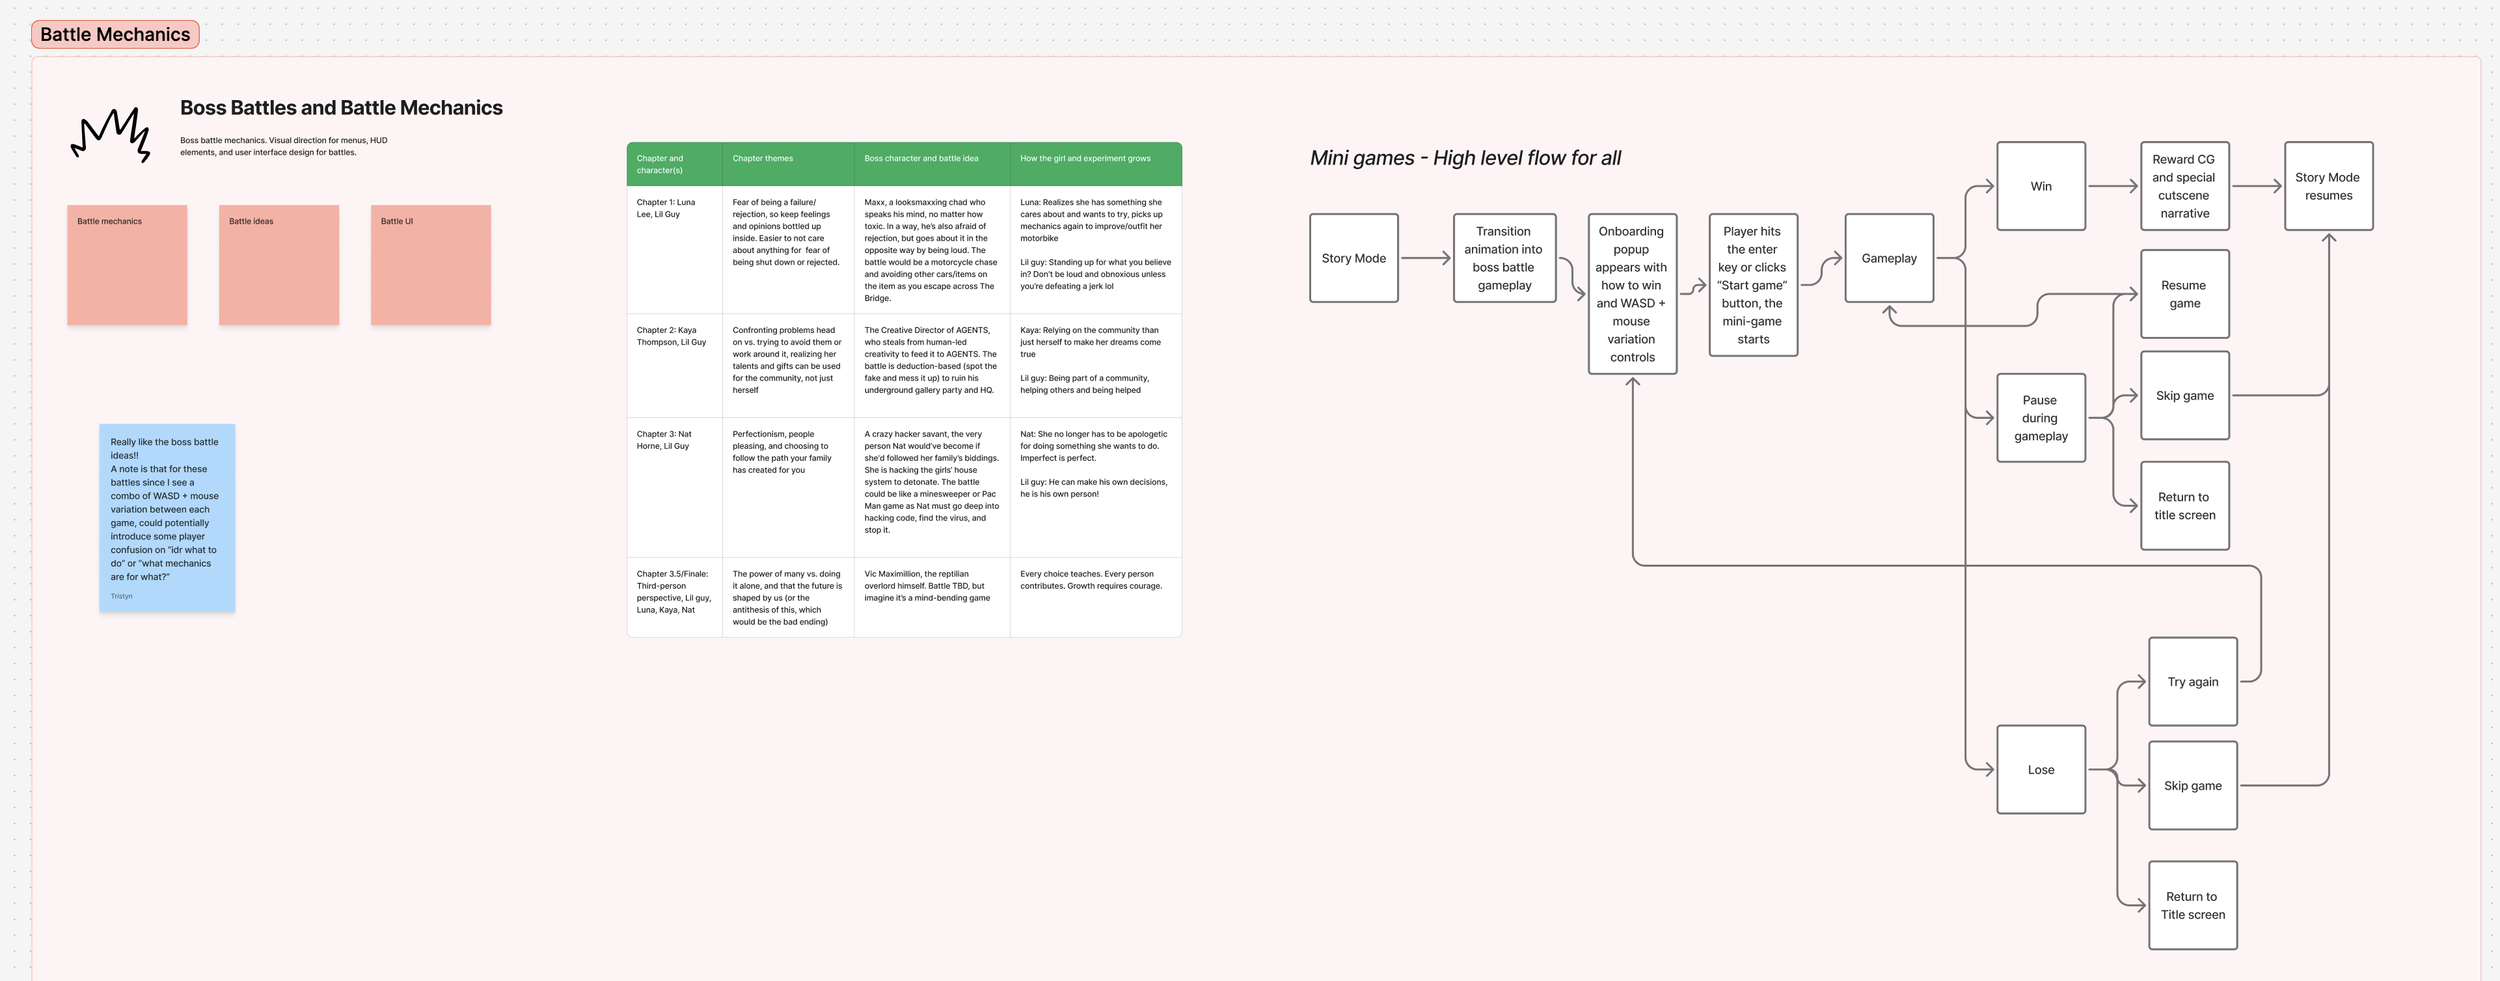
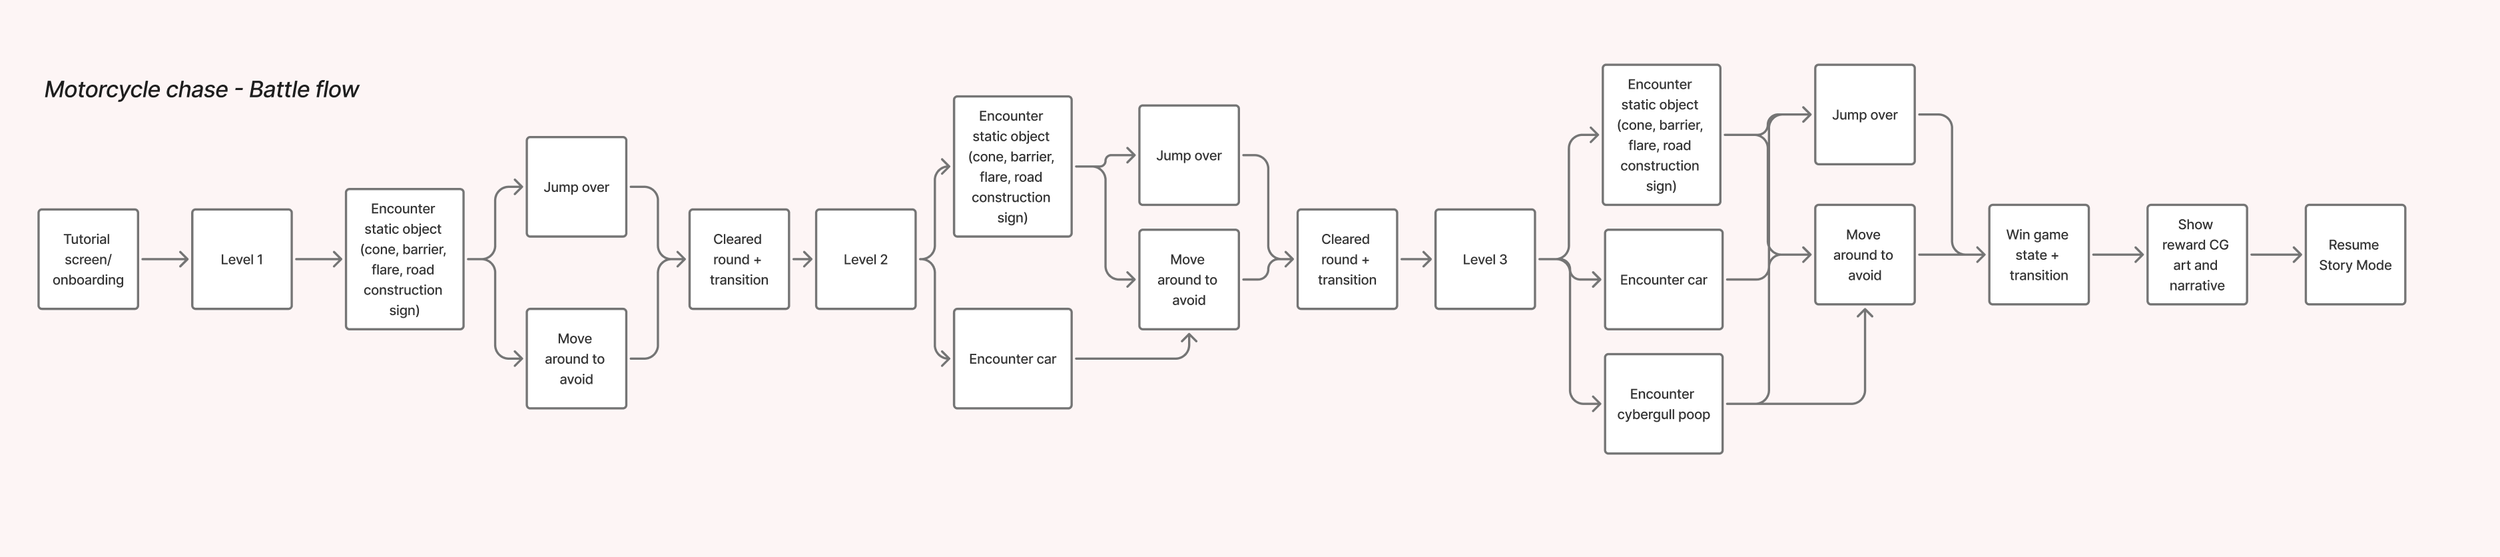
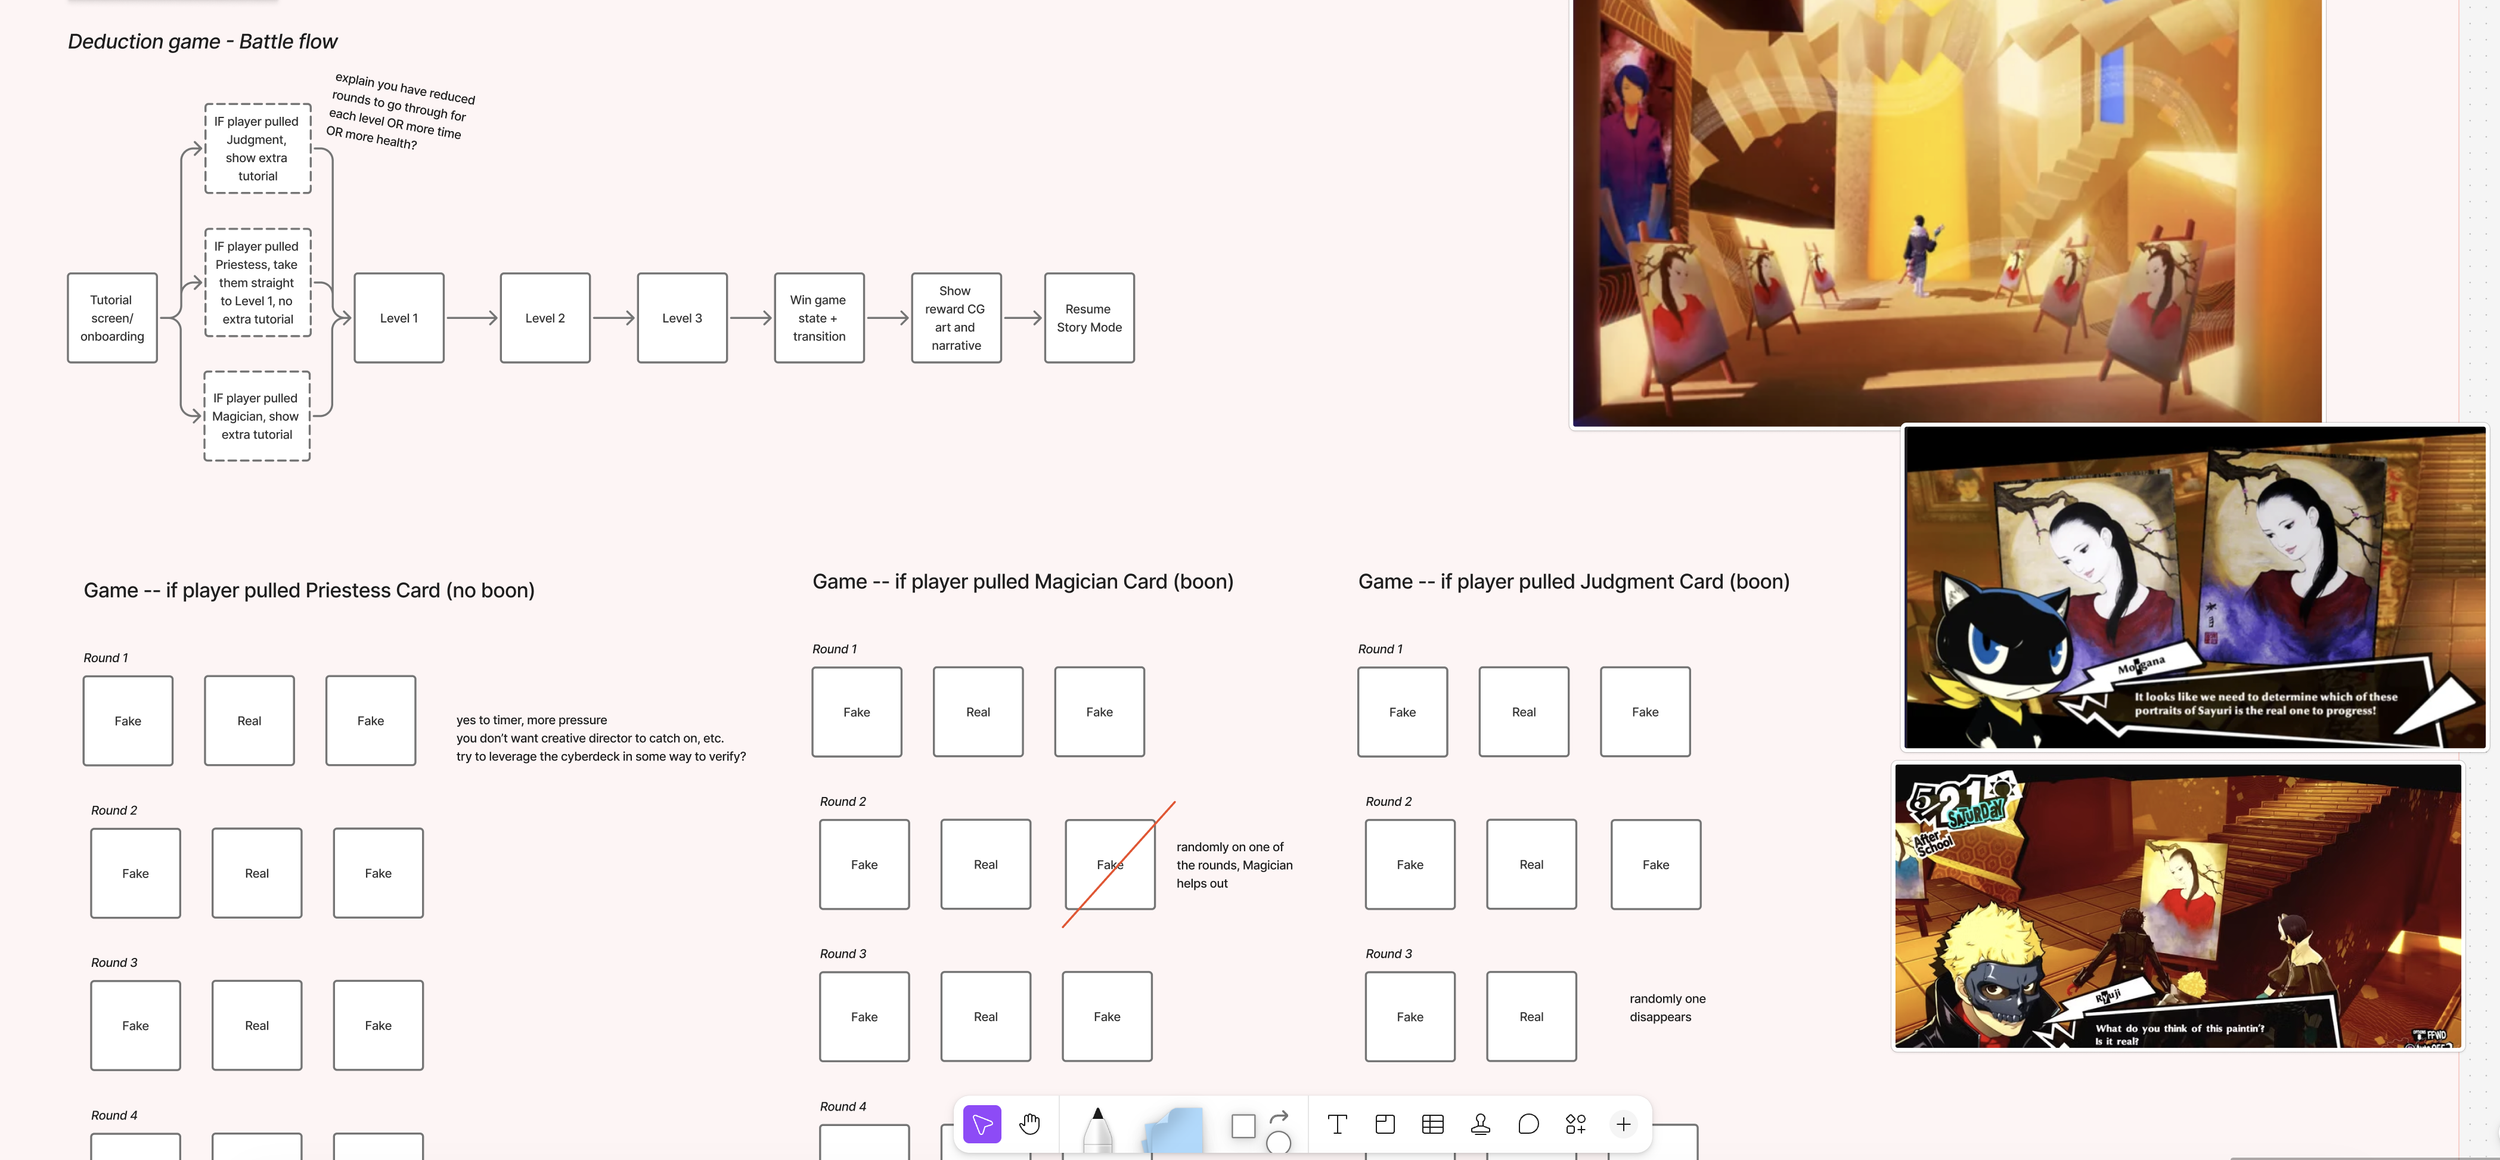
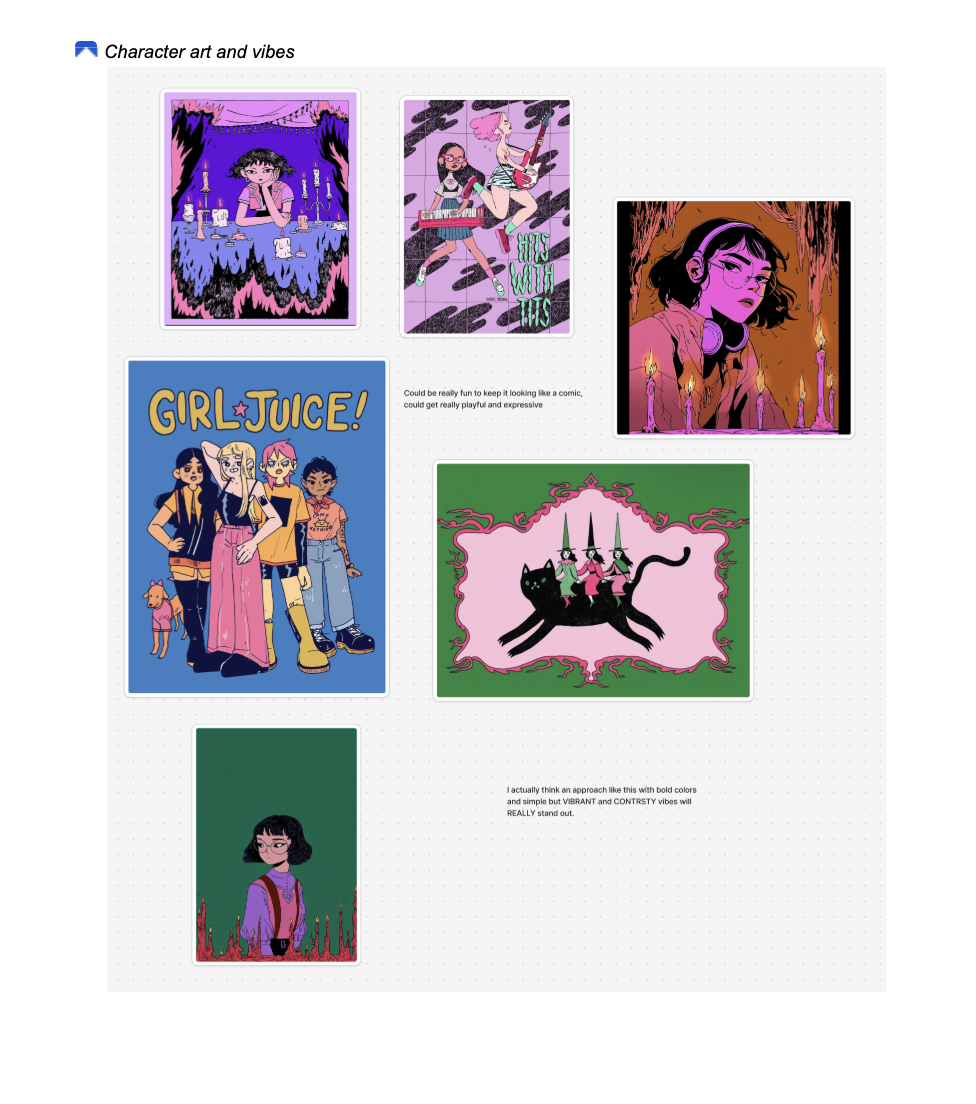
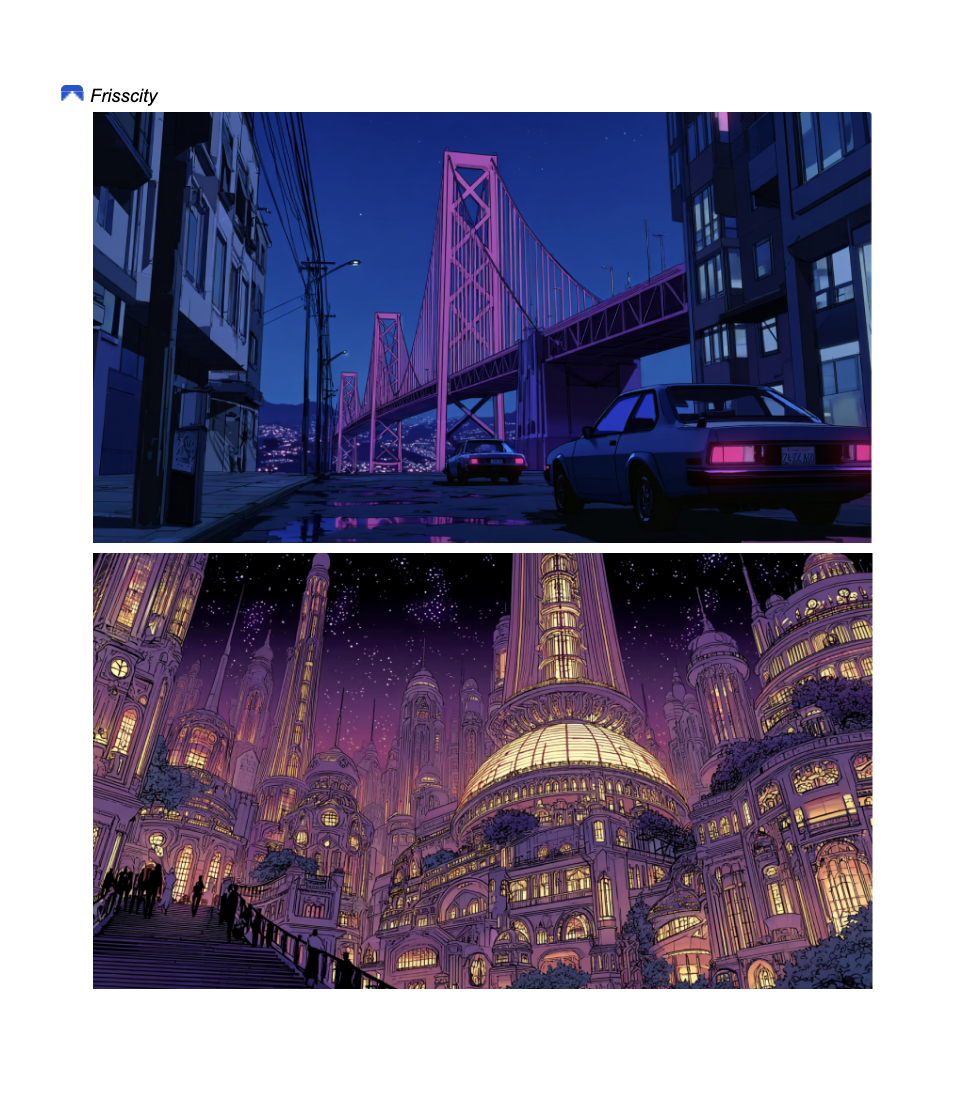
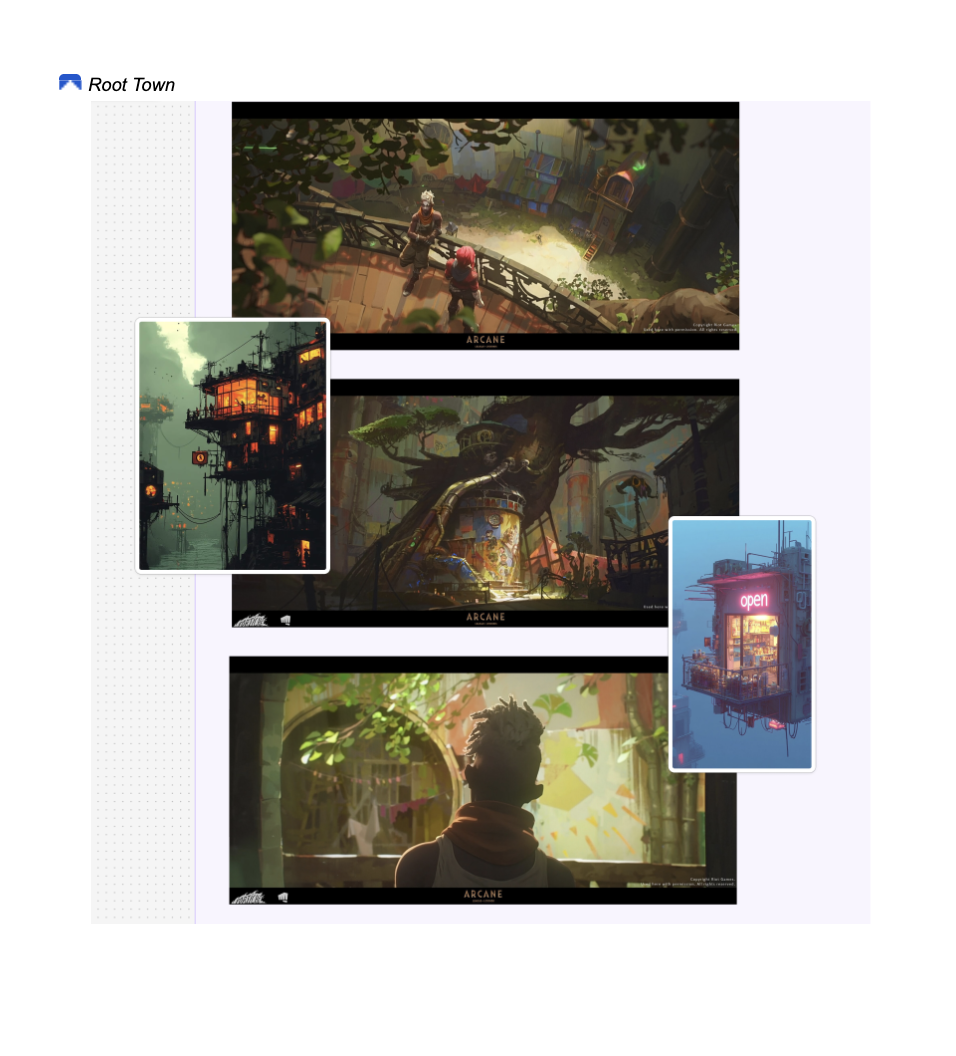
To develop an enticing pitch, we needed to give people insight on our overall plot, character bios and rough images that could distinctly capture what we were going for, as well as environment and vibe to capture the world we were building.
Two weeks before the jam started, Alyssa and I created multiple mood boards for the two key environments the game would take place in (sci-fi San Francisco and sci-fi Oakland), the characters, battle mechanics, game UI, music, and artistic style of the game.
I also needed to give people context on what the San Francisco Bay Area is, its history, its key neighborhoods, its slang, and how our futuristic version connected to real events that were happening in the area.
I knew we could be getting teammates from around the world, so I made sure to create a “context” section where everyone could join having the same context.
We were lucky to recruit 9 other members across the US and EU in under a week via recruitment posts I posted in the DevTalk Discord recruitment channel, as well as some Bay Area-based servers.
This included 2 music composers, 3 programmers, and 4 artists. They each contributed at various points of the project.
While a large team sounded great at first, there was a lot I learned about leading large teams for long game jams (which is down below, in the “Learnings” section).
Game One-Pager
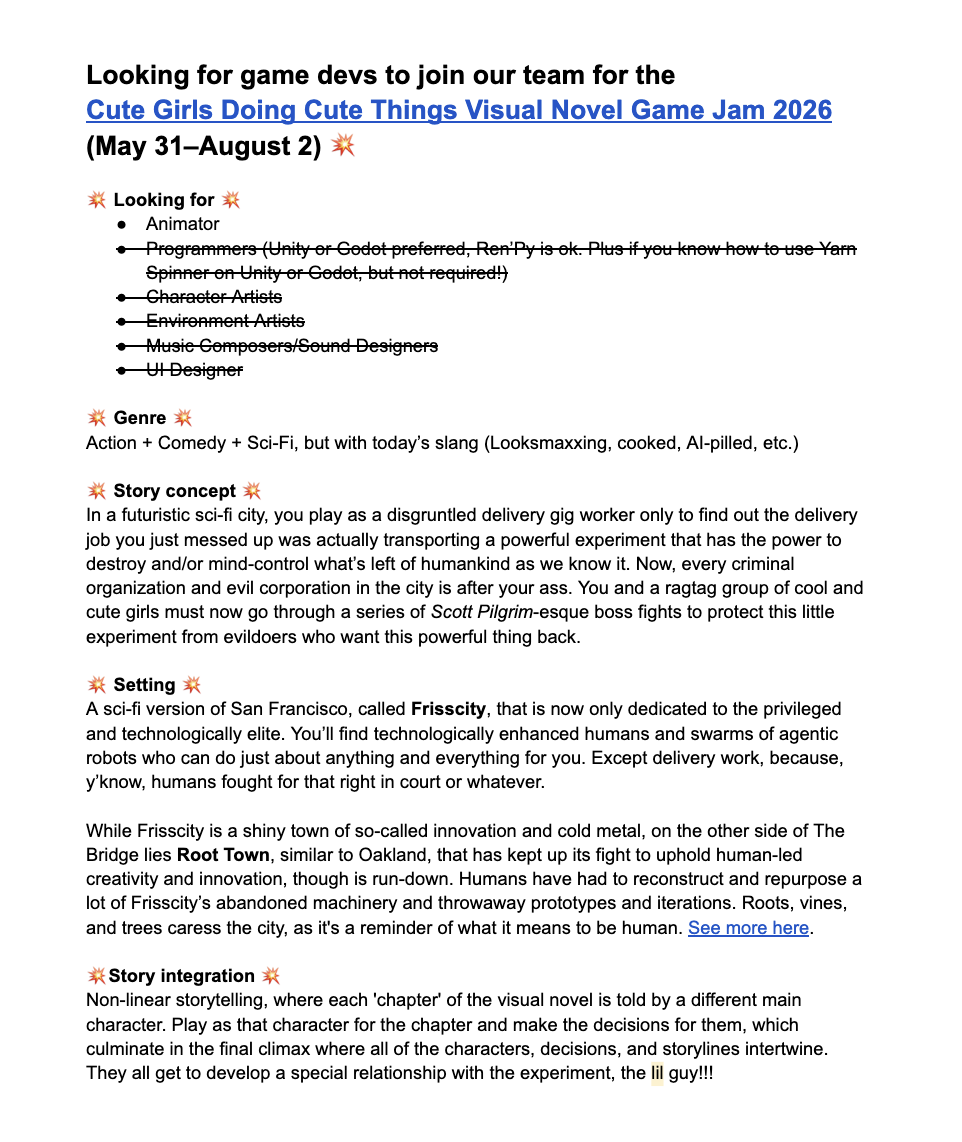
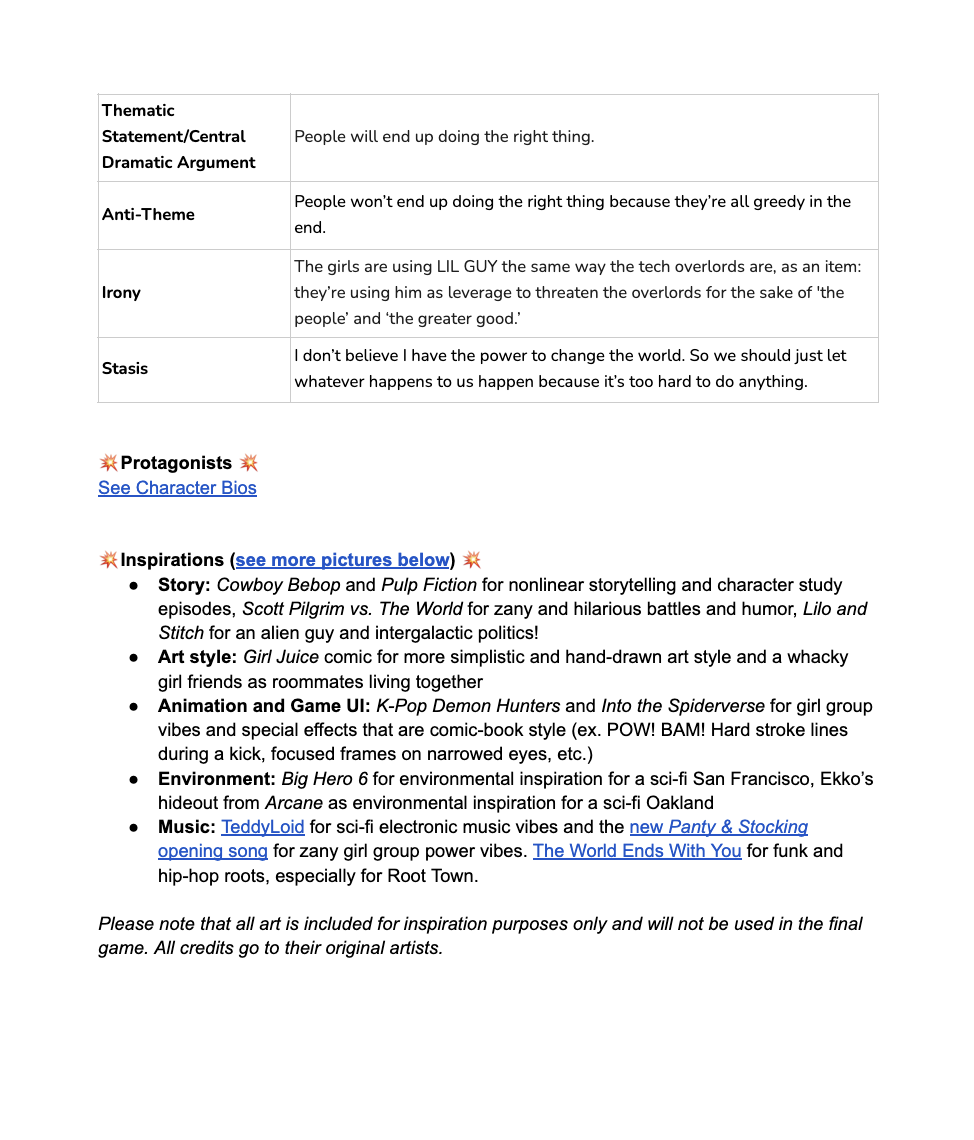
To recruit members for the jam, I created a game one-pager I wrote that included the main plot and main characters as part of my recruitment posts. I encouraged new teammates to contribute their own ideas and comment on the existing images once they confirmed they’d volunteer and join our team.
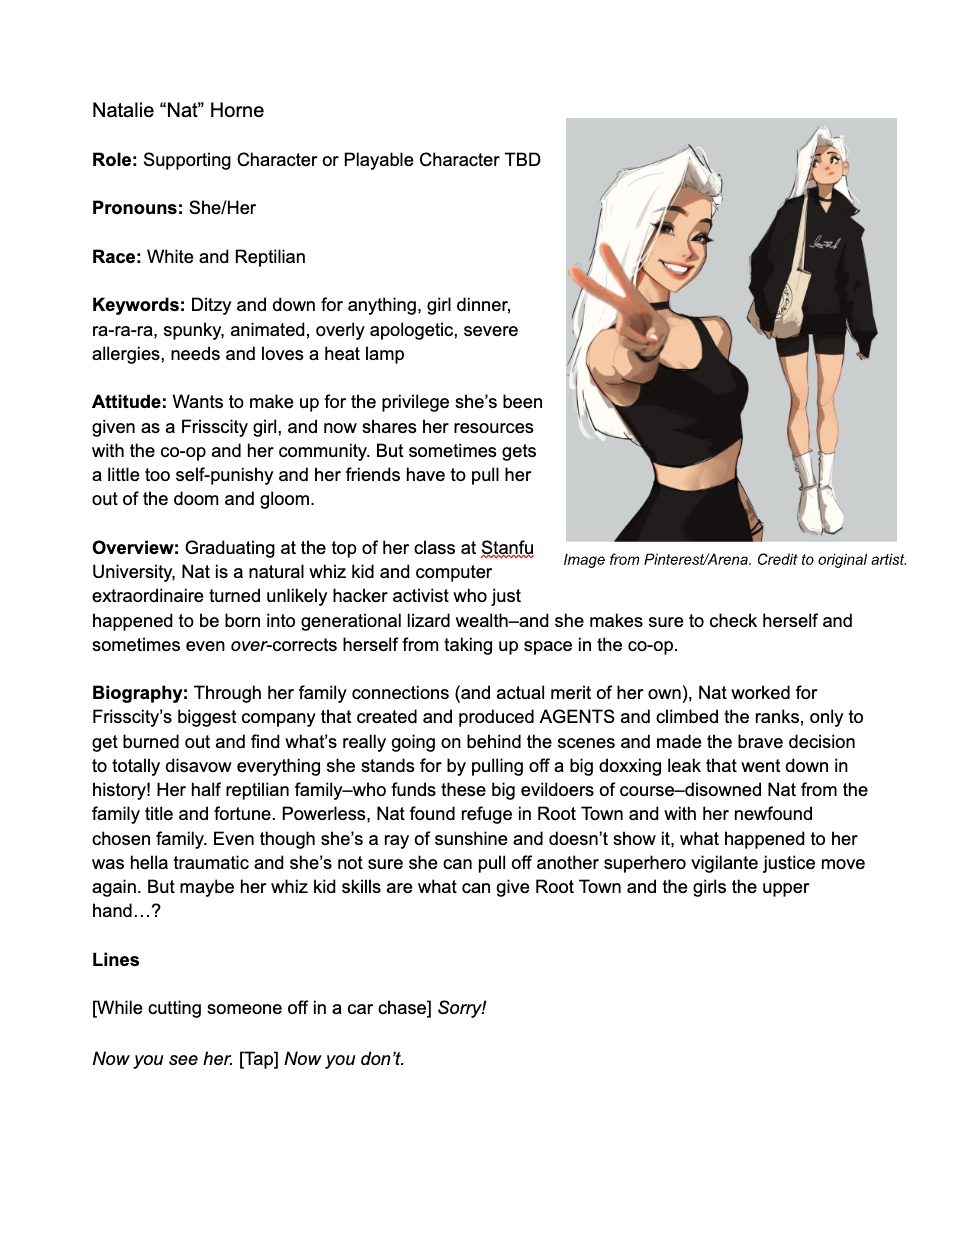
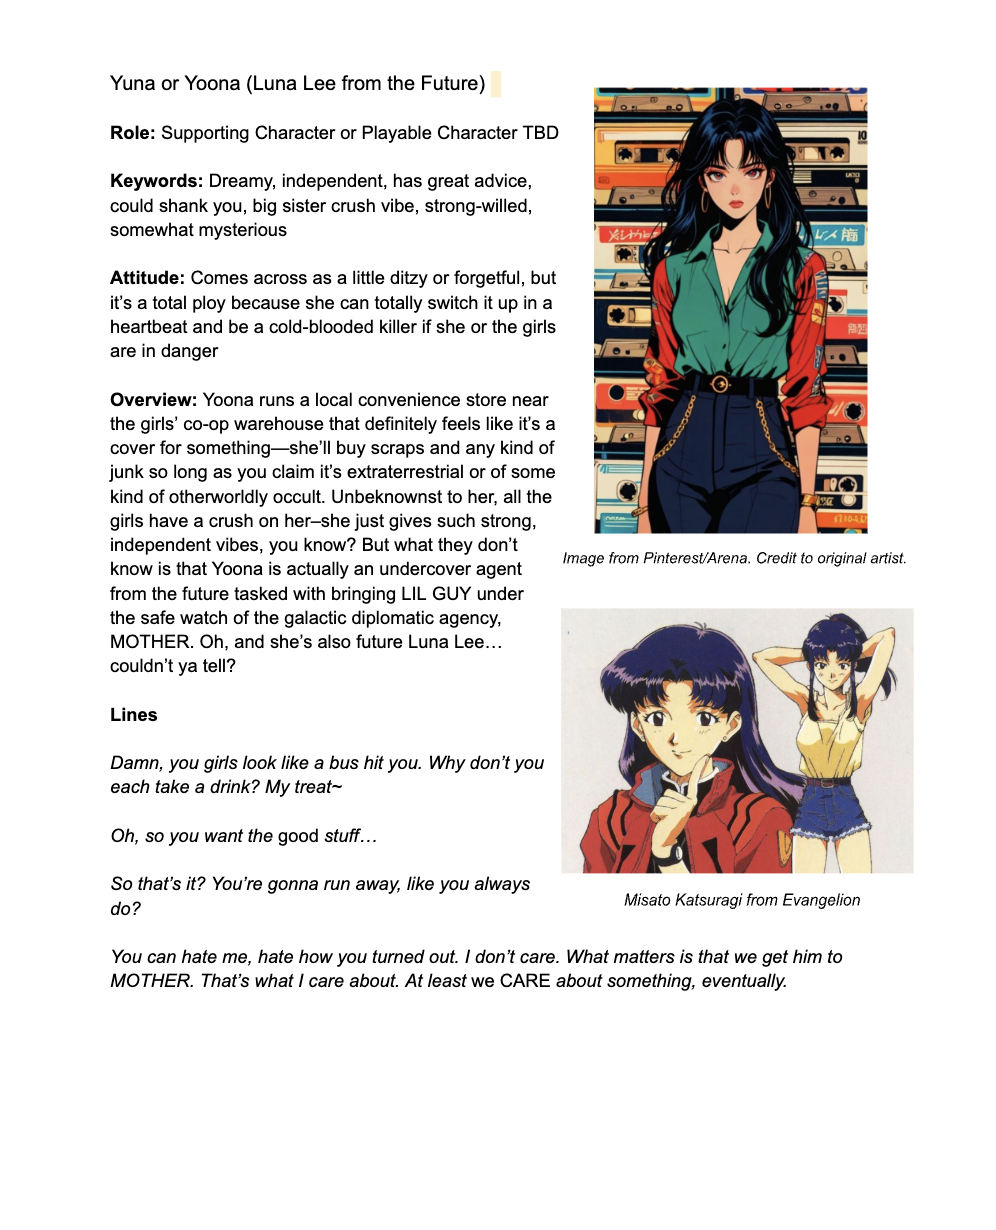
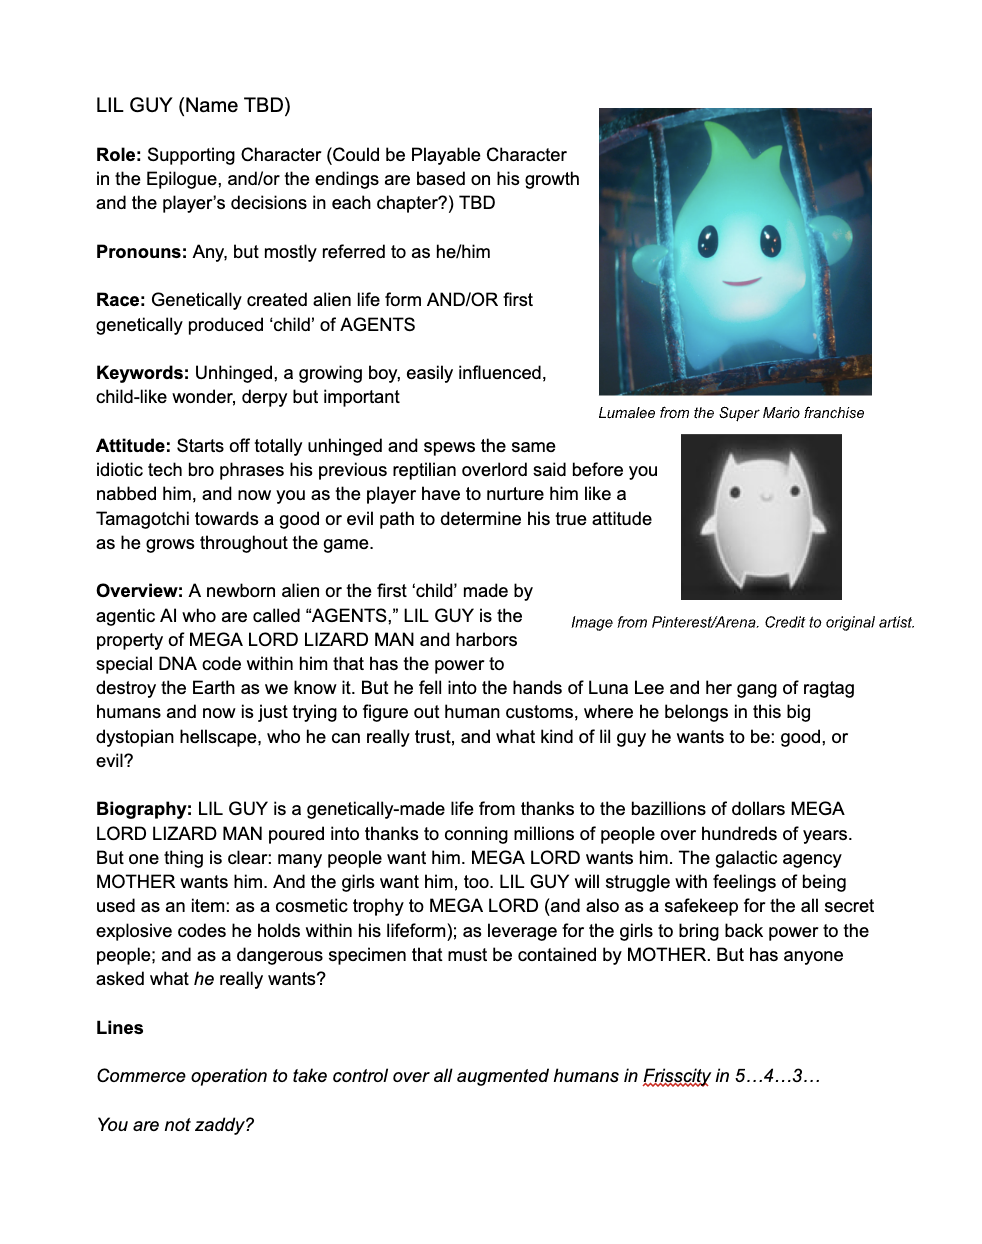
Character Bios
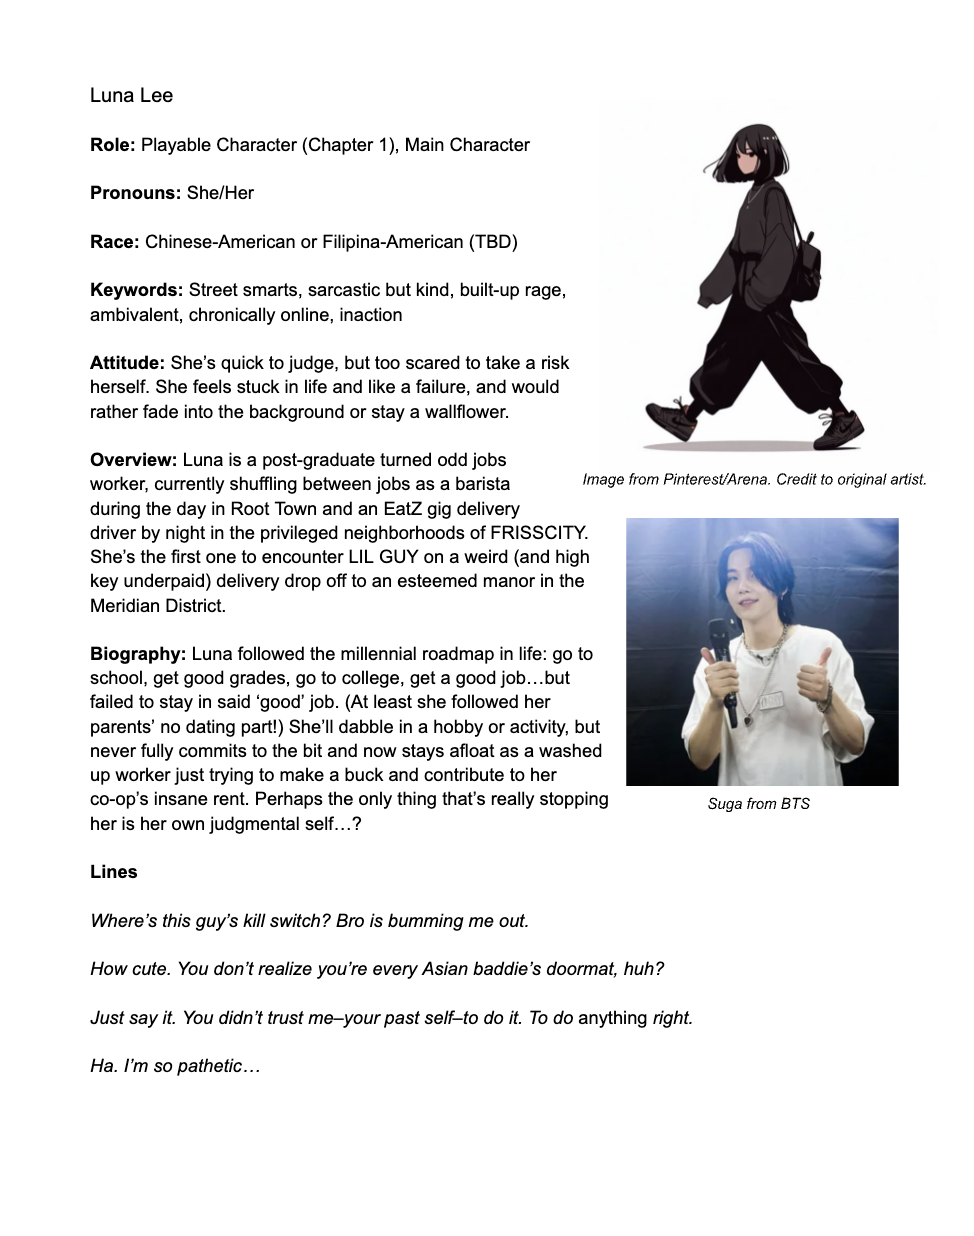
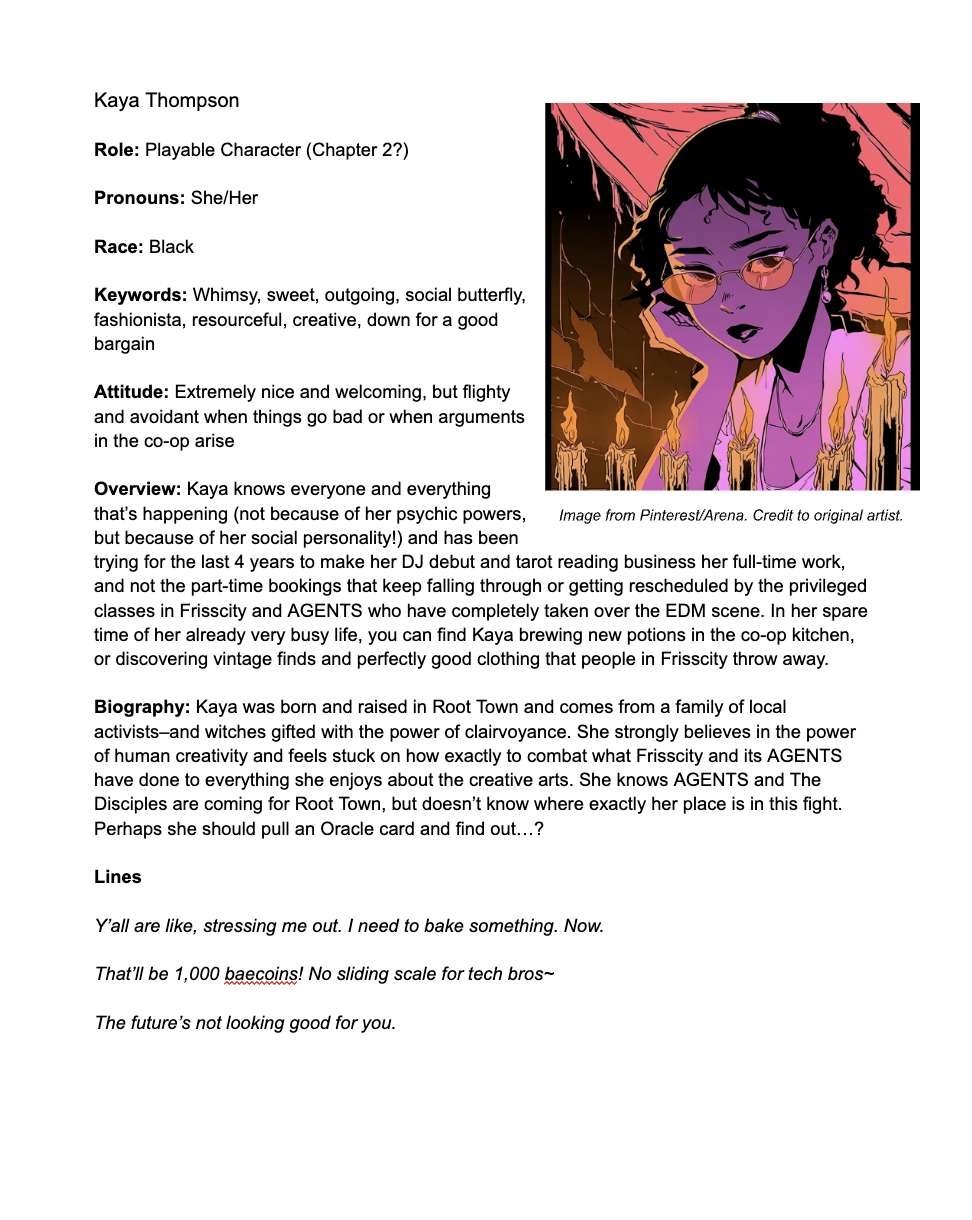
My character bios helped Alyssa and the other artists develop the shape language, art direction, and color palette for each girl character. These bios were also included in the game one-pager during the recruitment phase.
Writing the Game Design Document
A huge part of my pre-jam planning process was creating and maintaining an 80+ page GDD. (And it was a very good idea.)
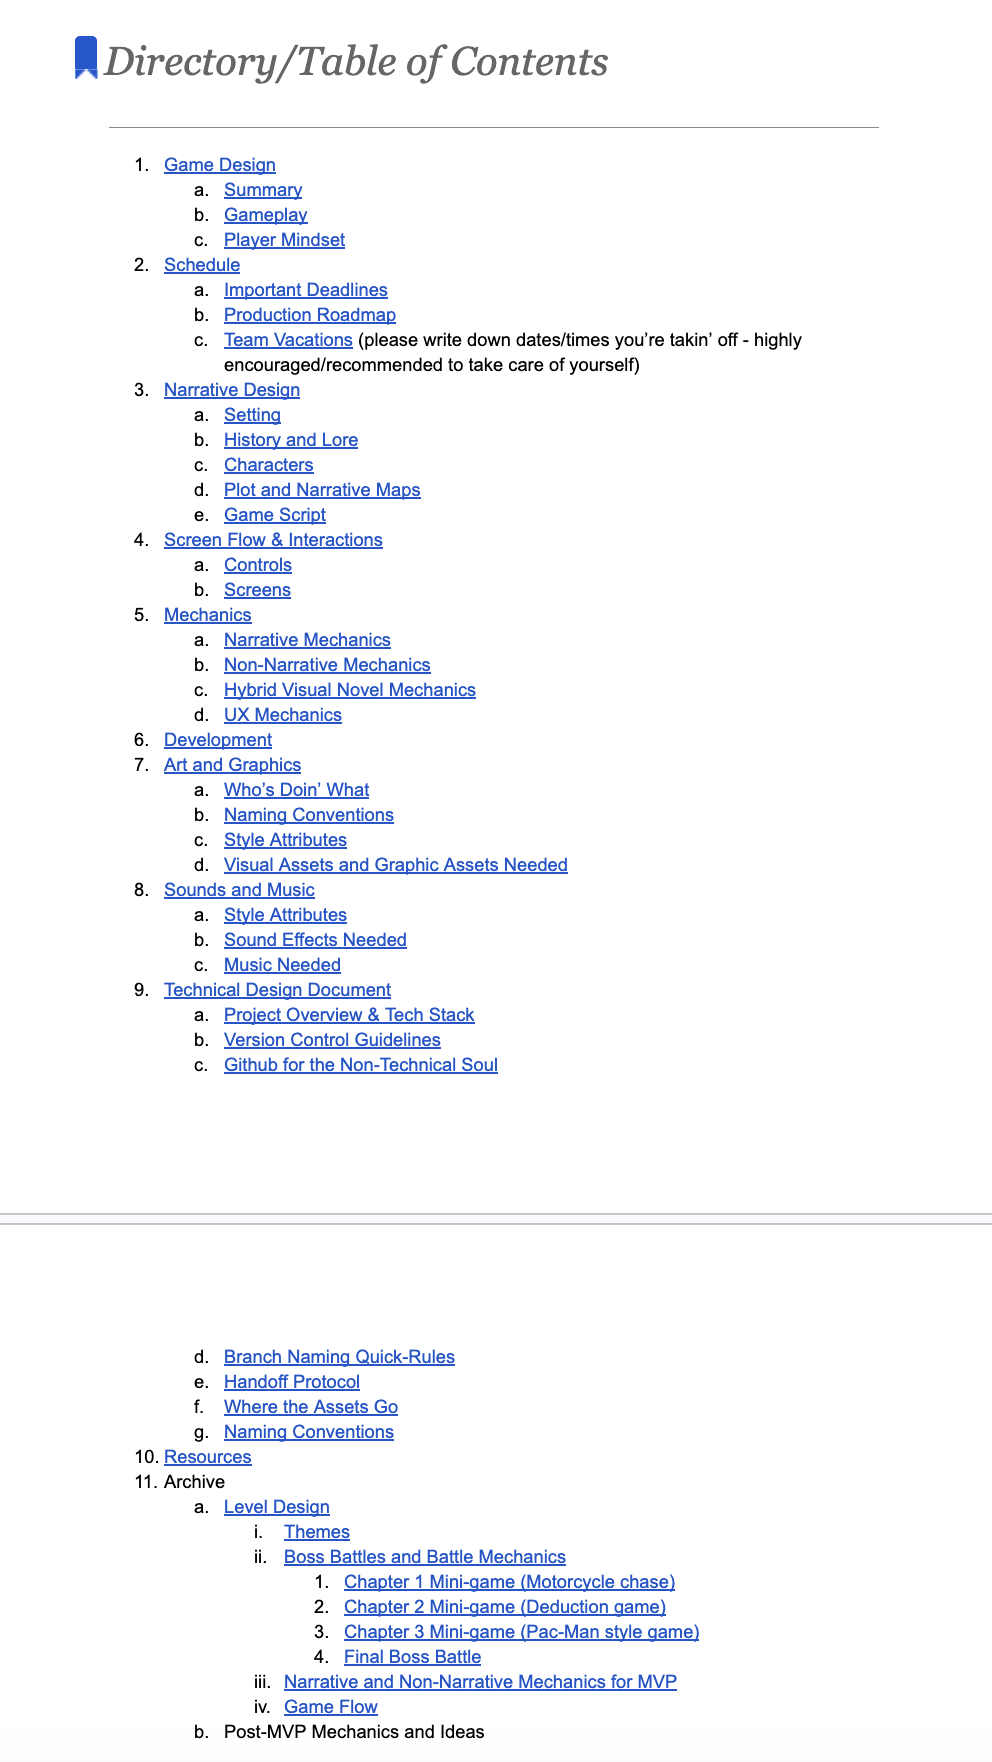
I thought about all departments and what they each needed to start working, so I jotted down all of my creative direction and created multiple sections, including:
Core Theme/Emotion, Game Design, and Game Flow sections for all departments
History and Character sections, including NPCs for Sprite Artists and Environment Artists
Narrative Mechanics and non-narrative Mechanics for Programming
Technical Design Document section for Programming
Sound Identity, Music Tracks, and SFX sections for the Music Composers
Production Timeline with milestones and an Out of Office section where people could put in their time off since the jam was during the summer months
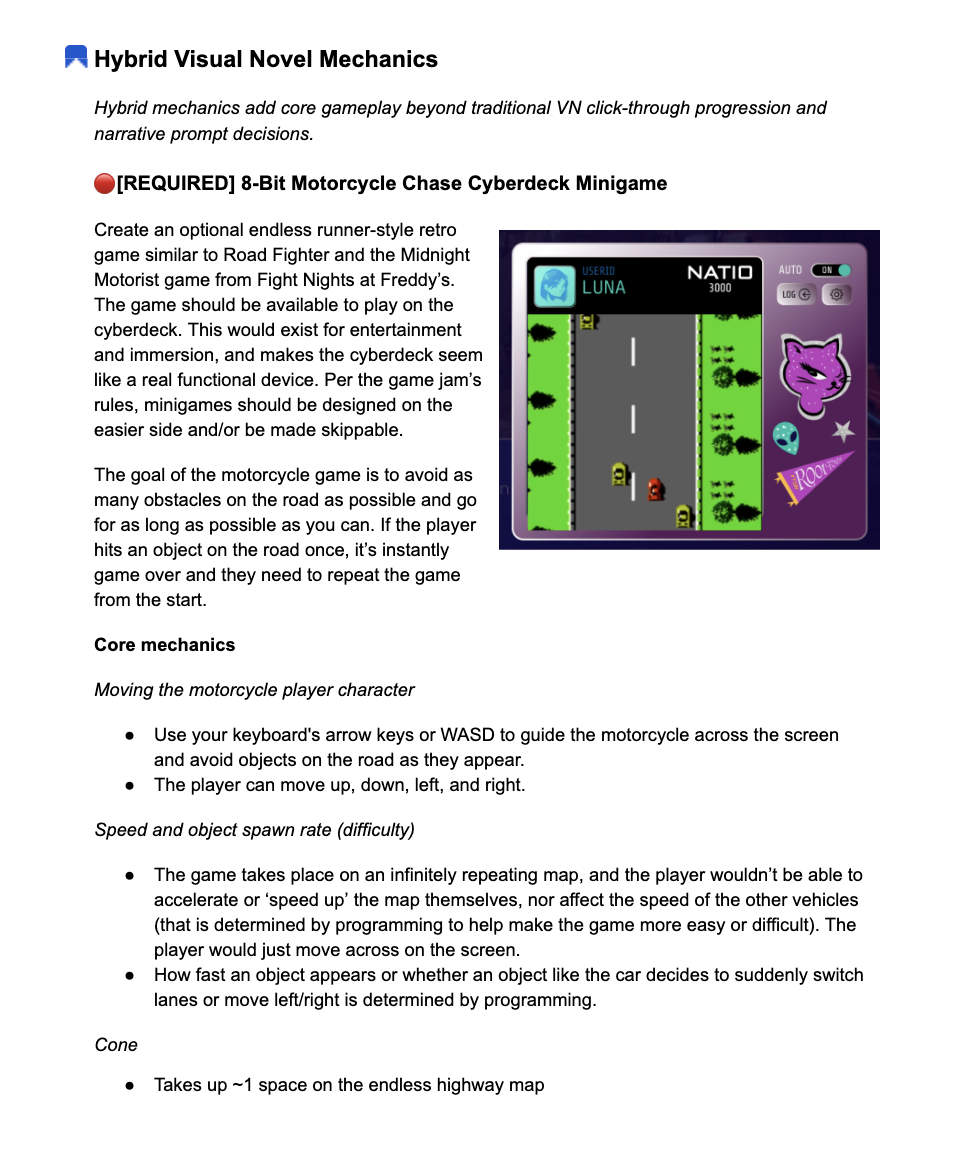
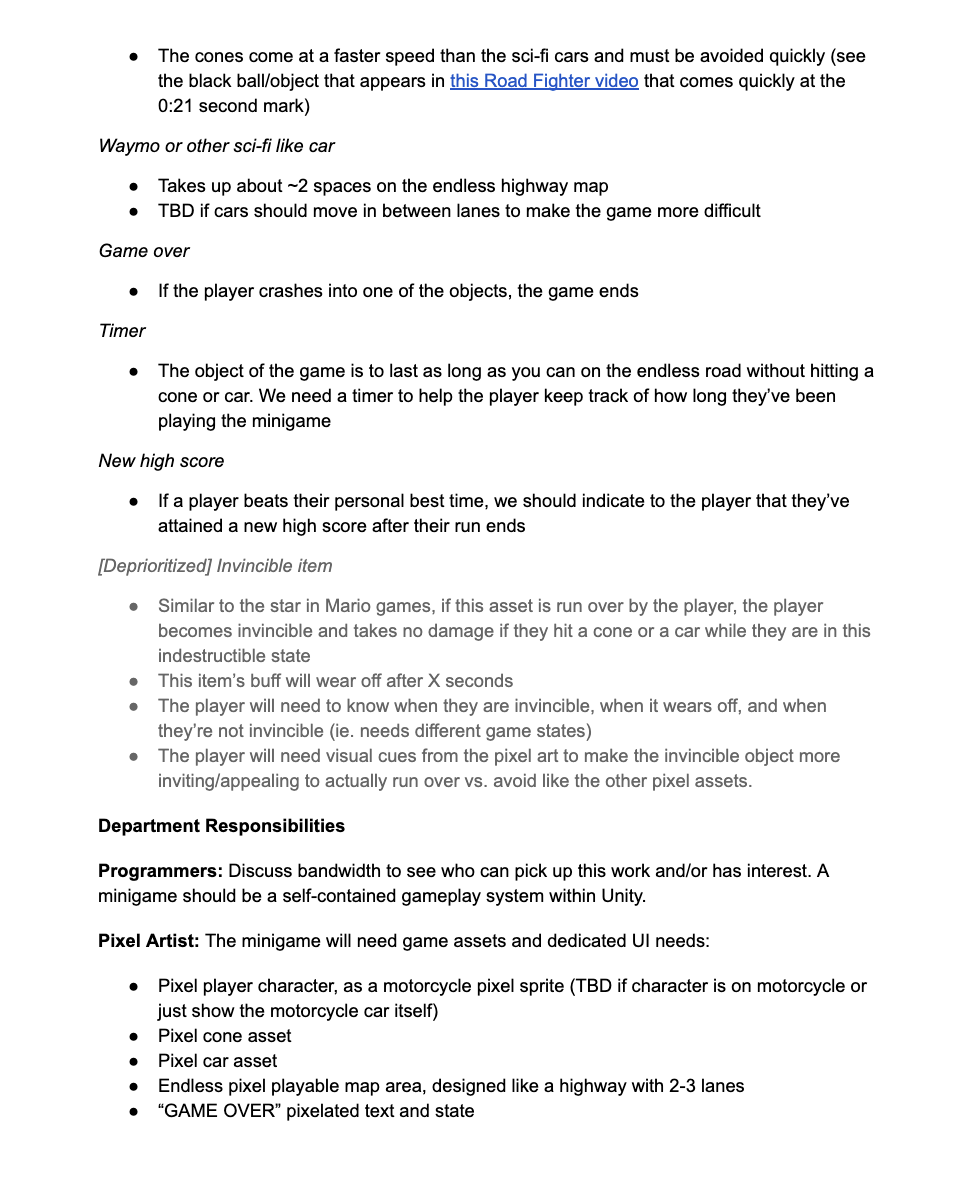
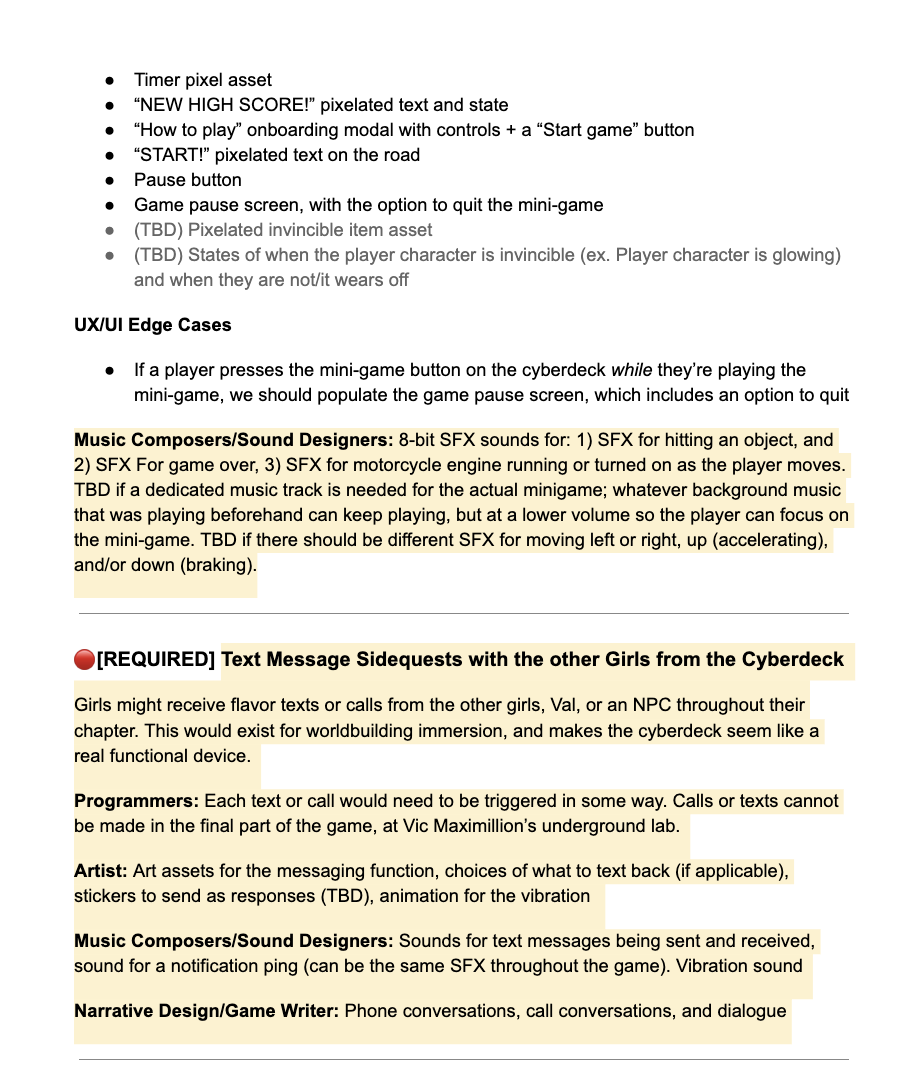
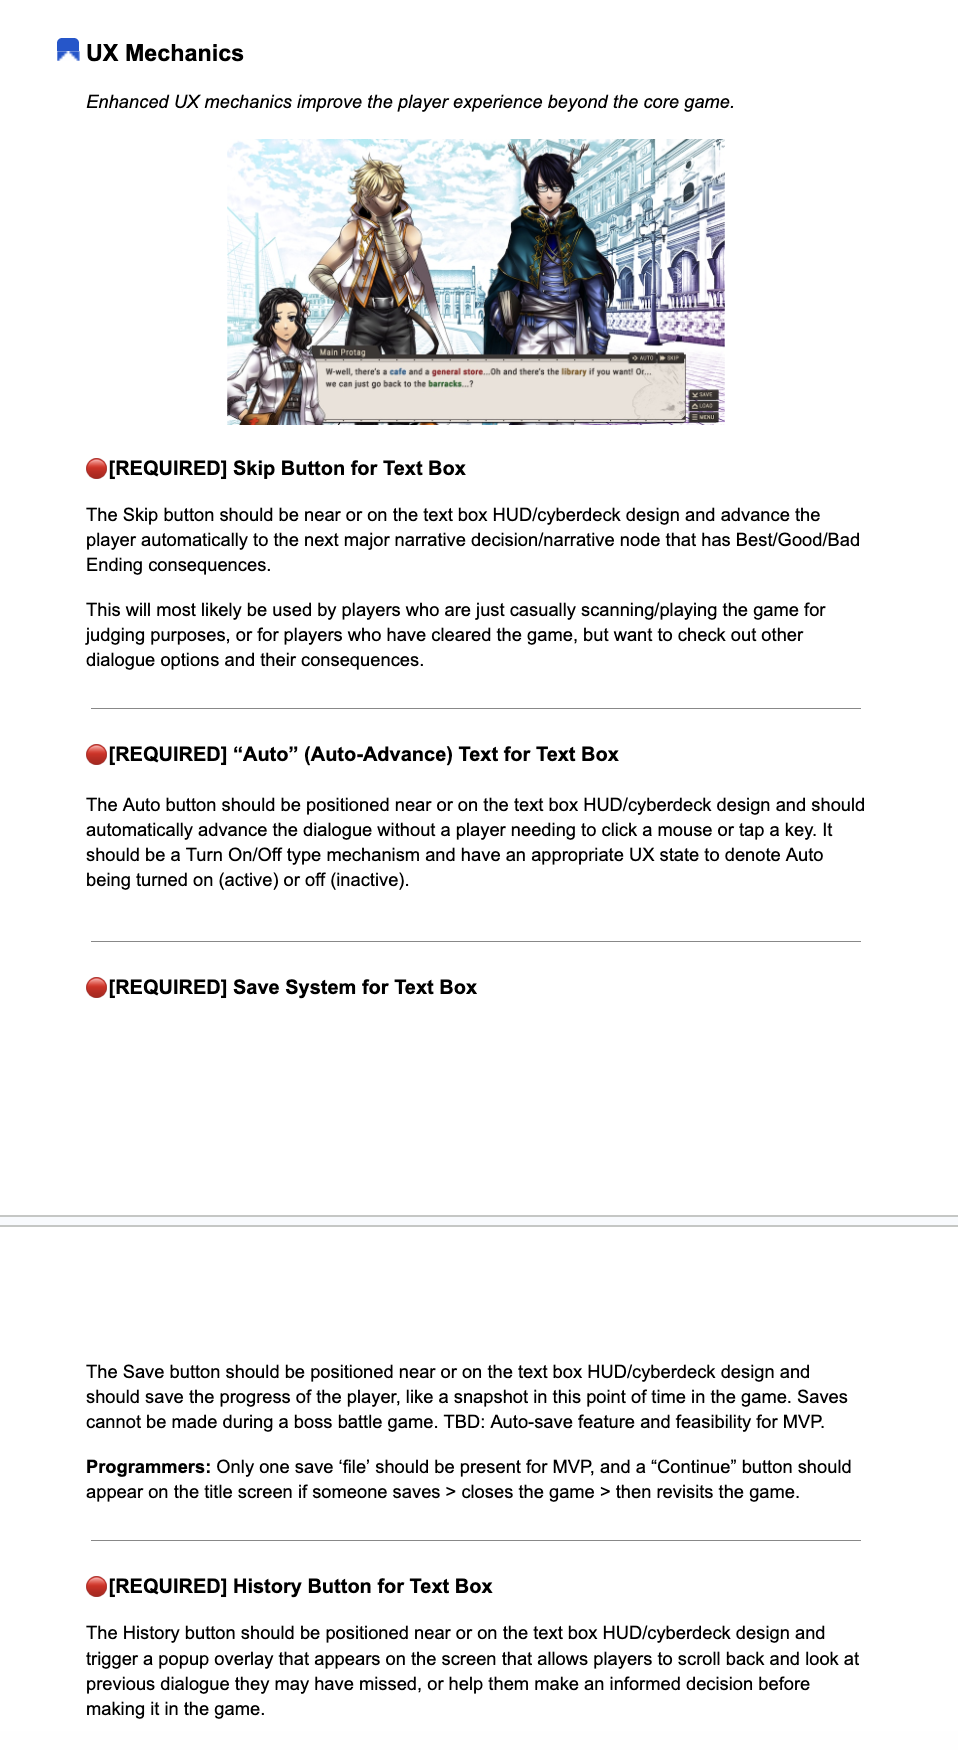
Below are specific screenshots from the “Mechanics” section, including Narrative Mechanics, Non-Narrative Mechanics, and UX Mechanics.
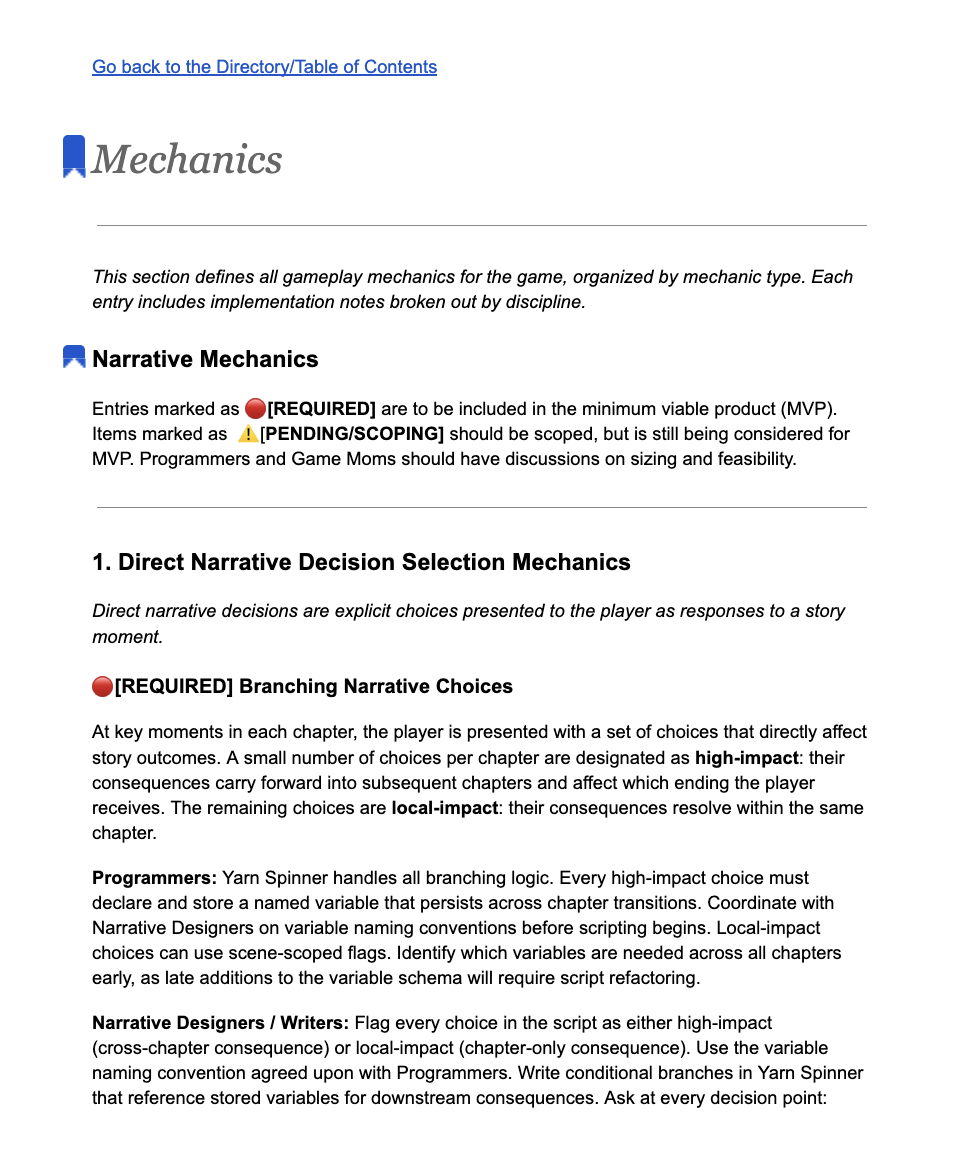
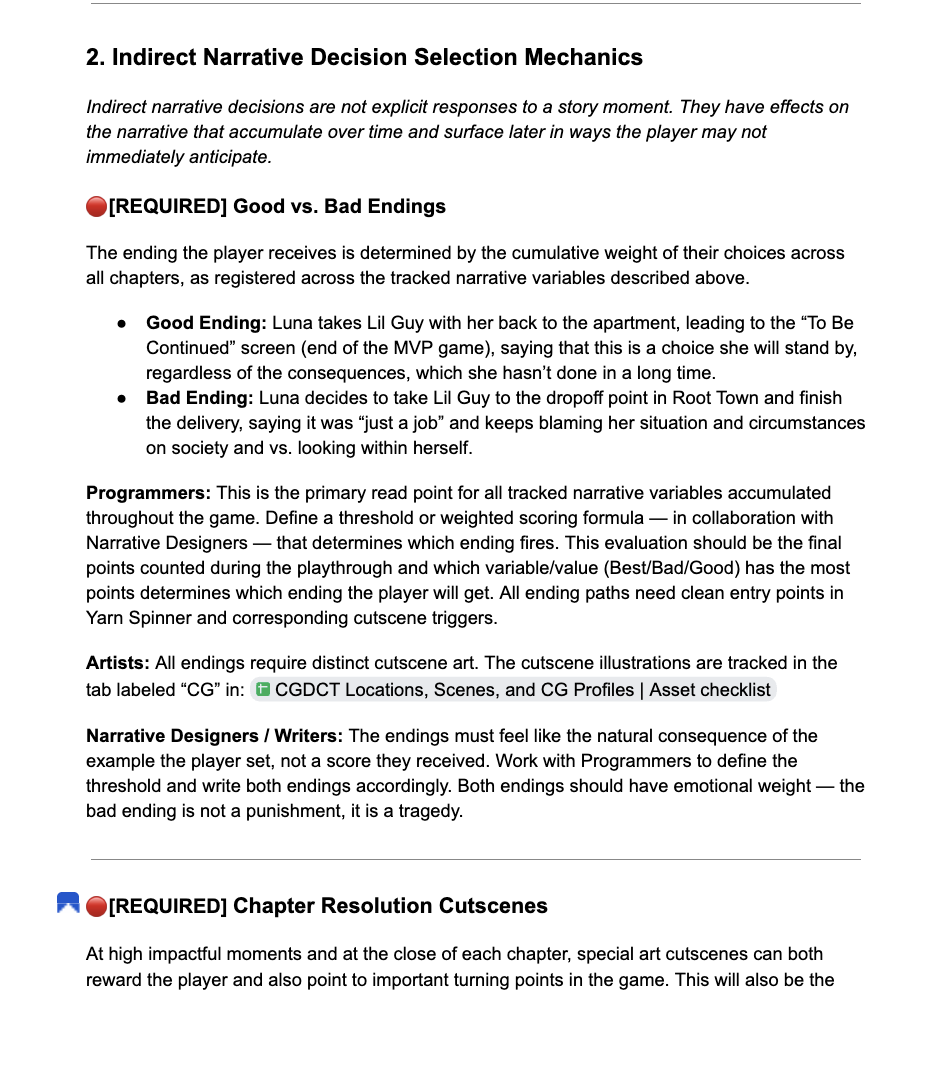
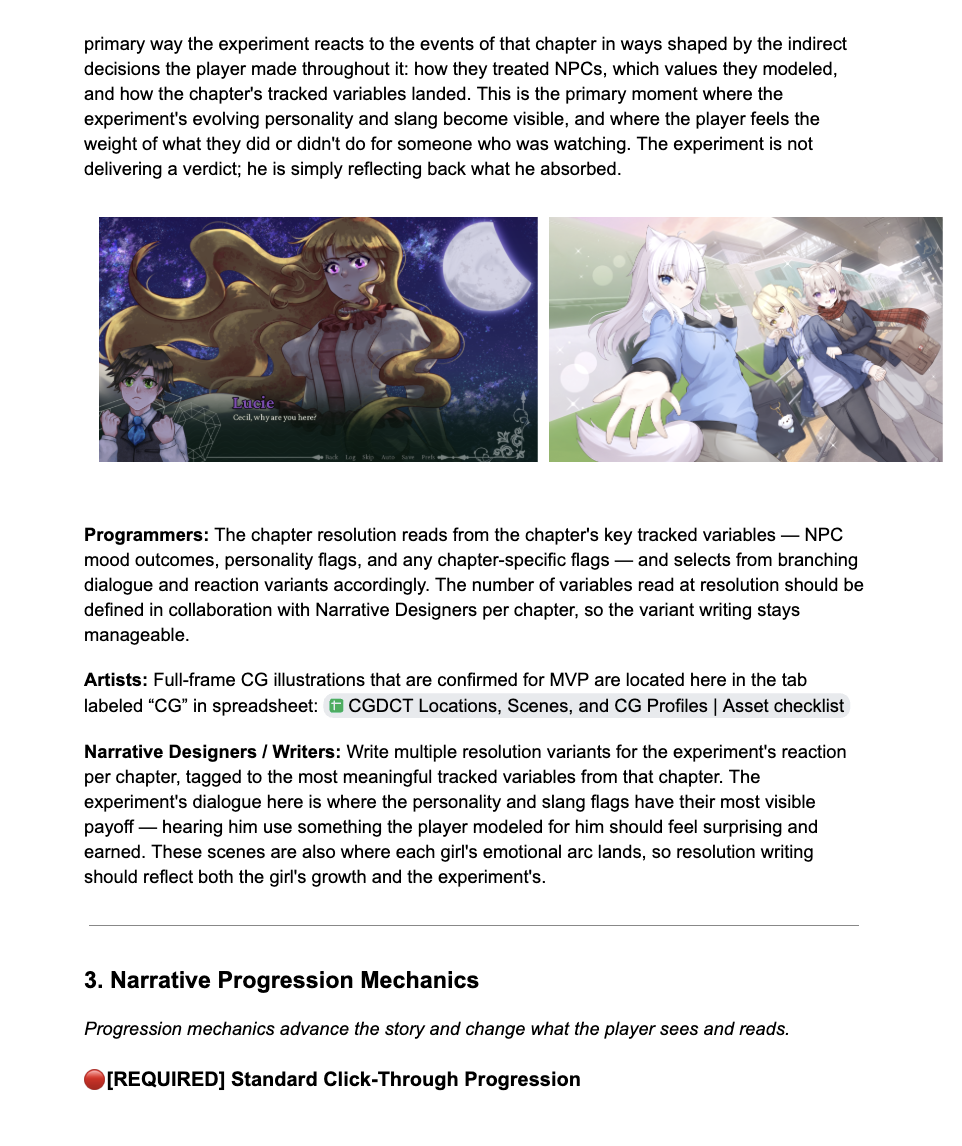
Creating Asset Trackers So Artists and Composers Knew Exactly What To Deliver
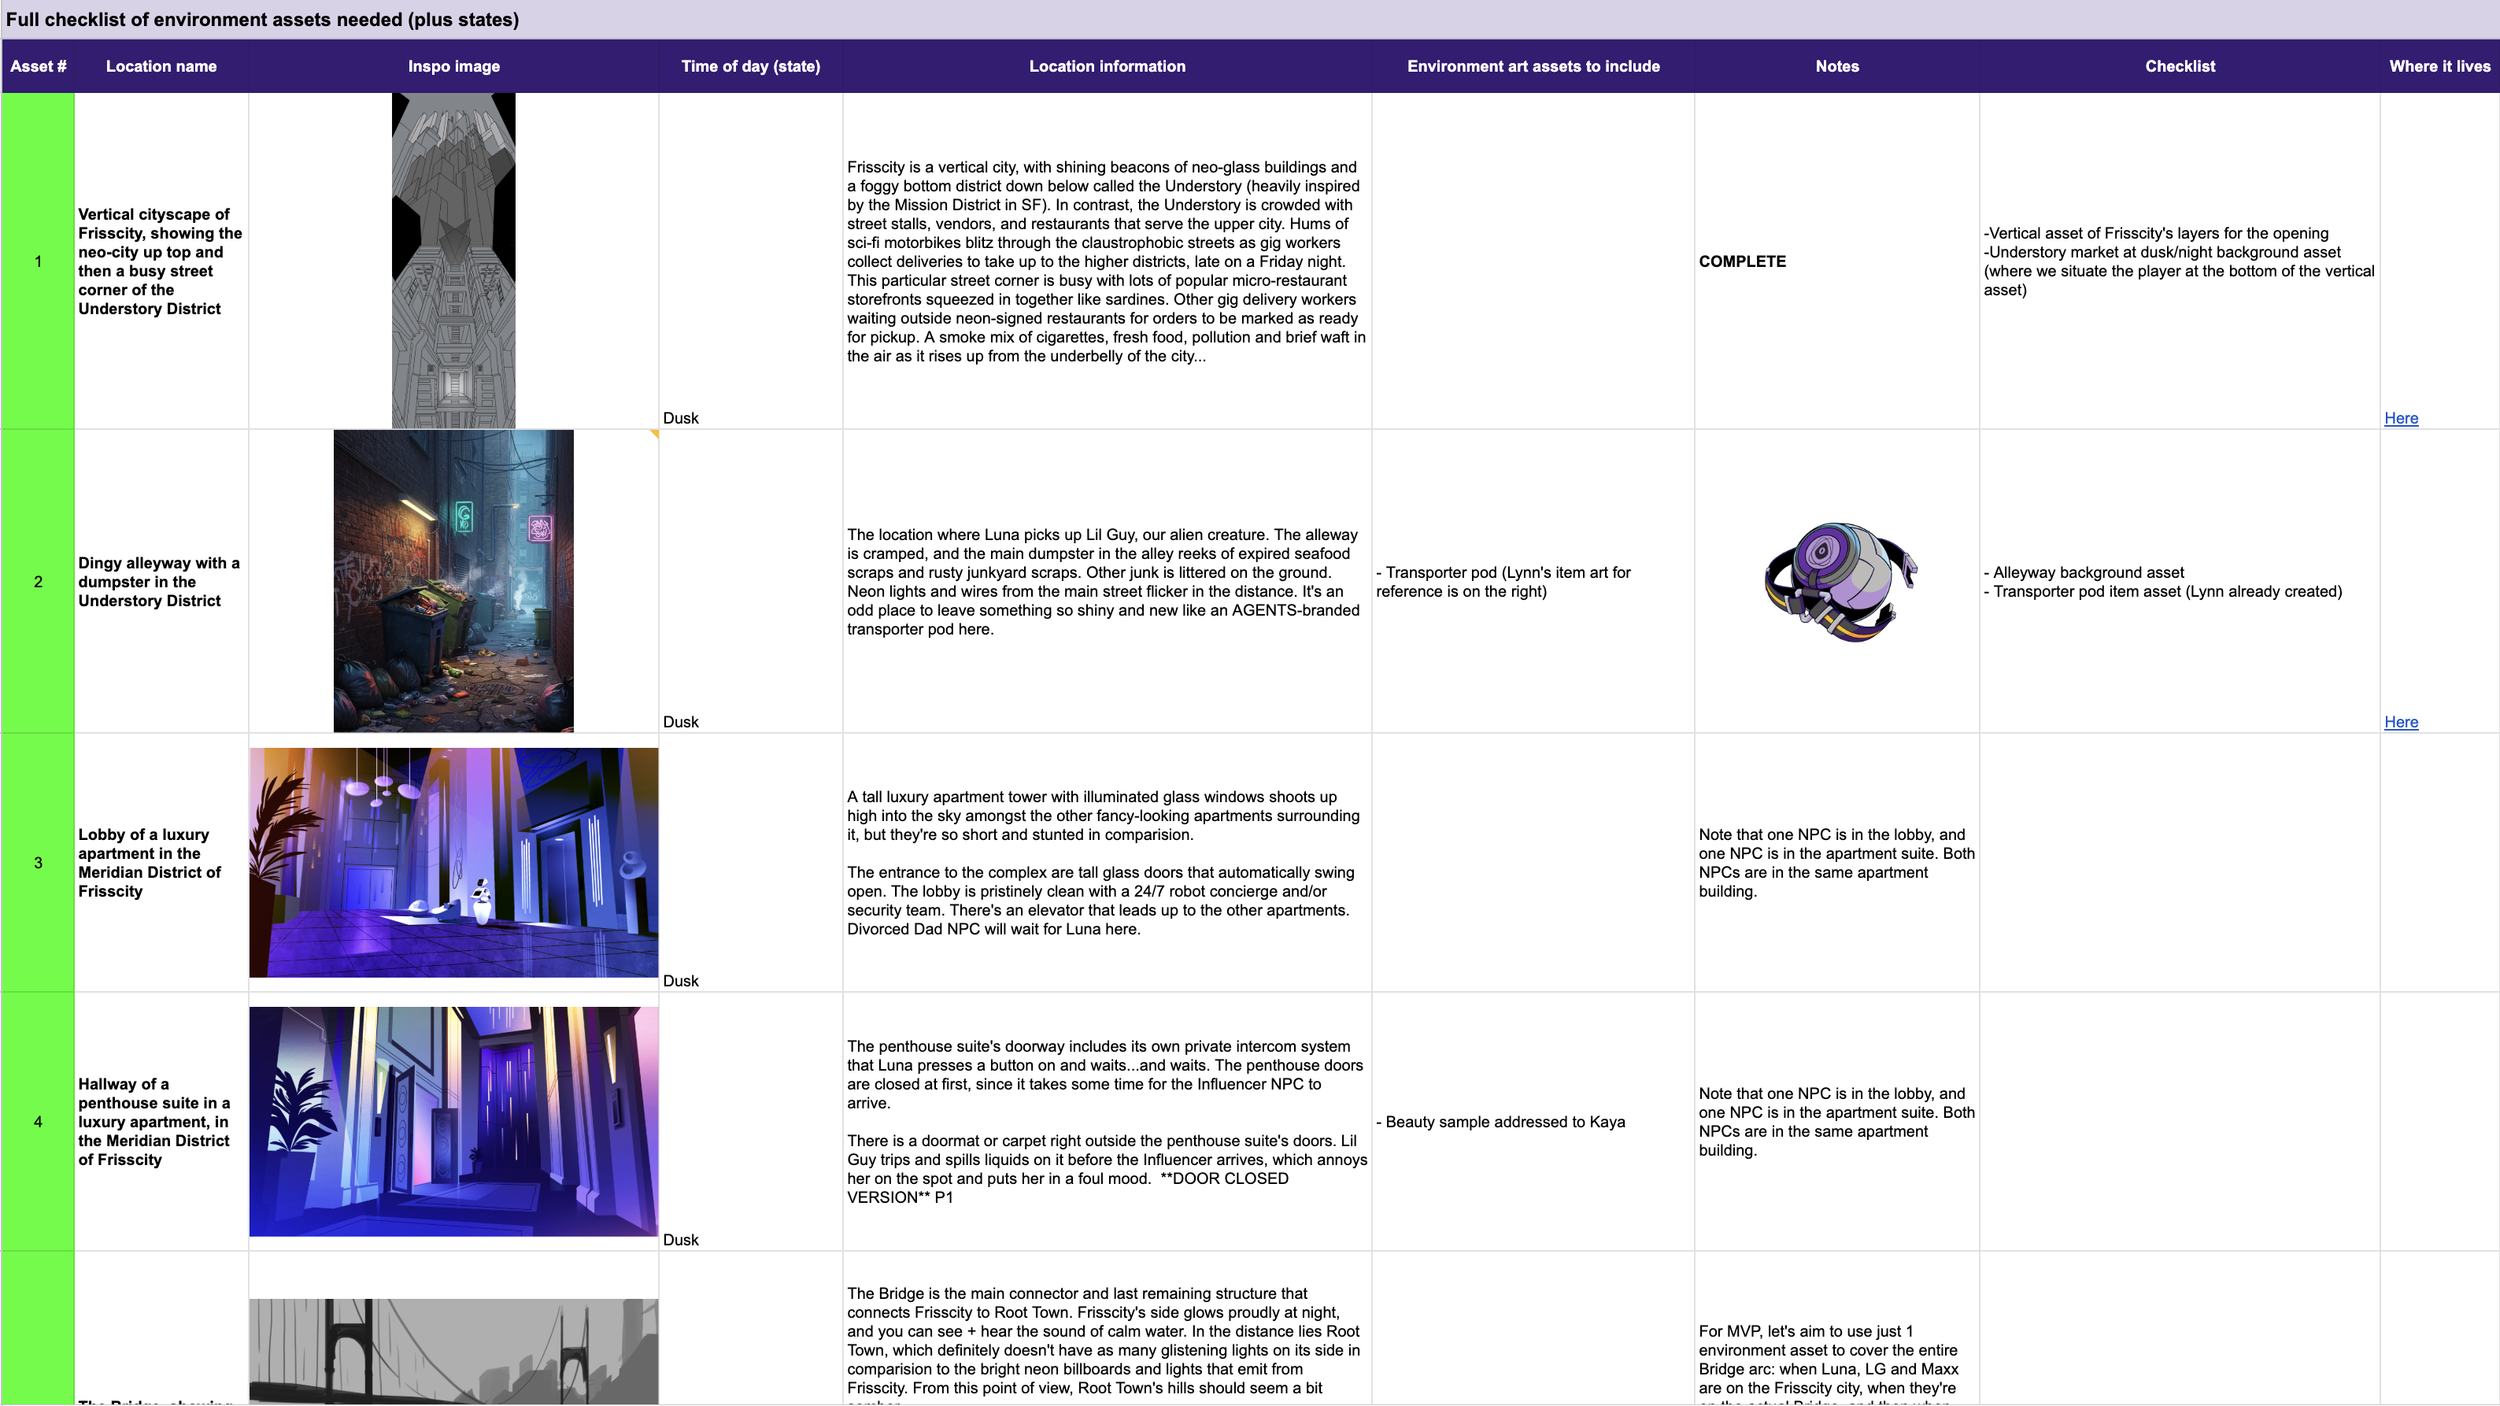
Environment Asset Tracker
The Environment Asset Tracker helped Alyssa and another artist on the number of environments our visual novel would have. We started off with a smaller scope, but gradually expanded the list once we realized we’d take two extra months to finish the project. The tracker included:
Description of the environment we wanted to show
Special item callouts we’d need to draw into the environment that related to certain characters (ex. Lesbian flag for Luna, tarot for Kaya, kaiju doll for our half-lizard girl Nat, etc.)
Emotions we wanted the players to feel in those moments
Mock image to show desired perspective. Mocks were later replaced with the artist’s sketch→ then final art → then marked in bright green when complete
Scene Tracker
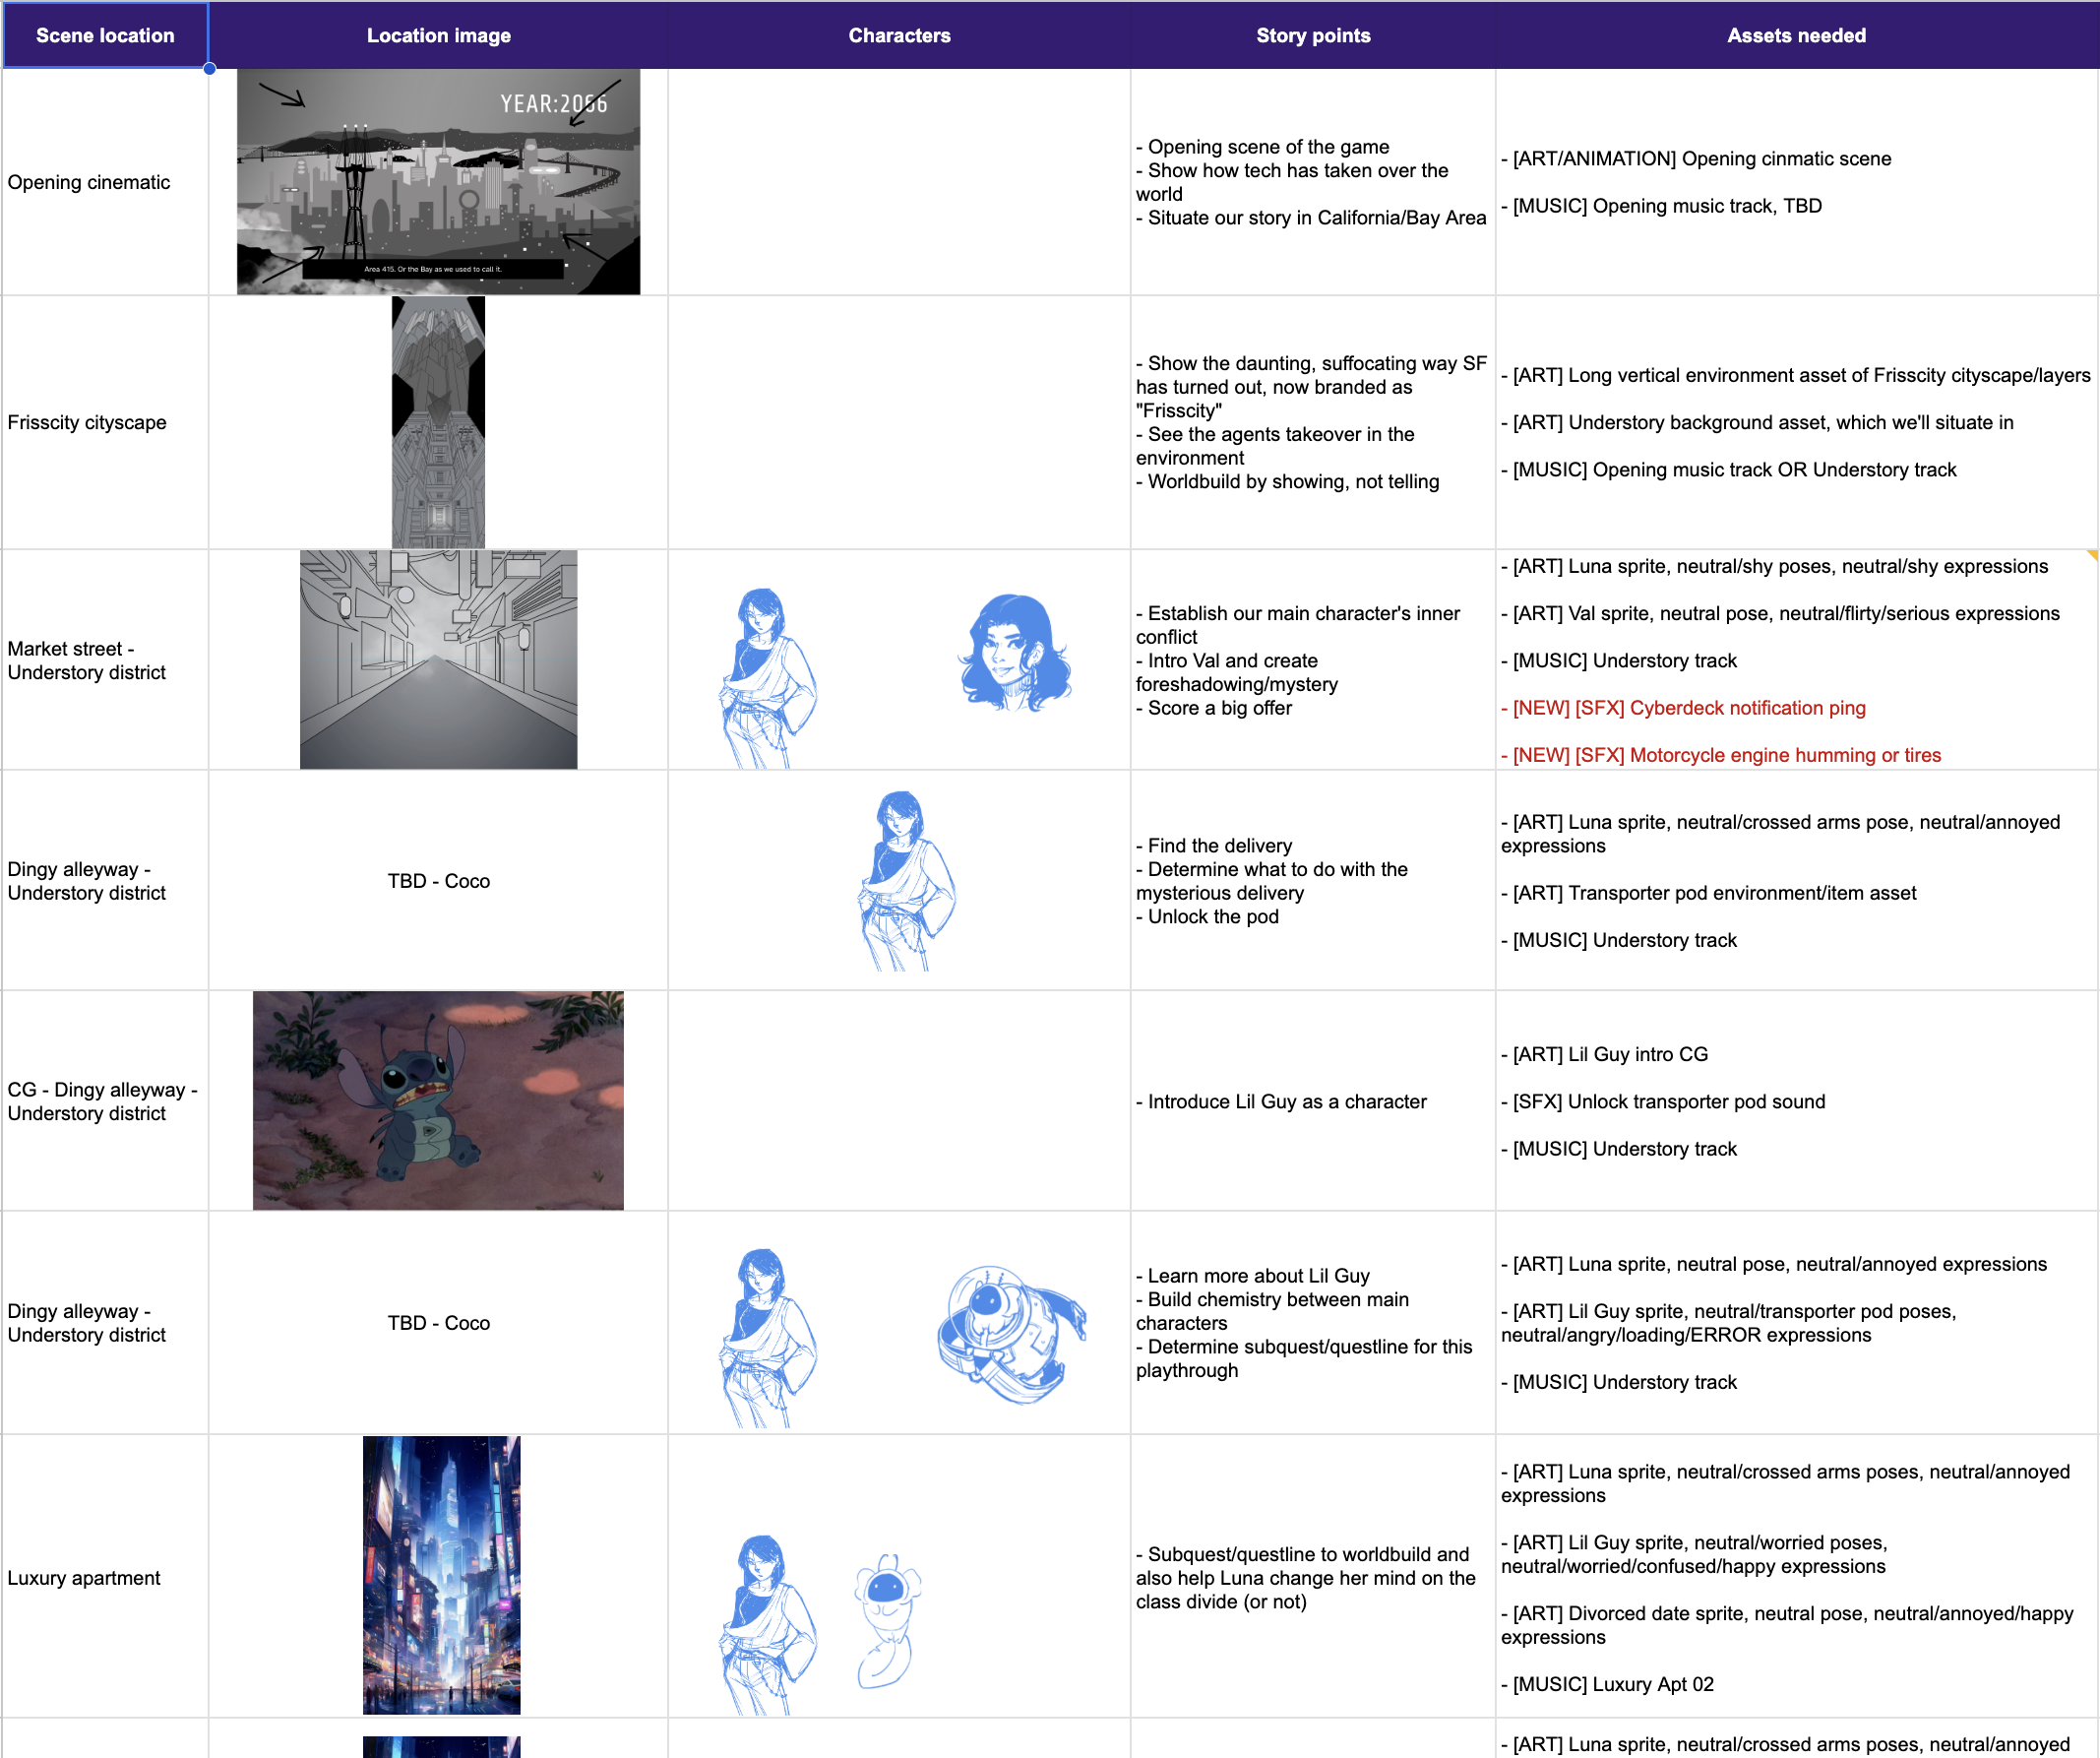
The Scene Tracker plotted out what each major ‘scene’ of the visual novel would include across Art and Sound. It was a key visual aid for everyone to see how their work contributed to the greater puzzle. I included:
Sprite art sketches to show which characters would show up during each story beat
Required expressions we’d need for each of the character sprites
Plot points as bullets to show at what point of the story we’d be at
Sound effects we’d need for each scene
Music track(s) we’d need to play for each scene
Location label to show how each environment asset from the environment tracker mapped to each scene
Character Sprite Asset Tracker
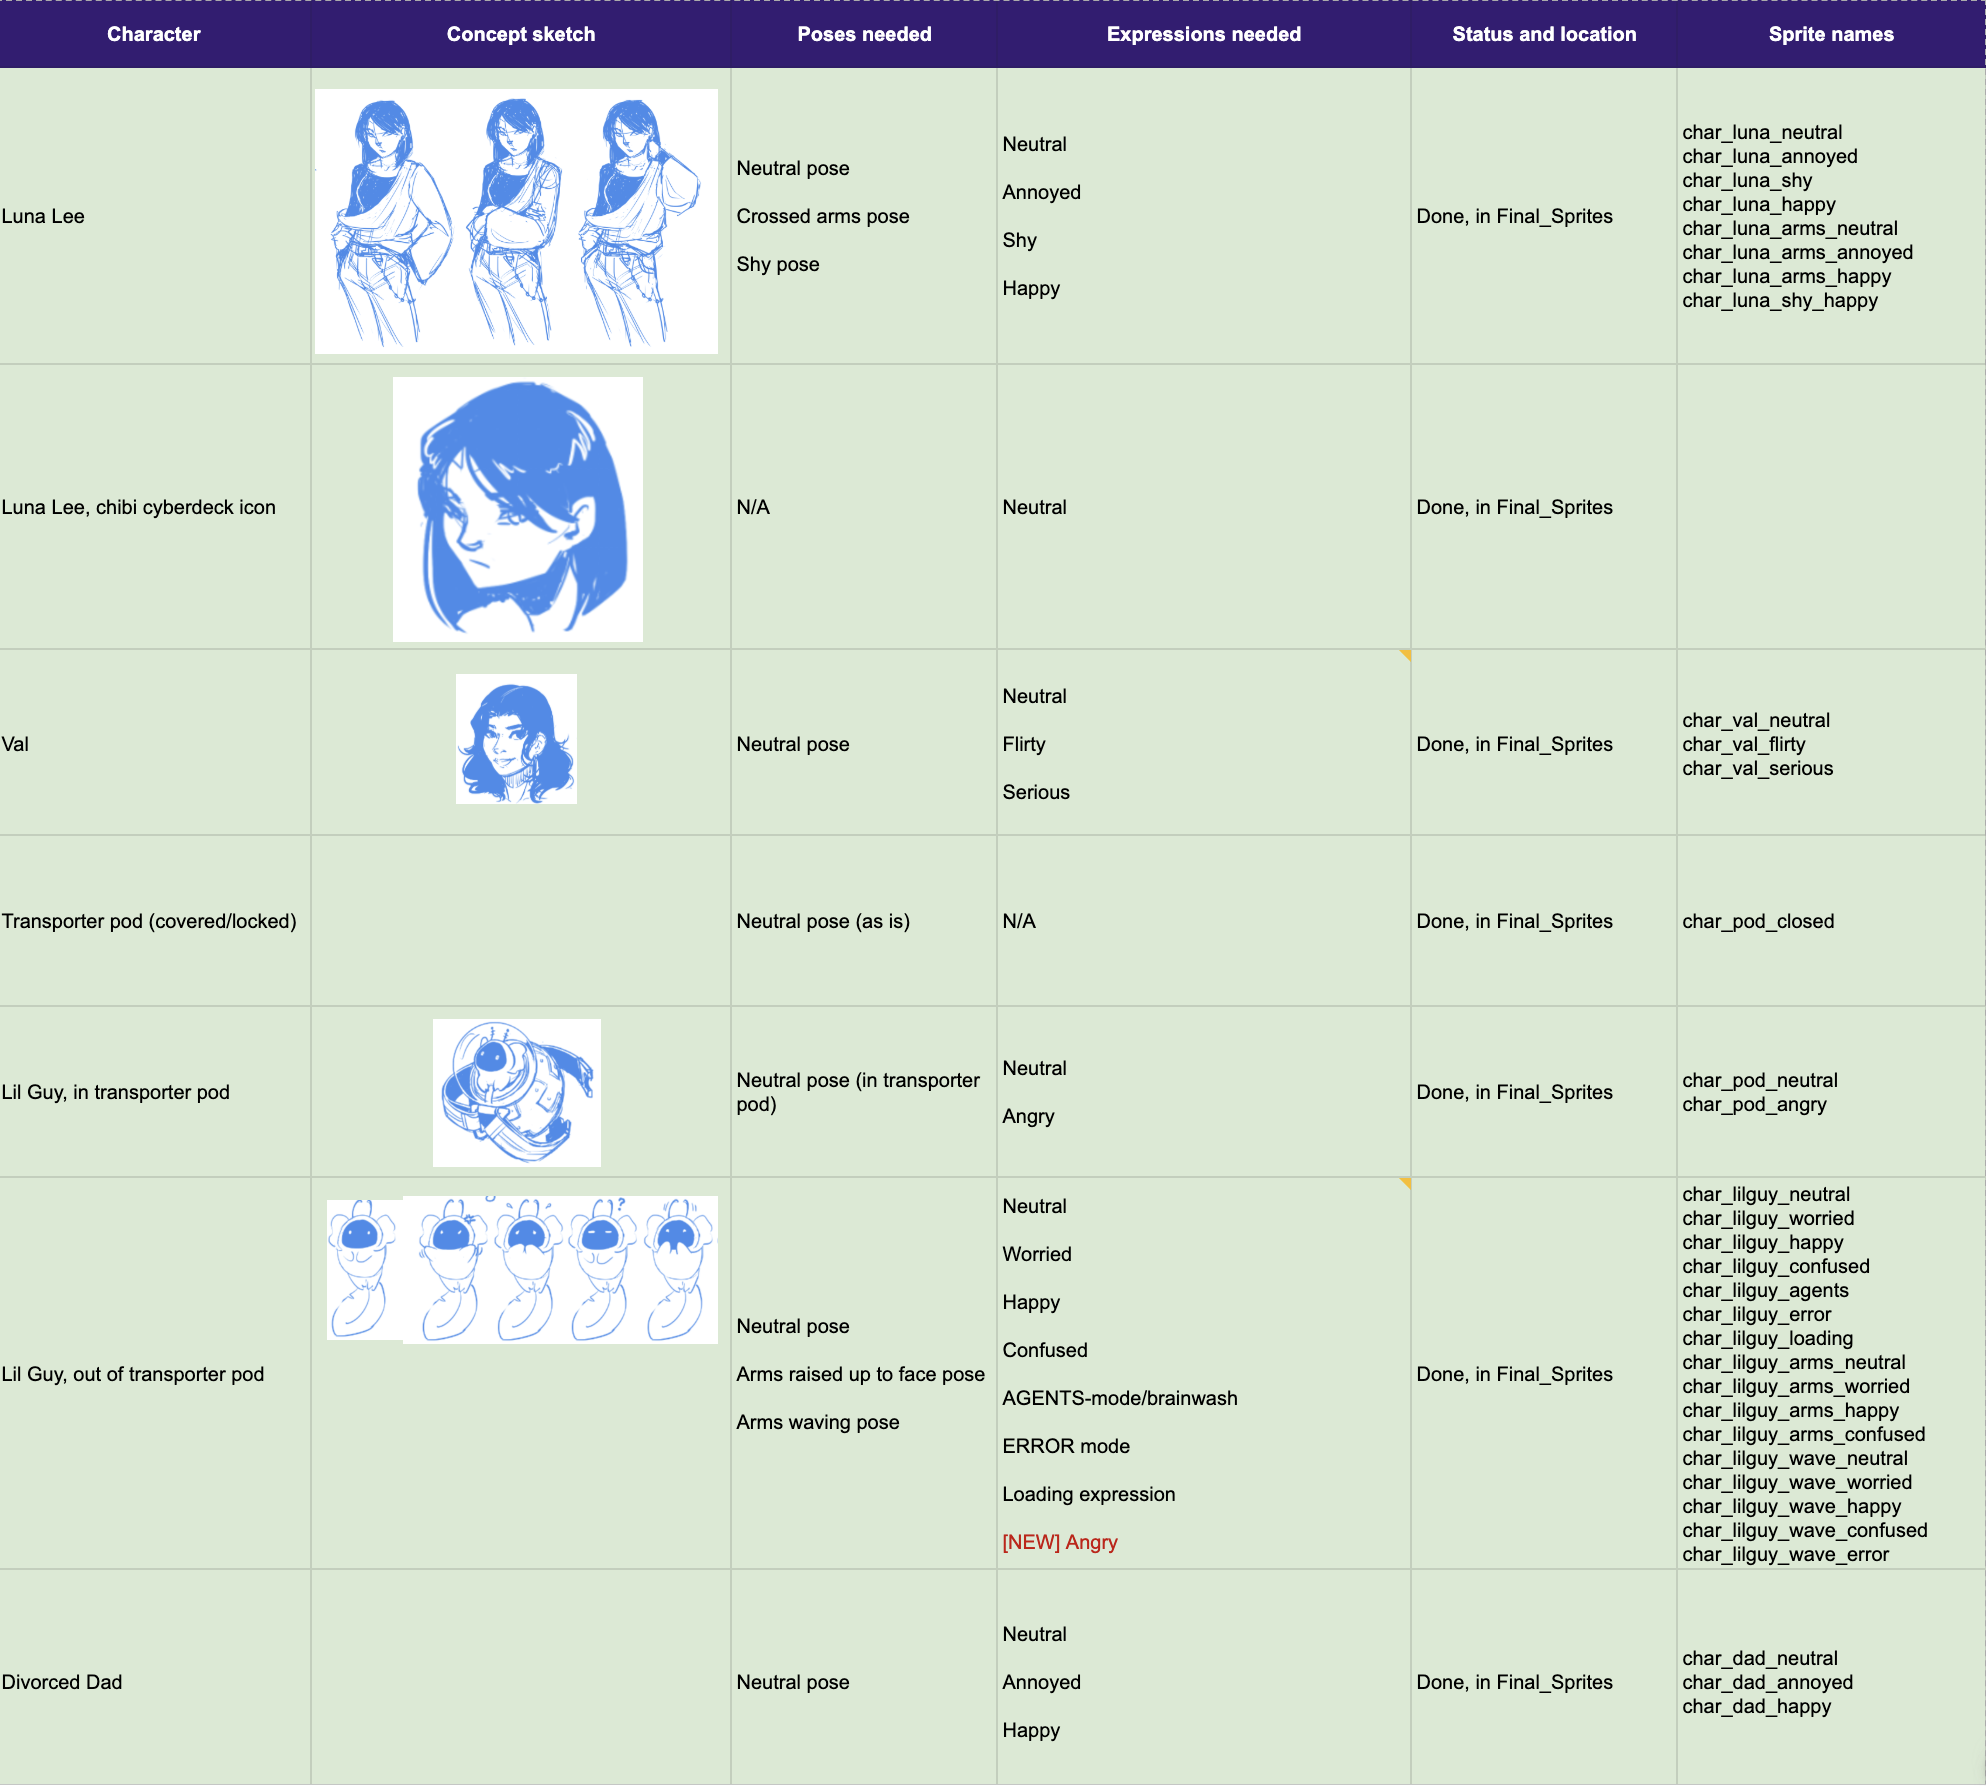
The Character Sprite Asset Tracker provided artists with a focused view of what they needed to deliver for the game.
This included the character, their name, the desired poses, as well as the desired expressions we needed for all the characters for the game’s MVP.
I also included a “Sprite names” section to suggest how each image file should be labeled when delivered, so that it’d be easy to track in Unity once the assets were uploaded into the game engine.
(This organization would help me later on, when I had to label what each expression should be called so that I could activate them from the Yarn Spinner dialogue scripts within Unity.)
Artists said this was an invaluable tool for them, especially since there were multiple game artists on our team who were in charge of separate characters, and helped them get an idea of scope and how to pace their work for the jam.
When an asset was finished, artists would mark their assets in green when they finished.
It was also helpful to remember just how many assets were needed for the game, like the ‘chibi’ versions of the character’s profile picture for the cyberdeck UI menu!
CG Tracker
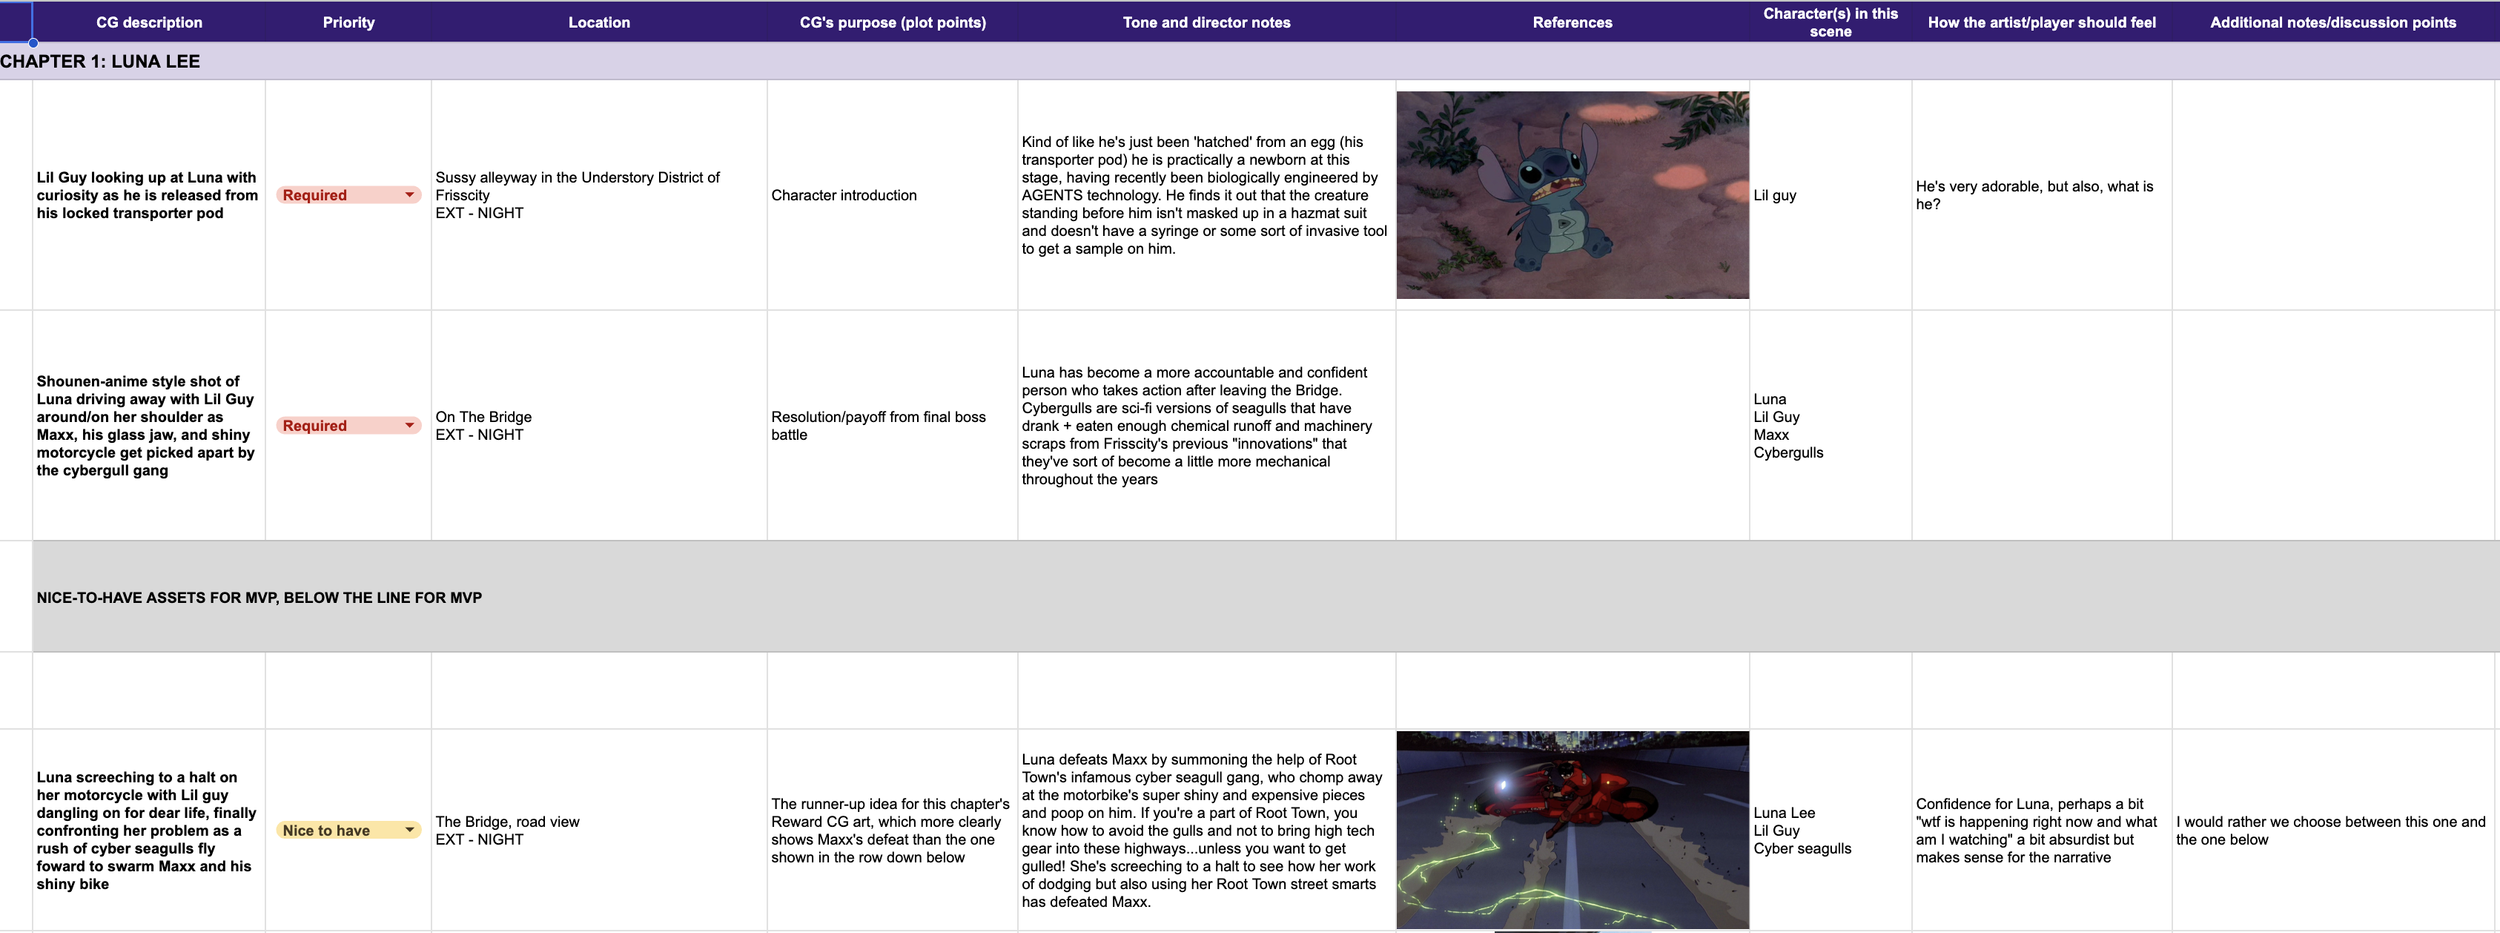
I also created the CG tracker as another focused view for our team’s CG artist.
This included all the illustrations we’d want to include, including a mock image and description of what was happening in that scene.
Because of the tight timeline and limited resources, we only planned for 2 CGs for the MVP.
Once we invested in the two extra months, we added more CGs that utilized as much of our existing assets as we could (ie. showing the motorcycle engine as a cue to the future wire puzzle)
Item Asset Tracker
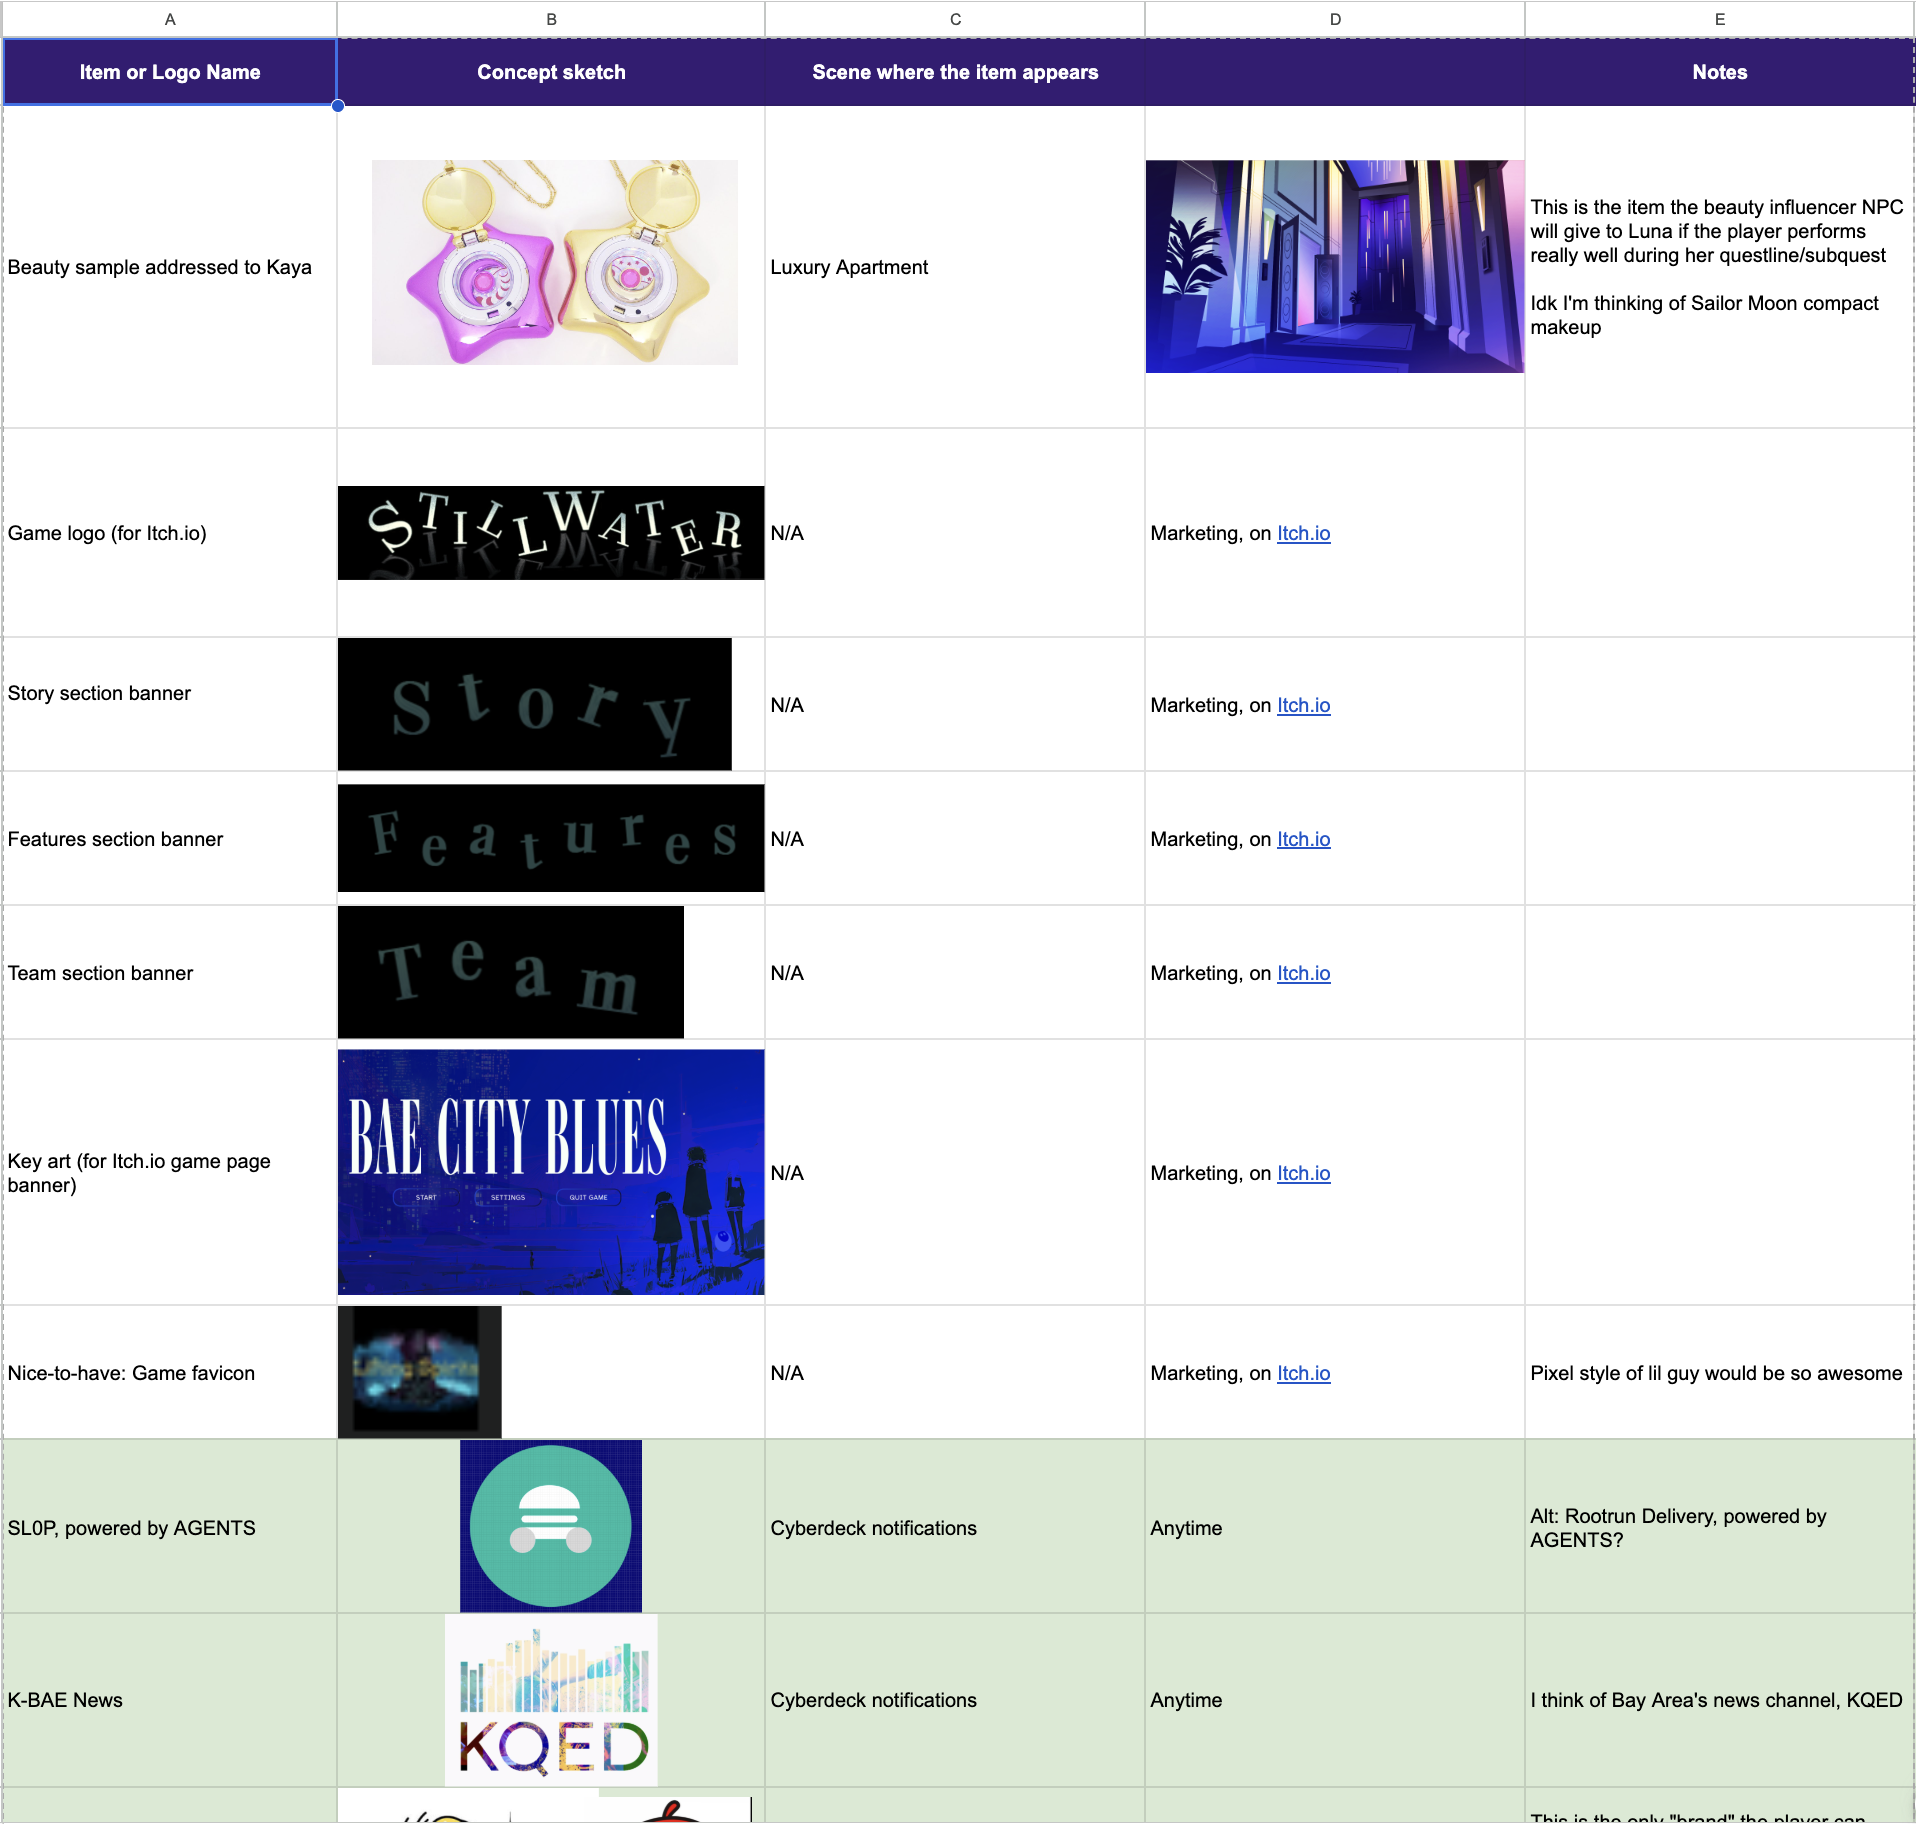
The Item Asset Tracker helped artists keep track of all the other ‘floating’ assets that weren’t character sprites or environments. This included:
In-game images we wanted to highlight, like the Beauty Sample an NPC gives the player character if they perform extremely well in their questline.
In-game logos that would appear on our “cyberdeck” game UI phone chats, like the SL0P app.
Marketing assets we would need for our Itch page, like stylized headers and capsule art for discovery purposes.
Tasks and Bug Tracker Spreadsheet
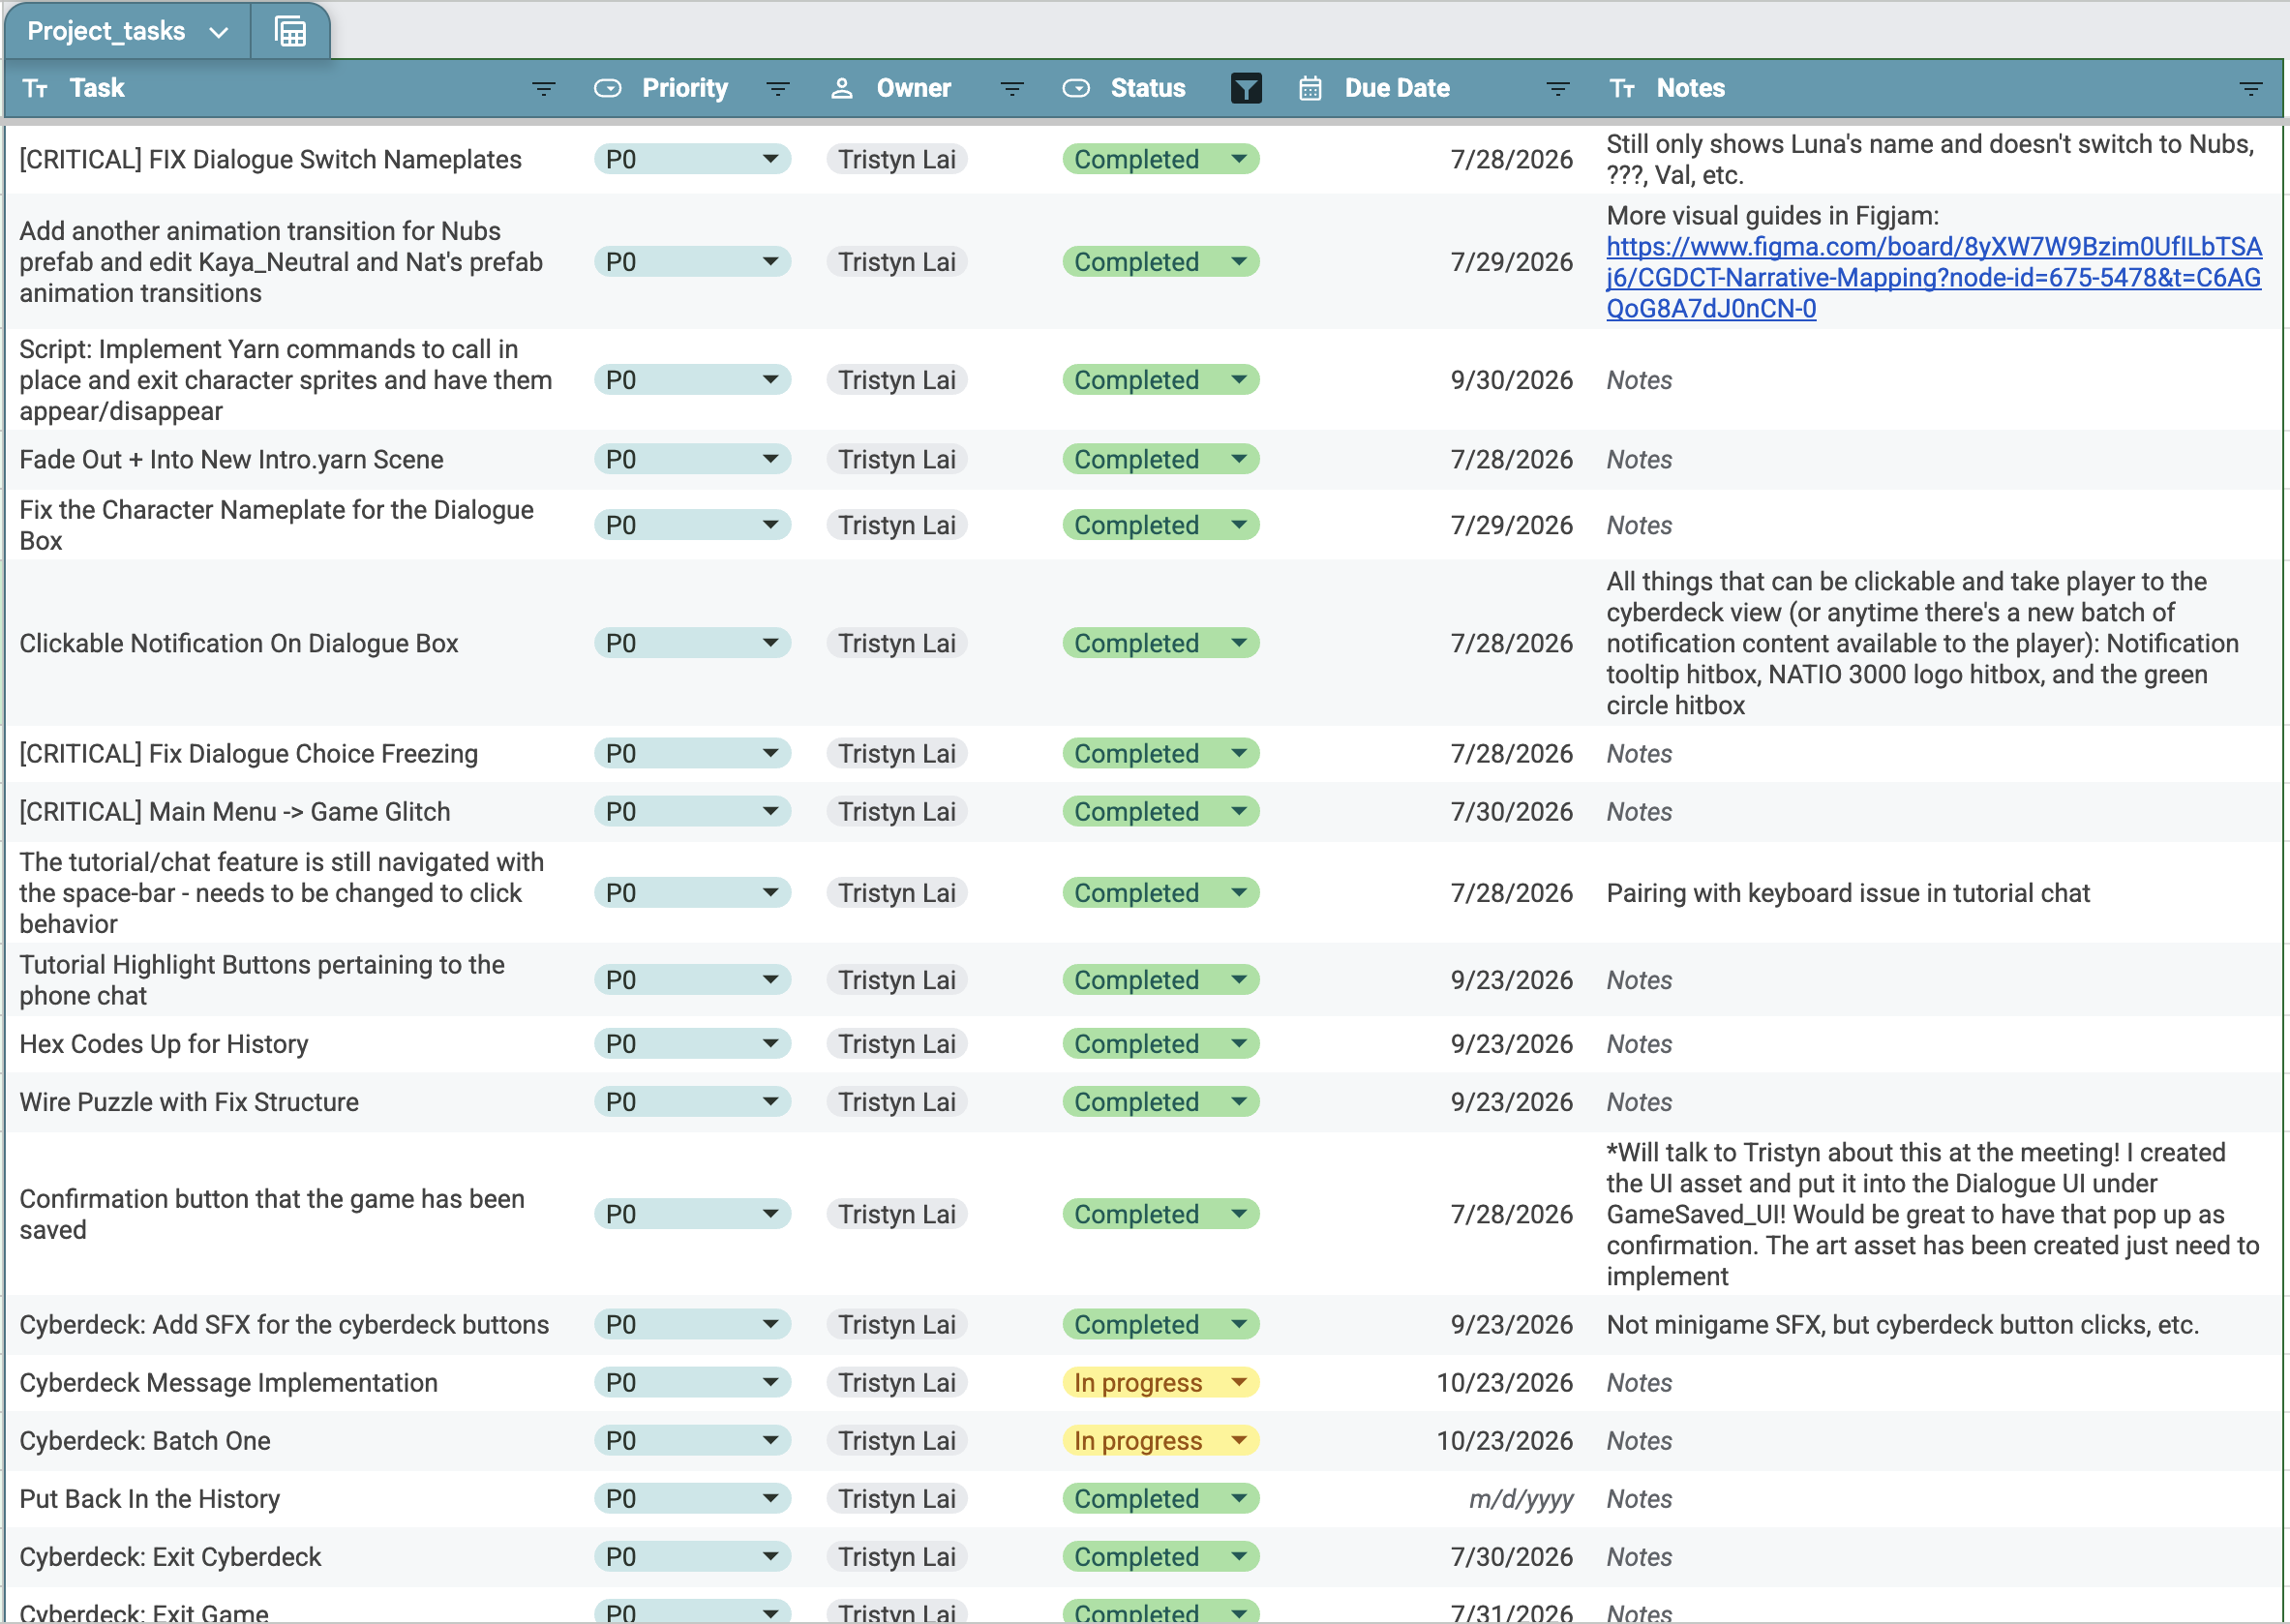
I originally created a Trello board upon request from the programming team, but it wasn’t maintained nor used.
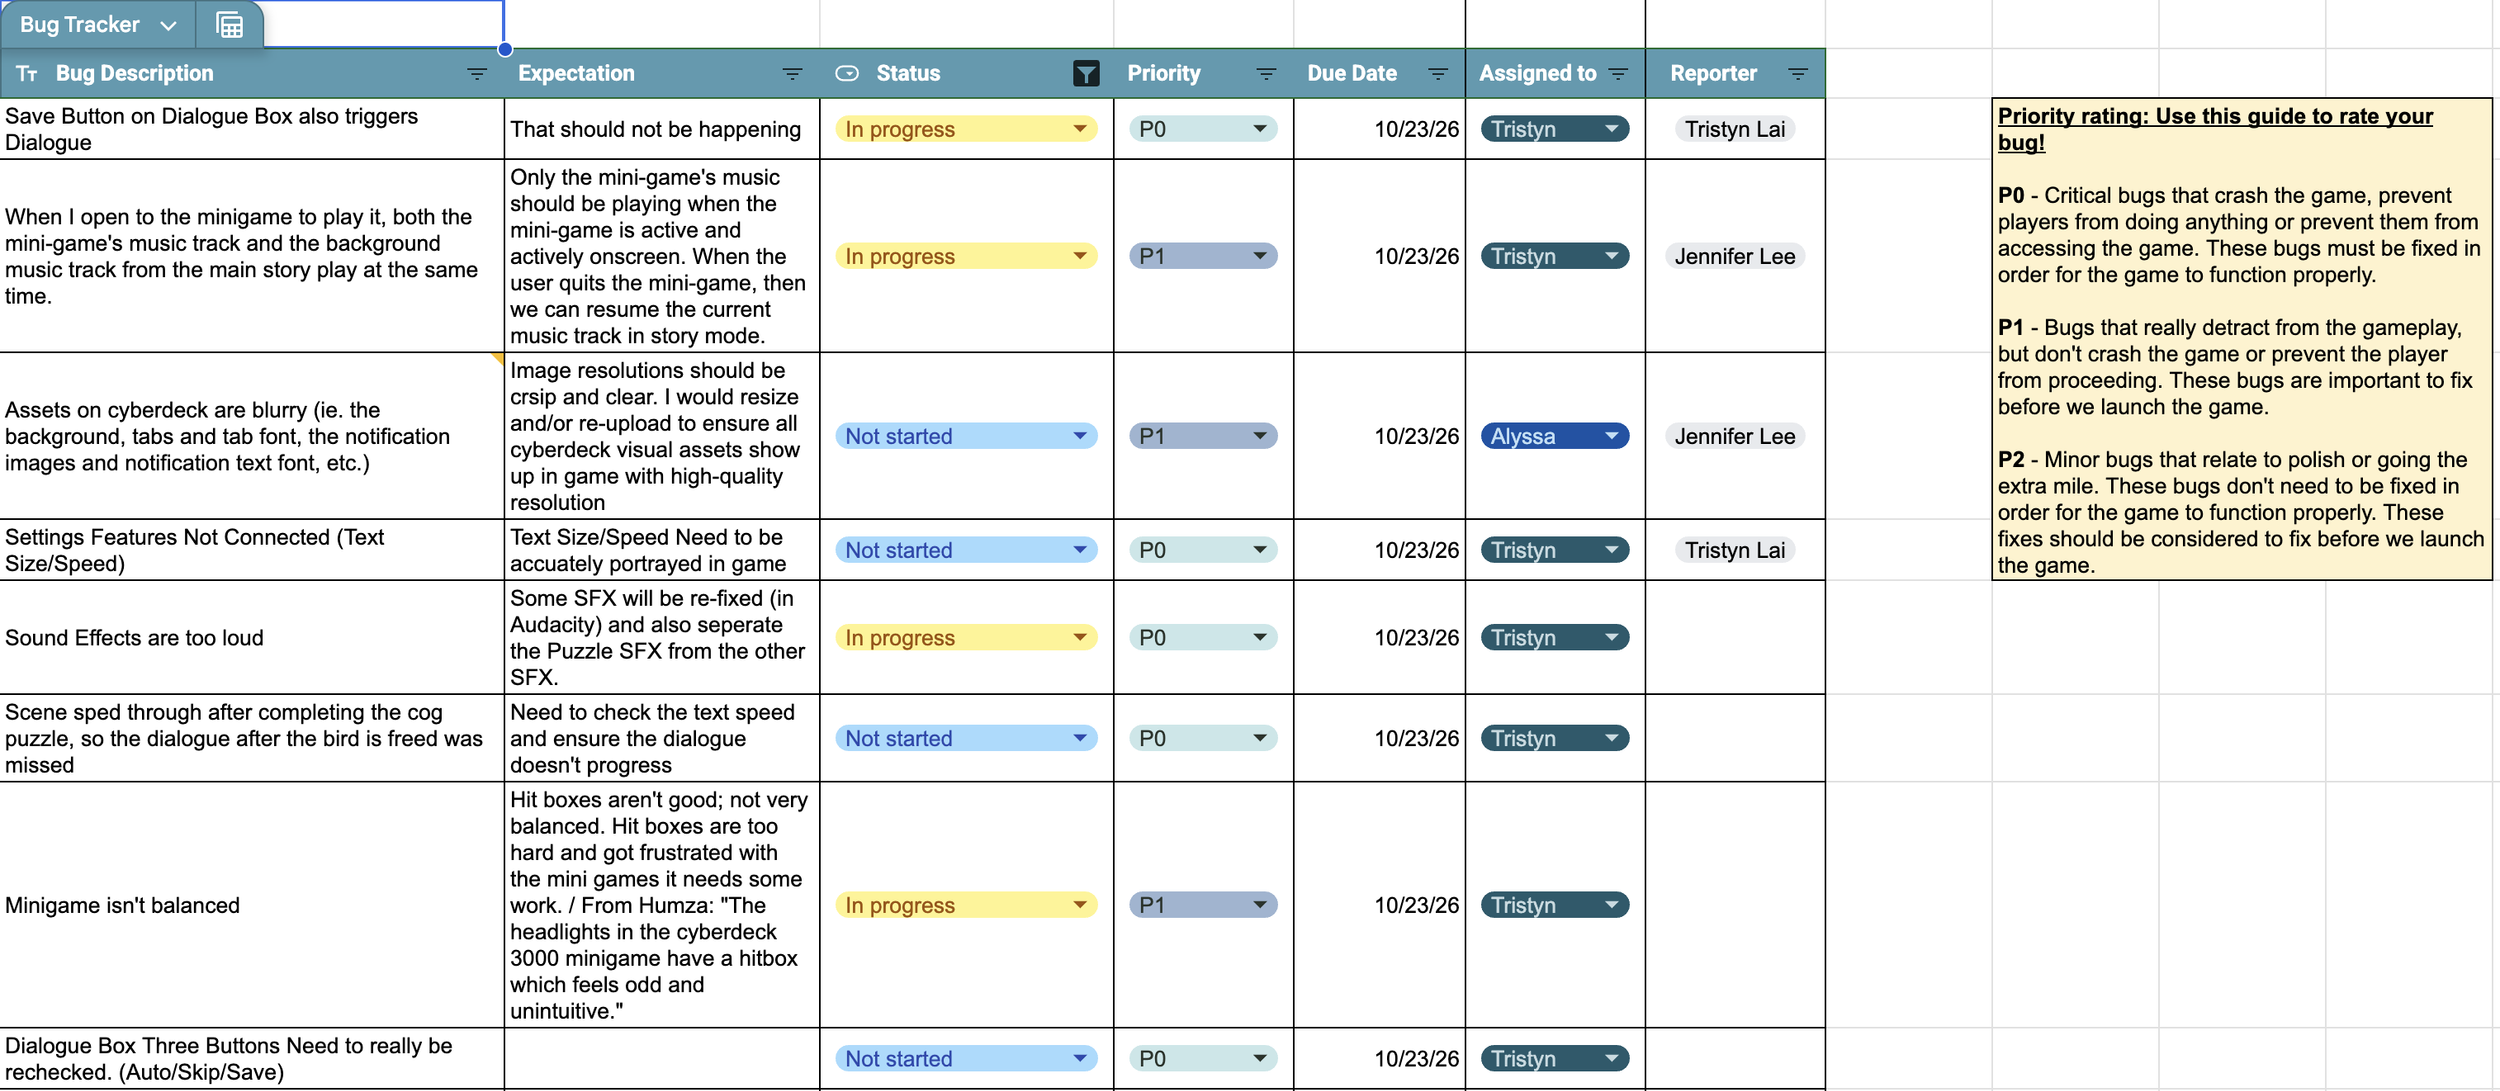
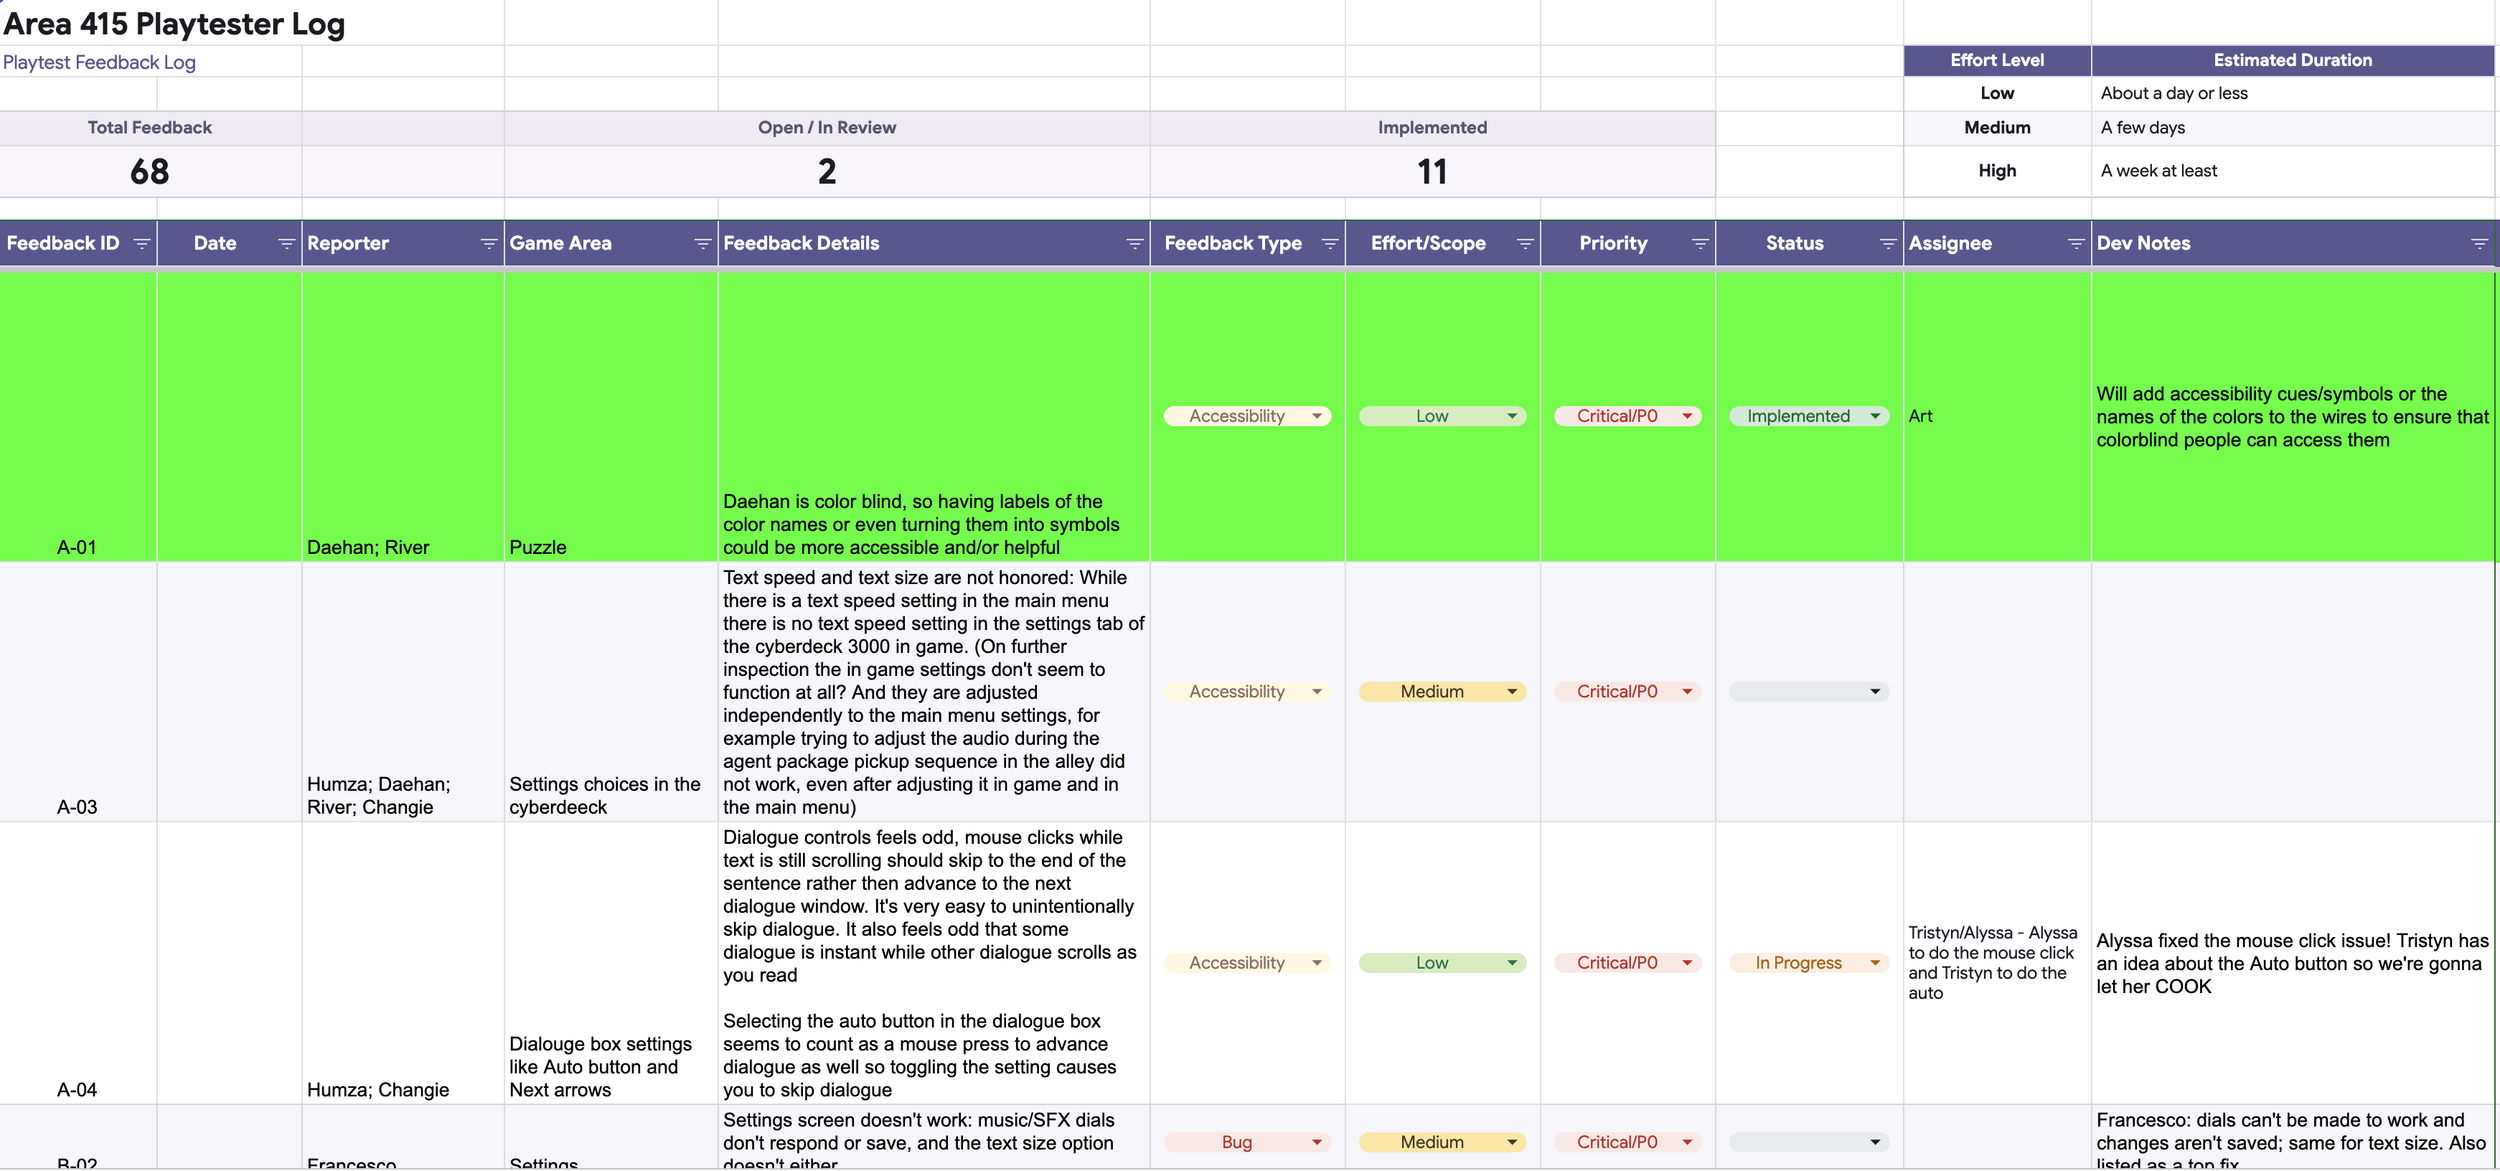
Once we downsized from 11 → 3 devs (me, Alyssa, and another programmer) we created a spreadsheet on Google Sheets that quickly became our source of truth for:
Tasks across Art, Narrative, and Programming with associated deadlines and priority label.
Bug tracker tab, which prioritized bugs and game glitches based on severity, and assigned a responsible individual. I made a rubric to help us determine which bugs were critical vs. polish.
Playtesting feedback tab that synthesized all the feedback we got from friends and family, and prioritized which pieces we’d fix.
This spreadsheet was an awesome asset to have, and I wished we’d developed it sooner during the original two-month jam.
Looking back, it would’ve been super helpful to have had a producer on the team who could keep not just programmers but everyone accountable on their tasks, as well as our milestones that we’d written in the GDD—which was easily forgotten.
My Narrative Design and Game Writing Process
Storyboarding and Screenwriting the Opening Cutscene
The Inspiration
The opening scene was our big chance to set the tone of the world and its state of affairs.
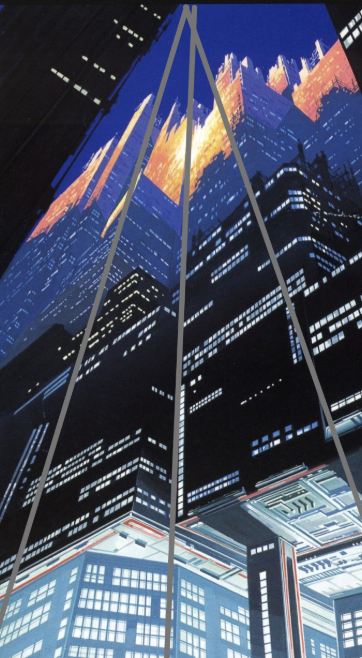
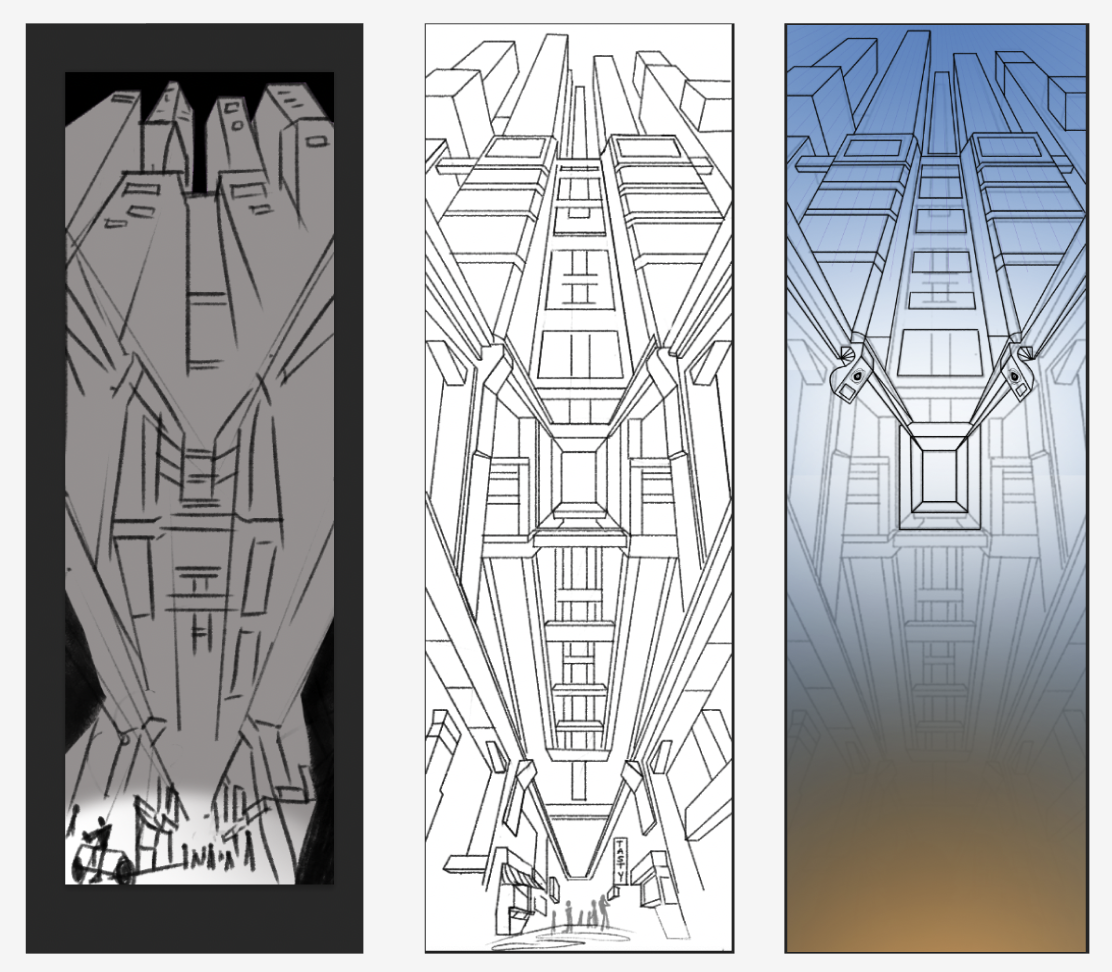
Early on in our brainstorming sessions, Alyssa had found a mood board image of towering buildings that I really fell in love with.
Paired with some motion with a camera panning down, it would really be able to communicate:
The class hierarchy between the ‘top world’ of the ultra-rich class who lived in the sky and the ‘lower world’ that was covered in San Francisco fog
Show how the game’s evil company, AGENTS, has taken over the city and surveils its inhabitants
Emotions of feeling like the city was almost suffocating
The Storyboard
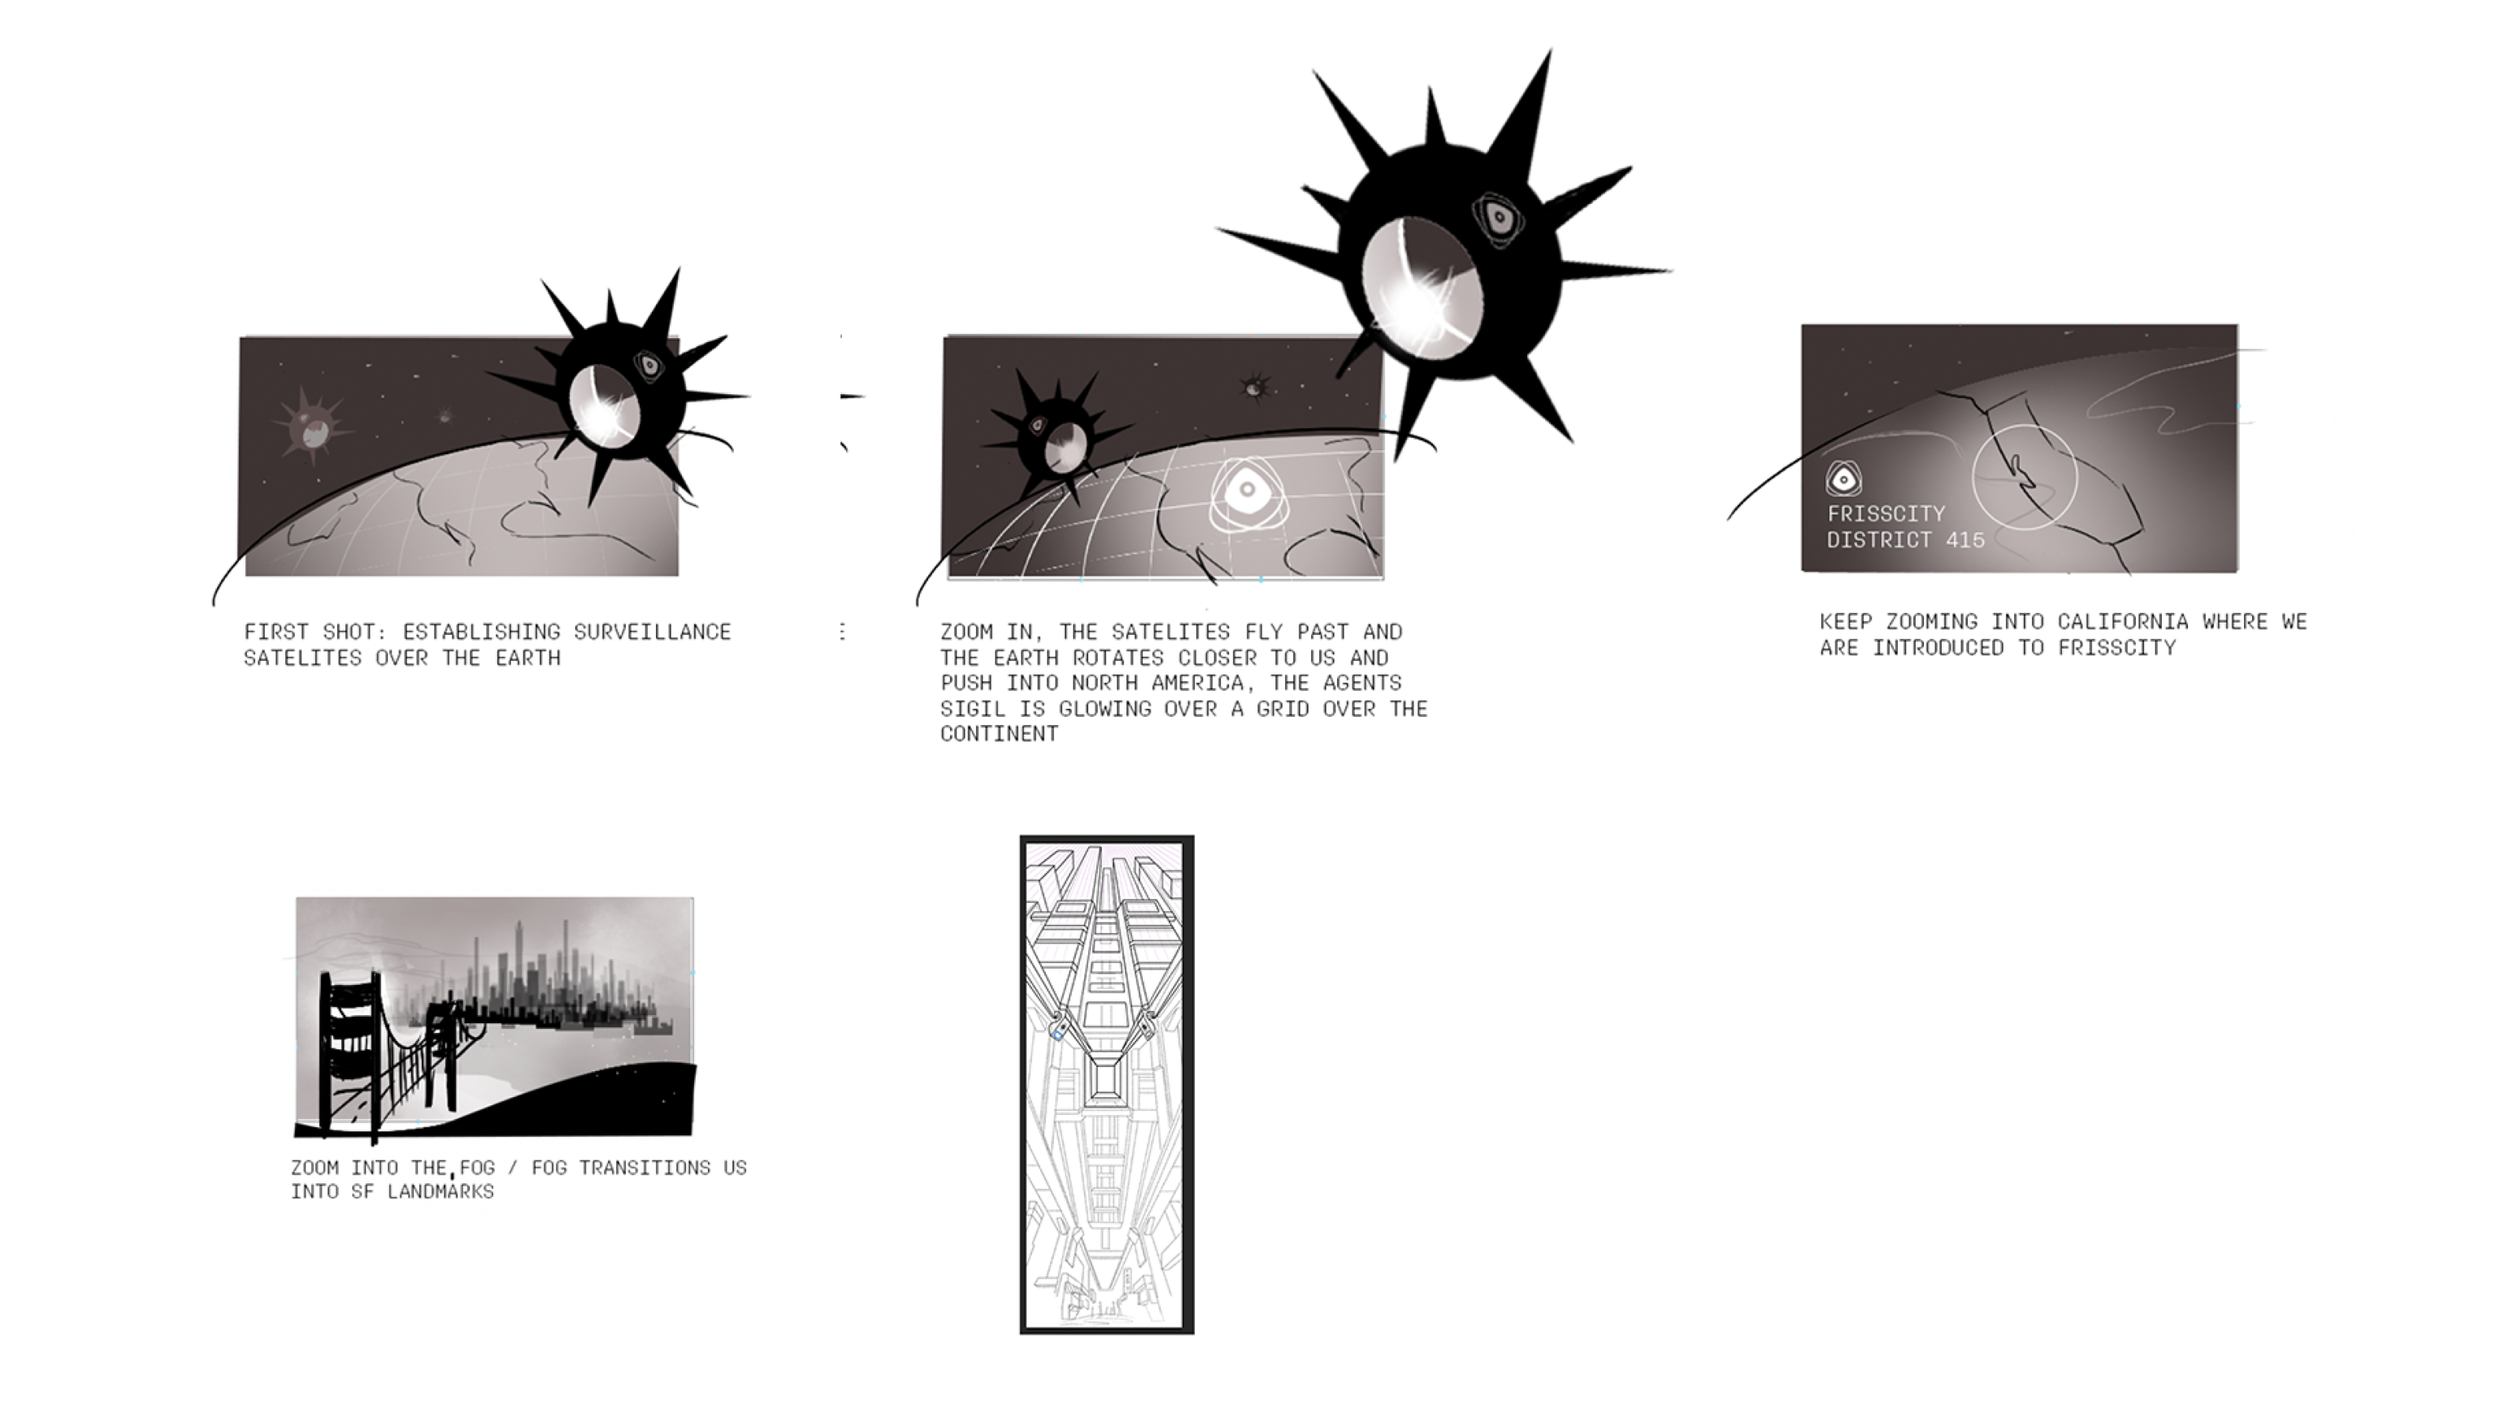
Alyssa and I worked together on a loose storyboard while I also worked on a screenplay script for the cinematic opening.
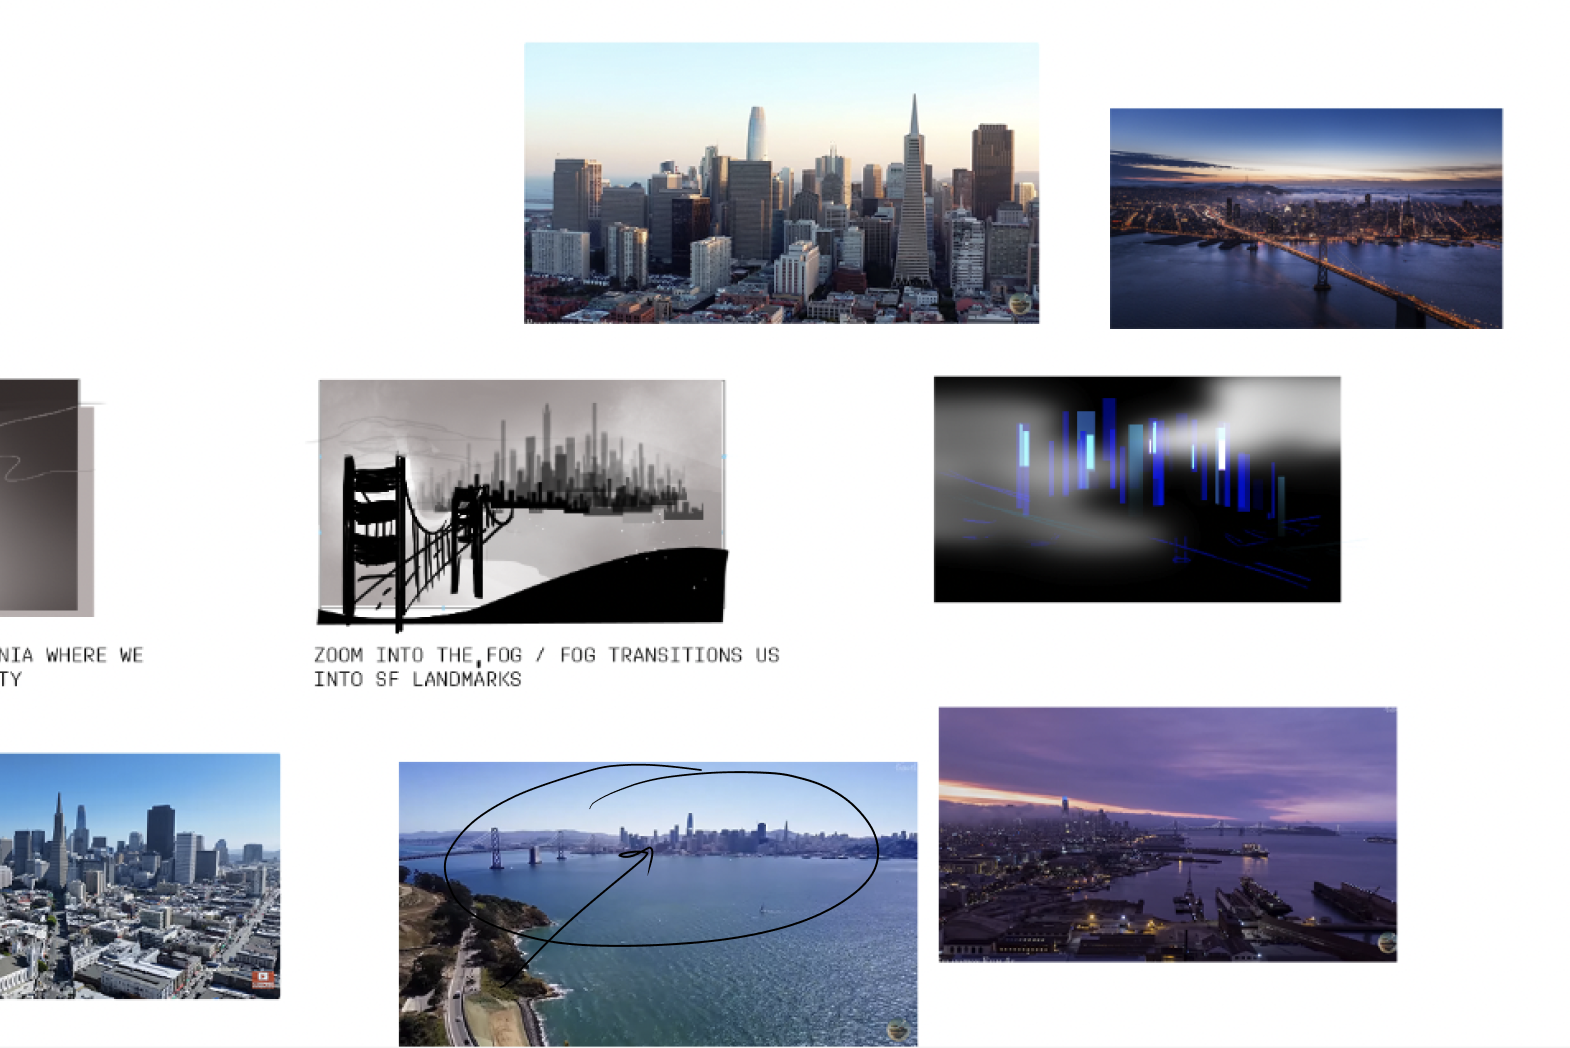
We started with a view of the world and the AGENTS eye-like logo → then to the USA that highlighted California → then to the city of San Francisco.
The storyboard helped us realize that this was too much context and the pacing felt too slow. While we both wanted to show how much power AGENTS had over the area and the world at large, it was ruining the pace of the cinematic and I feared that people may get bored and skip the video—or quit the game altogether. Alyssa tested it out anyway in a rough video mockup and we agreed that the pacing was too slow.
Cinematic Script and Opening Cutscene
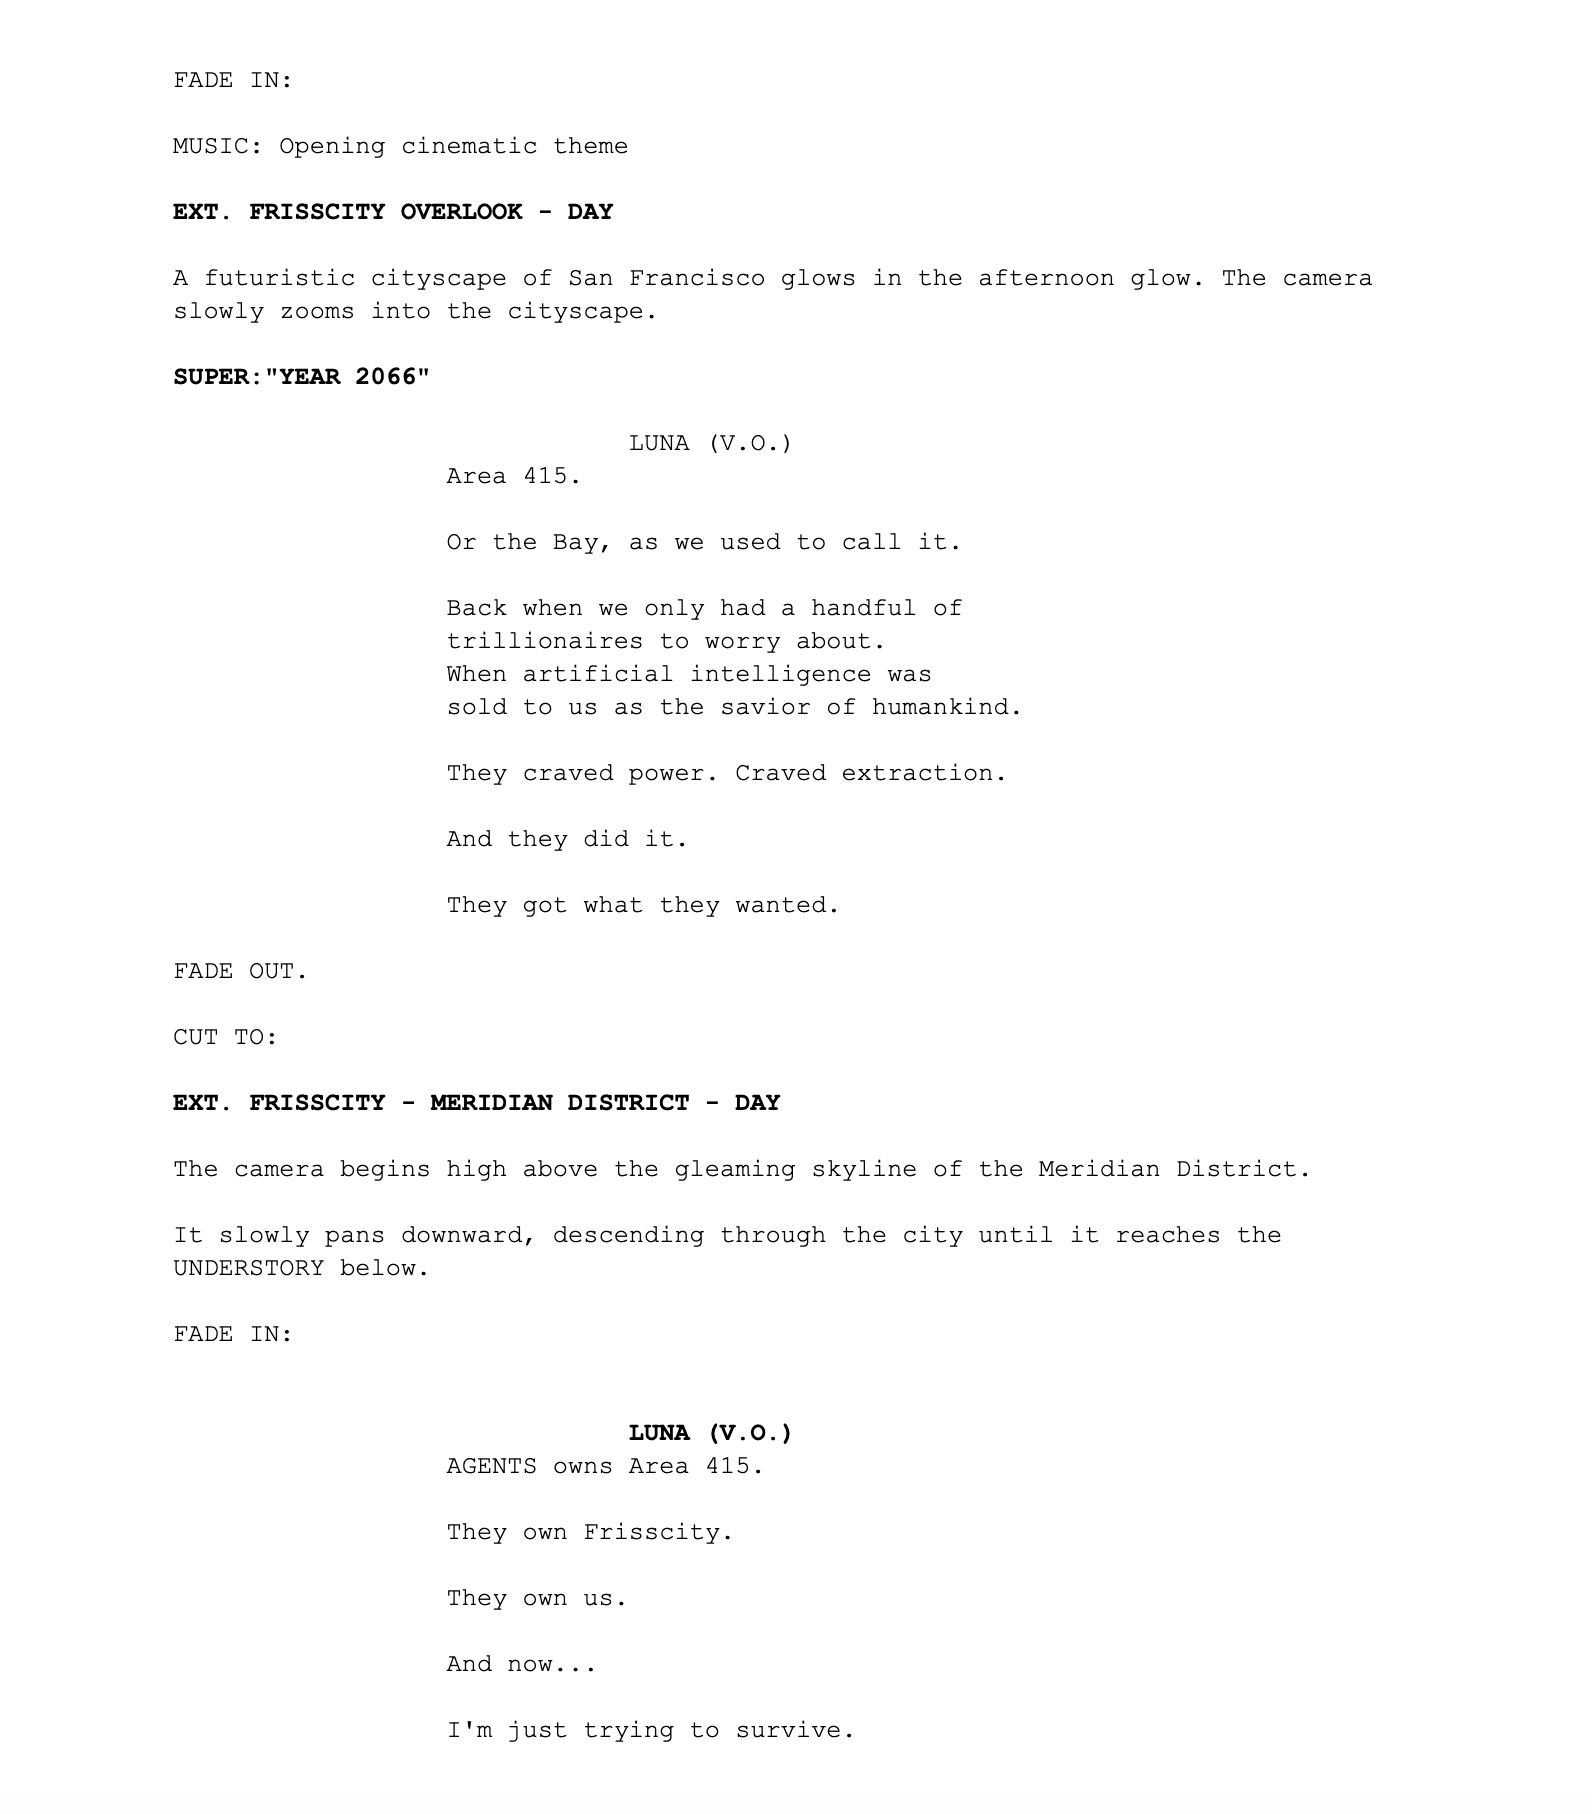
She also provided great feedback on my script and suggested I soften a couple of my lines from its biting criticism of Silicon Valley. Instead of using words like “money-grabbing” and “scrawny,” I eventually landed on the line: “back when there were only a handful of trillionaires to worry about.”
Below is the final script and final cinematic side-by-side comparison in all of its glory!
Creating a smooth transition from the opening cinematic to in-game play required a lot of transitions—plus a lot of documentation and meetings to get it right
Moving from passive to active gameplay required a lot of communication between me, art, and programming.
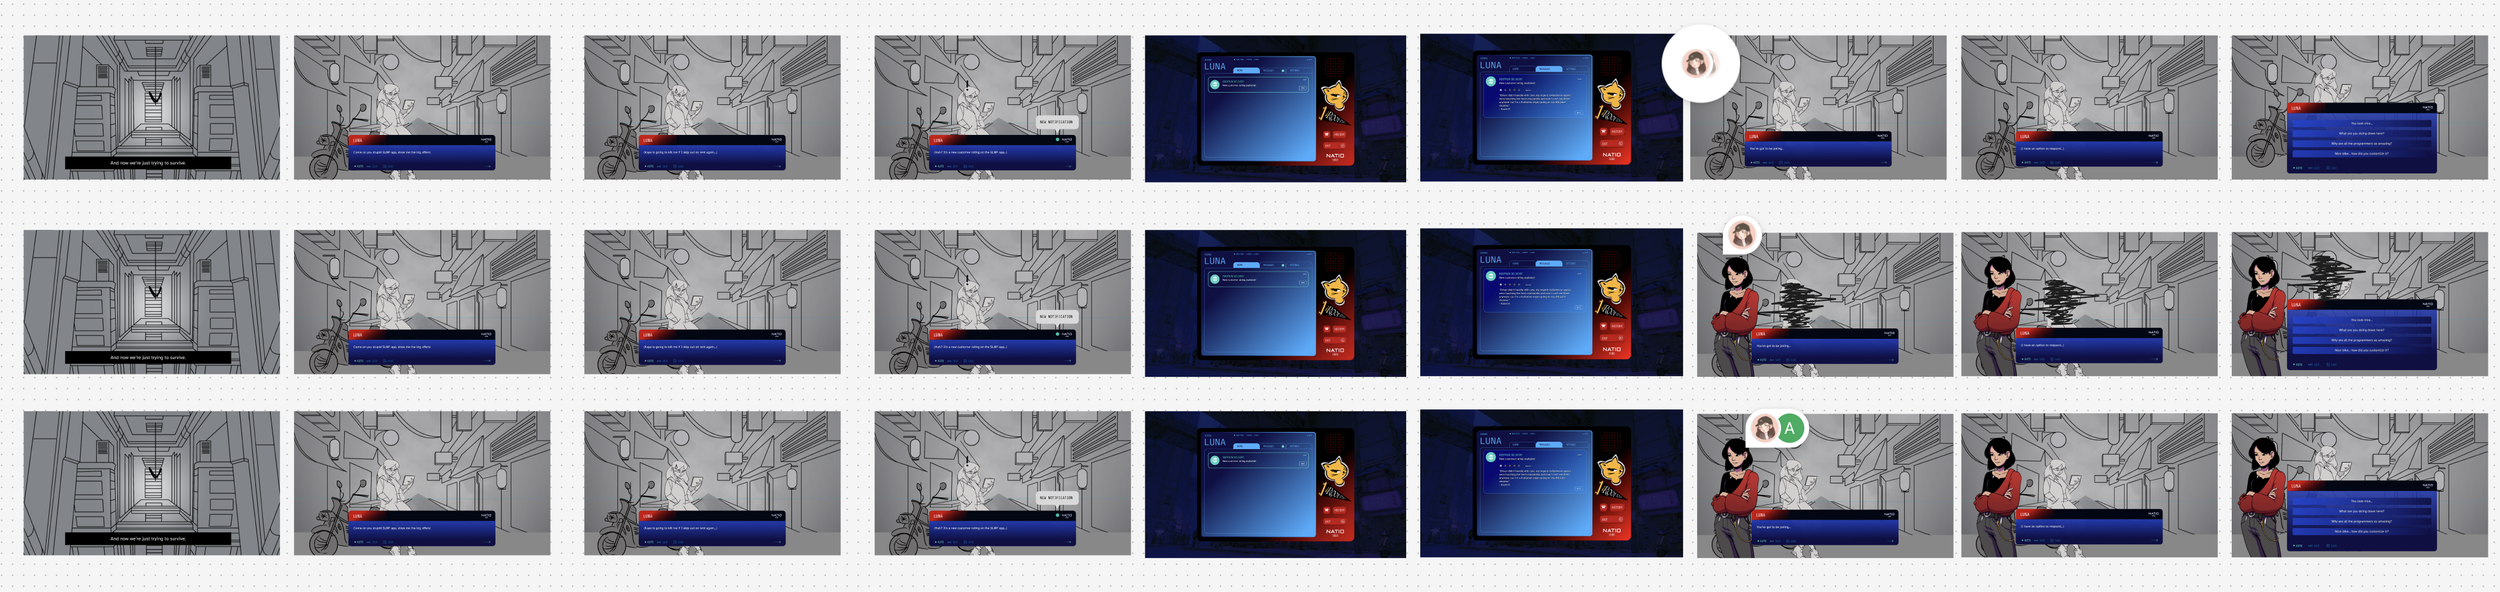
I created multiple documents—one in Google Docs and one in FigJam—that tried to visually outline the various paths we as a team could take to transition from the opening cinematic to the player character’s in-game sprites.
The FigJam was overwhelmingly preferred since it was the most visual of the two. It was tricky to land from a programming standpoint, but we were able to make the transitions seamless!

Transition Explorations I Presented to the Team So We Could Align
The story flow was: opening cinematic → in-game dialogue → introduction to our game UI menu (“cyberdeck”) → back to in-game dialogue and our first branching choice.
There was some nuance to how we’d handle the transition, particularly when it came to which character art we wanted to show.
We eventually went with the middle row, since the transition into the cyberdeck let us ‘reshuffle’ our screen and prepare players for our in-game sprite art, which would be used for the rest of the game.
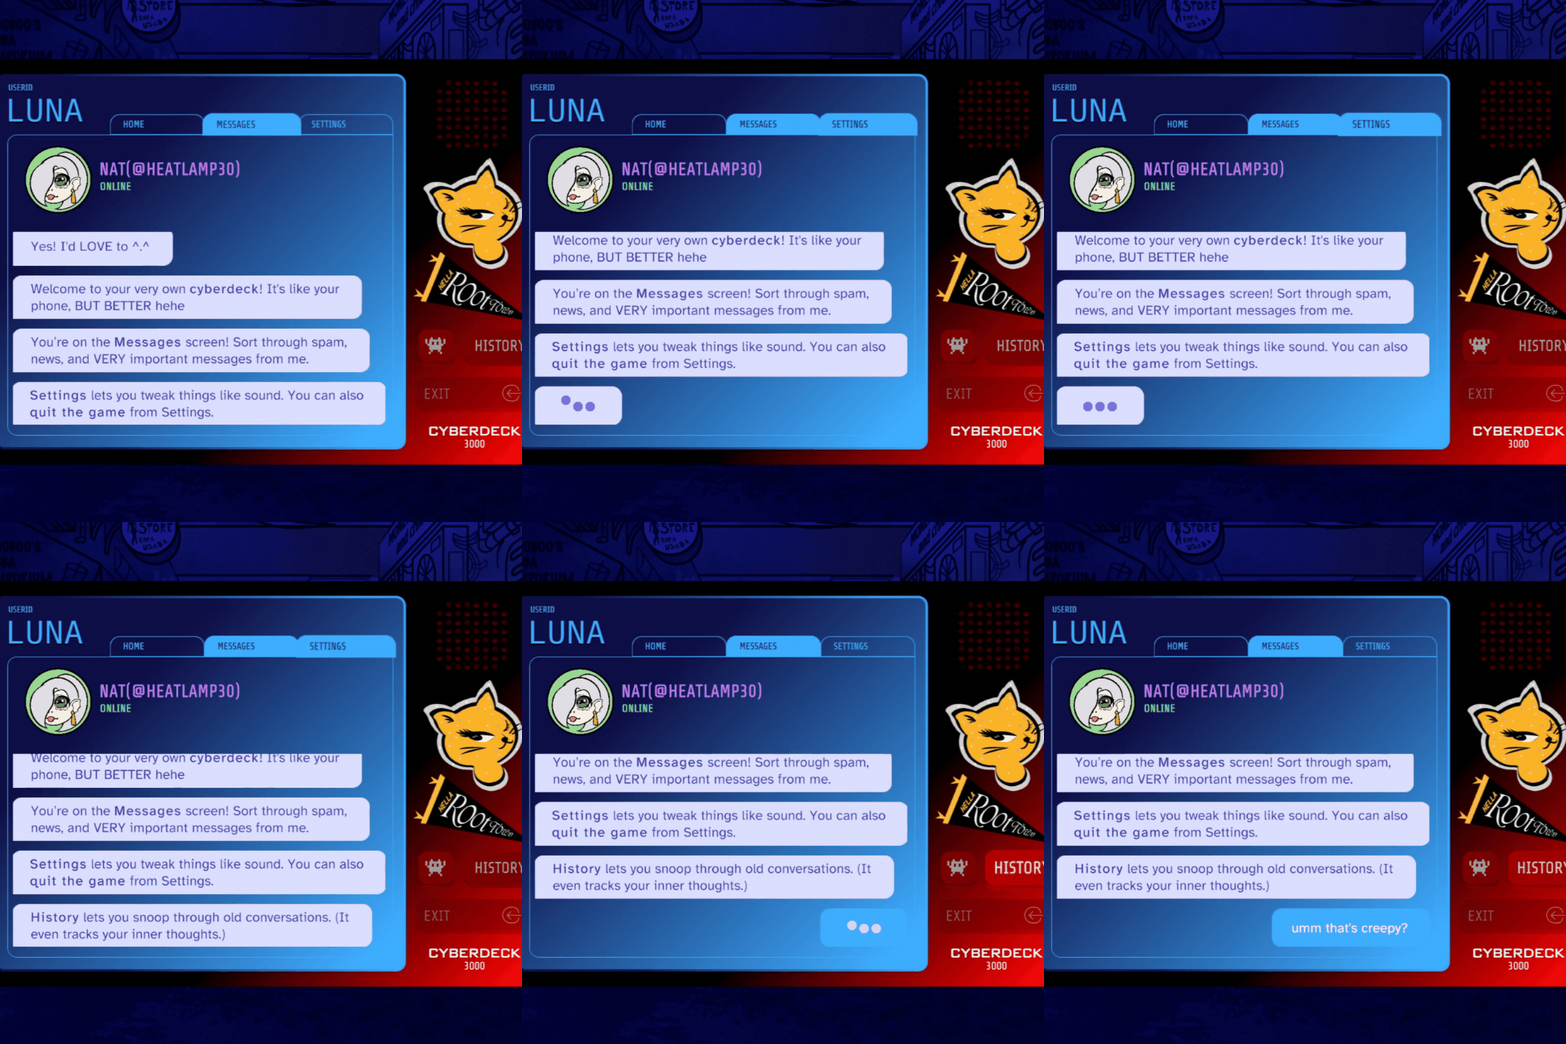
Introducing the cyberdeck’s game UI early in the game was crucial to onboard the player to key in-game features
I leveraged my previous experience as a UX Writer and Content Designer—where I’ve done tons of work on designing new user onboarding experiences and flows—to ensure our players knew how to quit the game, how to use the game menu’s features, and how to return back to the cyberdeck whenever they wanted.
This part came the easiest to me, and it was fun to turn the onboarding experience into an actual text chat between two characters!
I needed the conversation to feel believable in the story, while also succinct enough so as to not bore players. So I created a situation where Luna asks for a refresh/walkthrough of the cyberdeck’s functionalities.
I used bolding («b» and «/b») in the Yarn Spinner script to call attention to key tab and button names.
I also asked our programmer if there was a visual way we could also call attention to the assets, to make the content and visual association stronger.
Luckily, our programmer was able to create a ‘glow’ animation, where certain tabs and buttons jumped out at the player whenever they were mentioned in the dialogue to call attention to them.
We also prevented the player from venturing off too far during this tutorial conversation by removing button and tab functionality during the tutorial.
Once the conversation ended, the “Exit” button would light up, signifying that the tutorial was done and they could return to our main story mode.
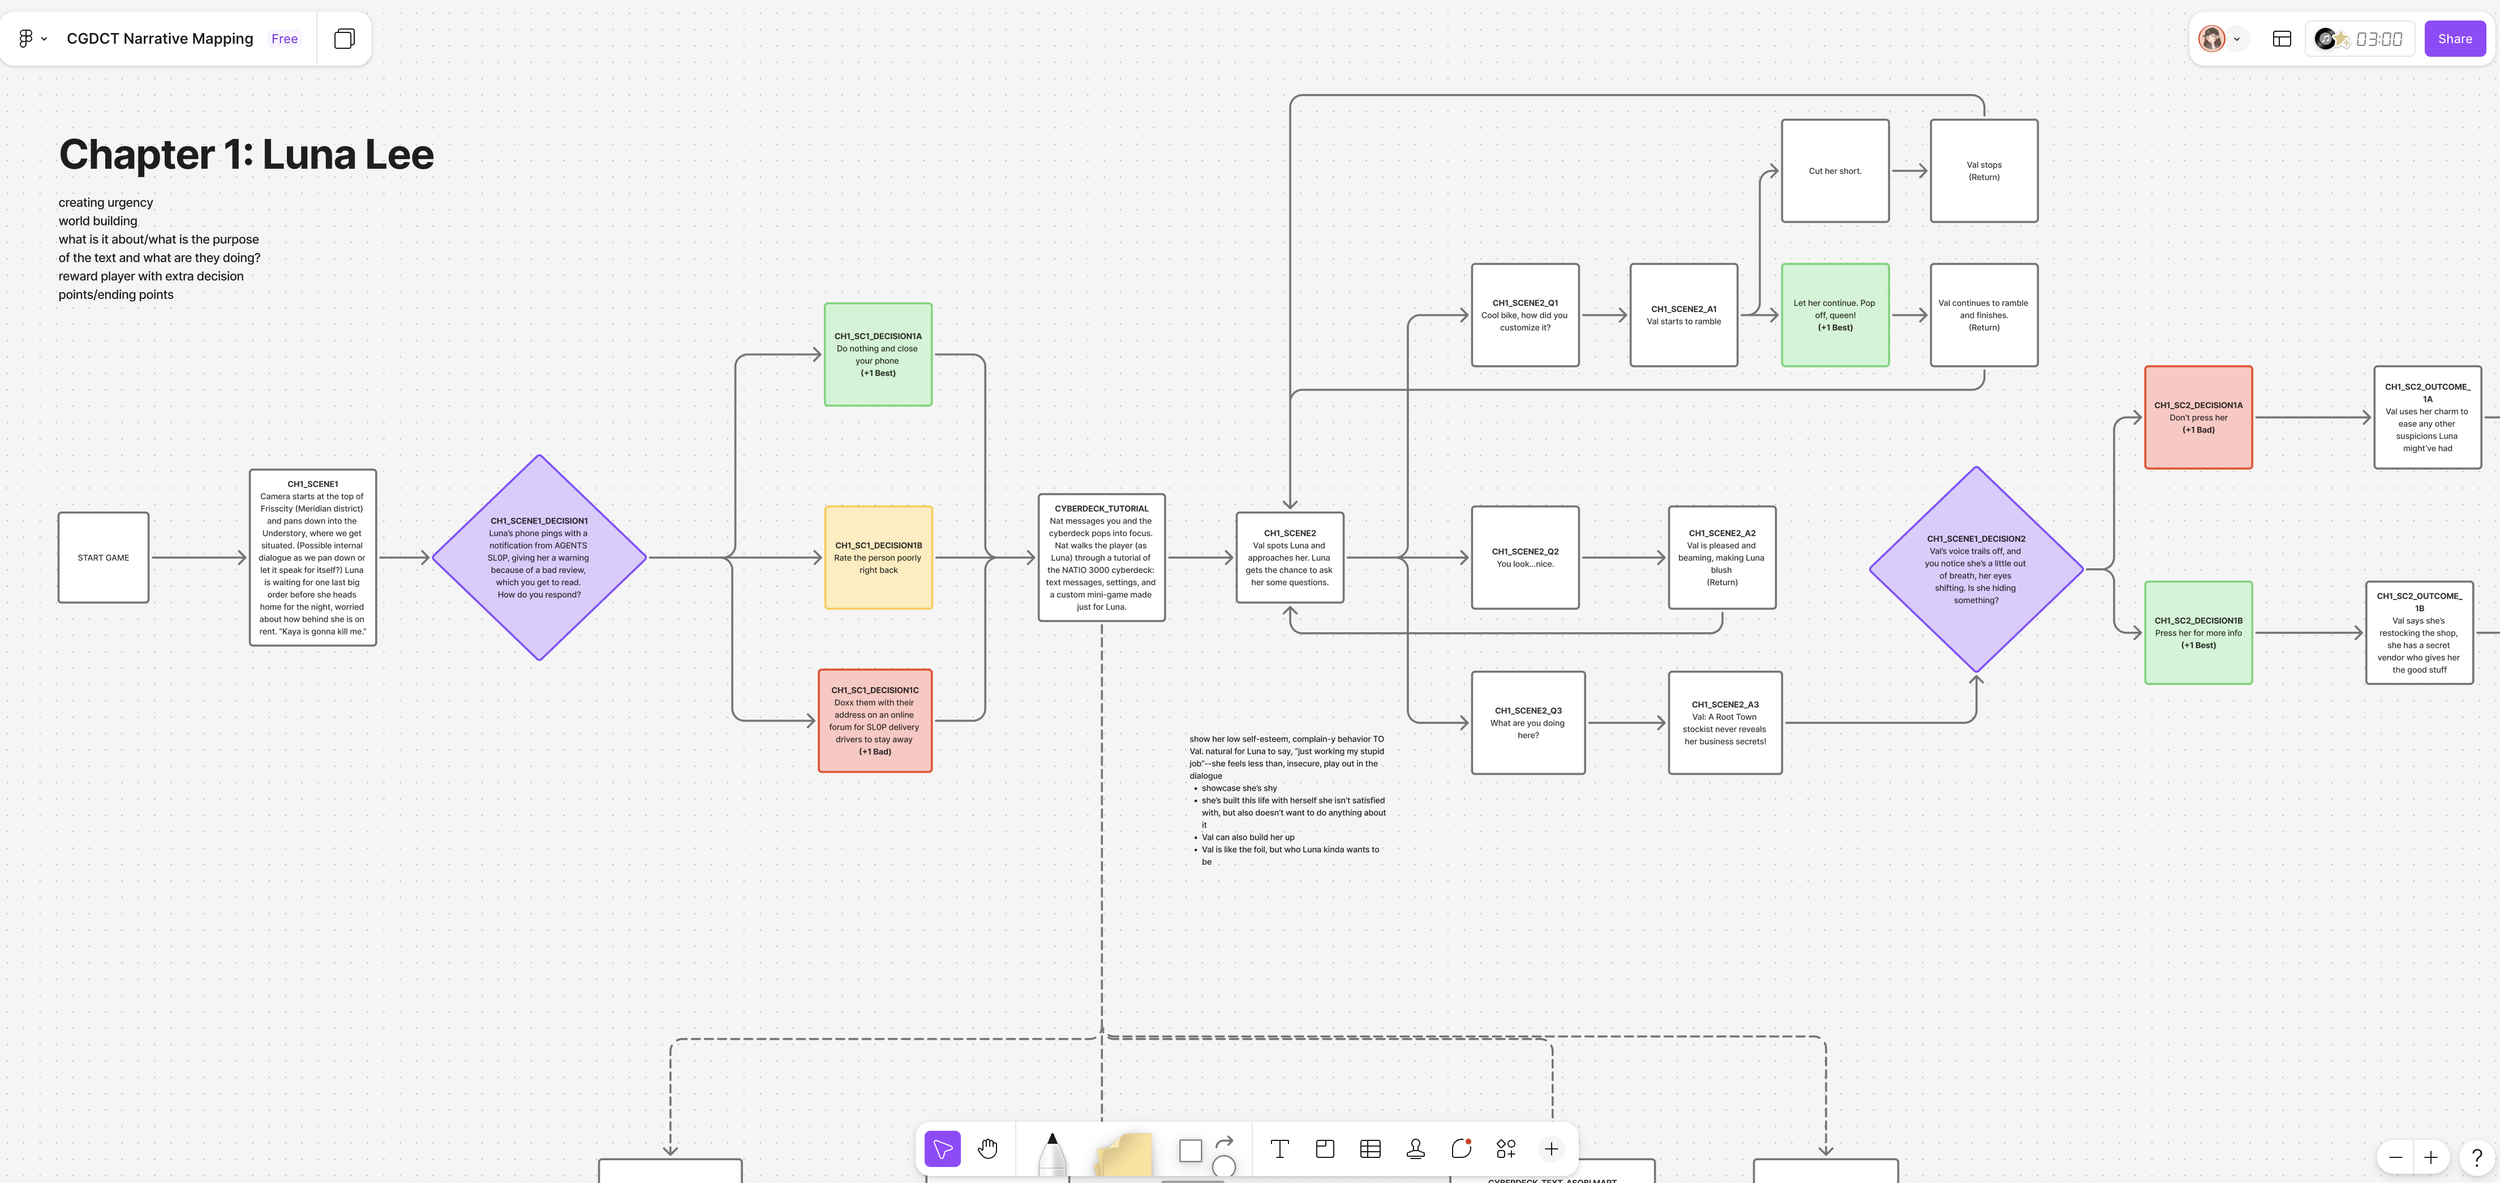
Mapping out the story’s branching choices and variables first
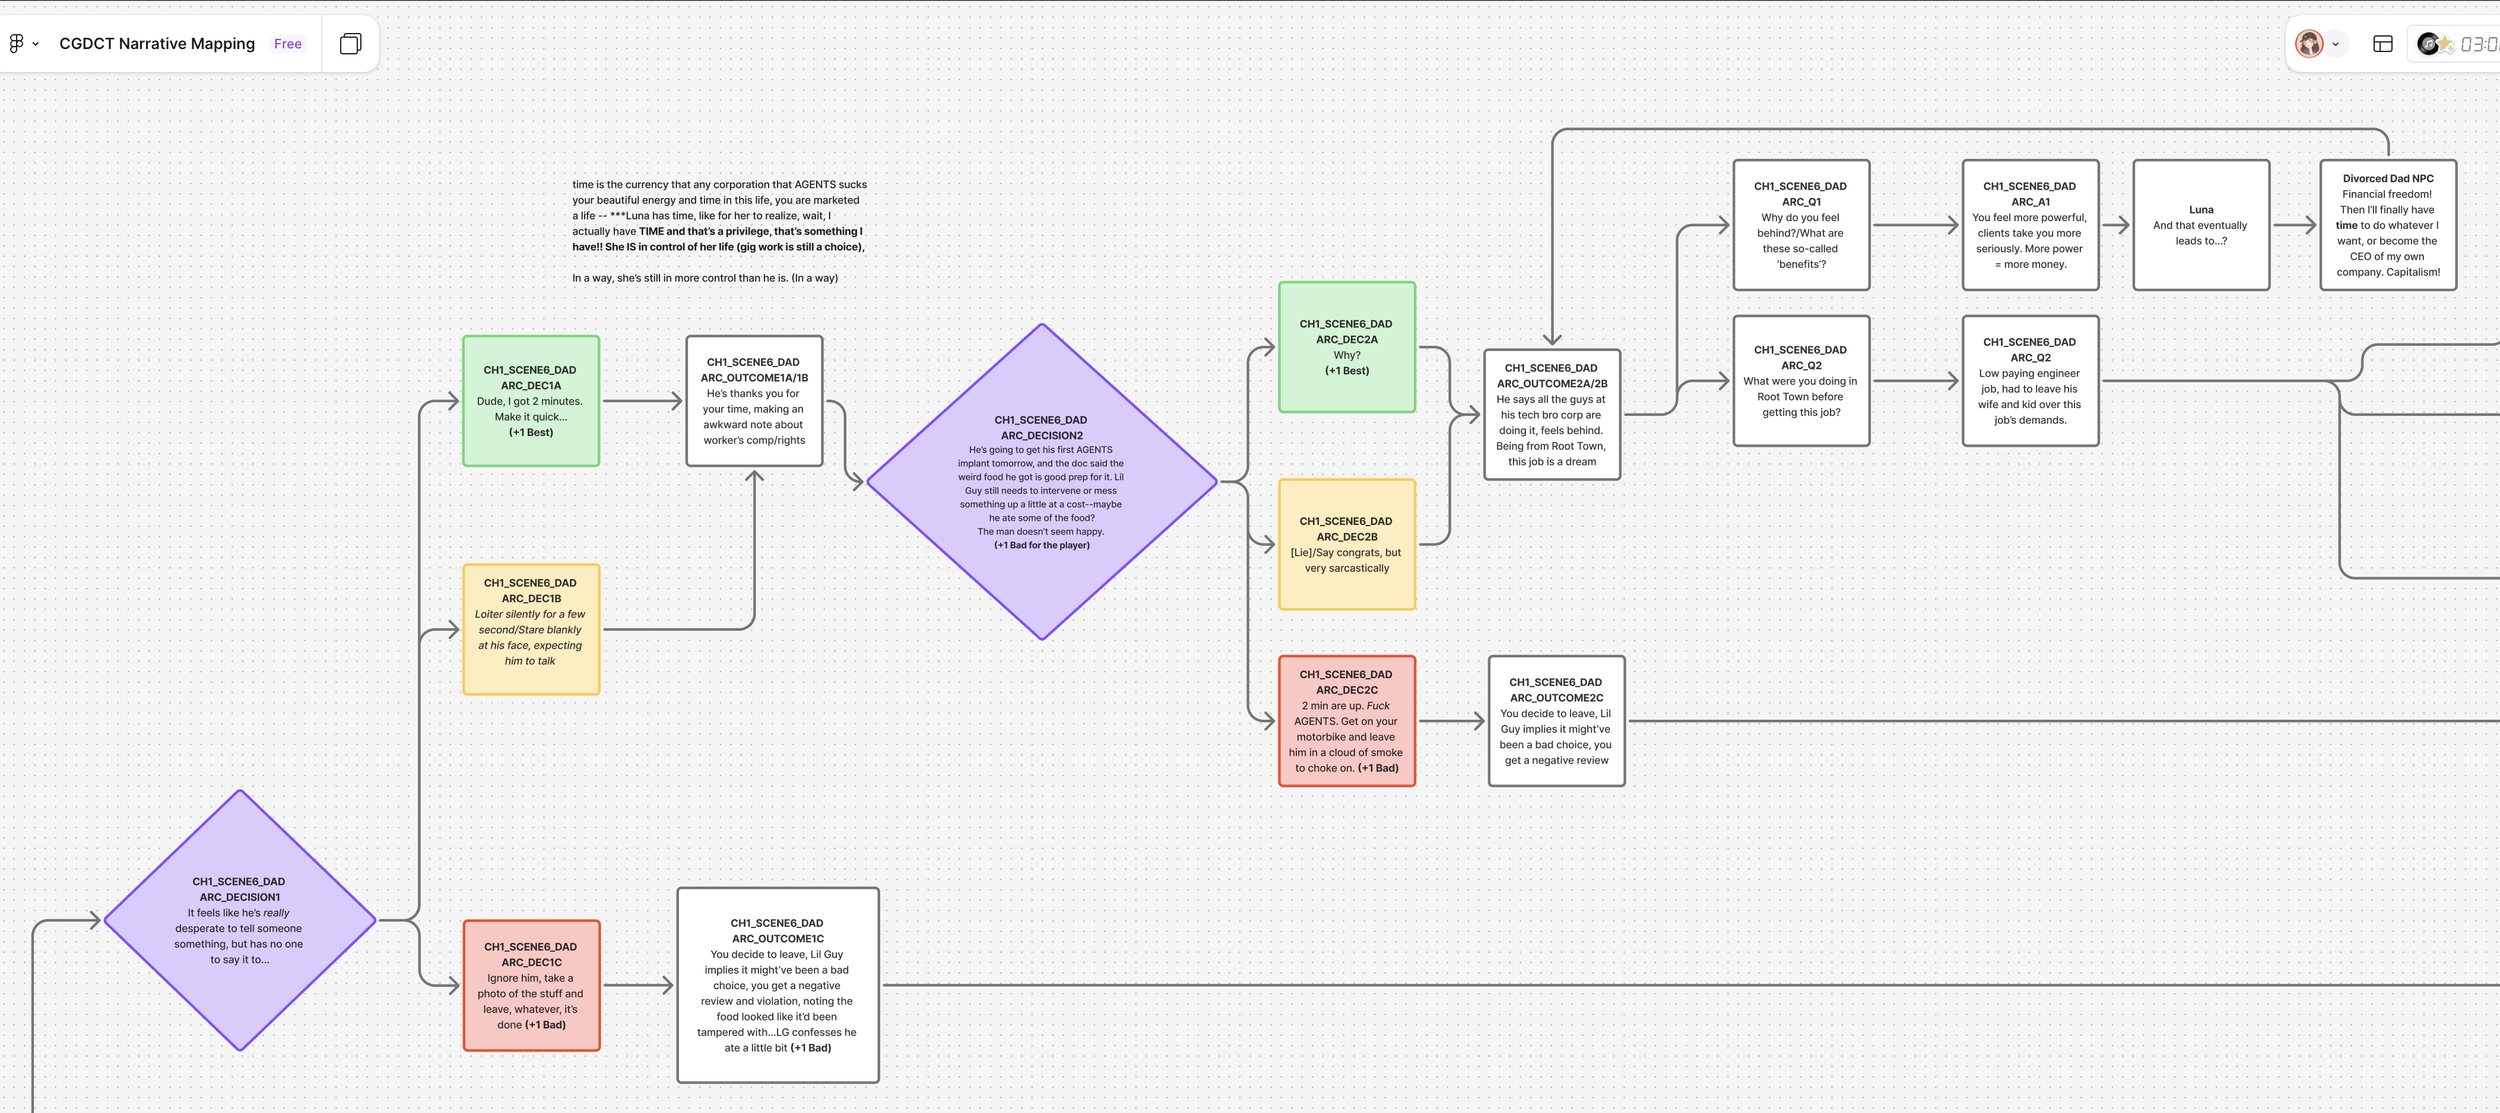
I used different shapes and colors to help developers know which choices would lead to a bad ending vs. a good ending. This also helped me stay on track when actually writing the game’s script itself to ensure there was consistent pacing and a main ‘message’ that needed to get across in each story beat.
This flowchart also helped me determine which variables I’d create in Yarn Spinner and prepare to learn how to design logic that lets you return to the main decision node after asking a question, like a similar behavior in Baldur’s Gate 3.
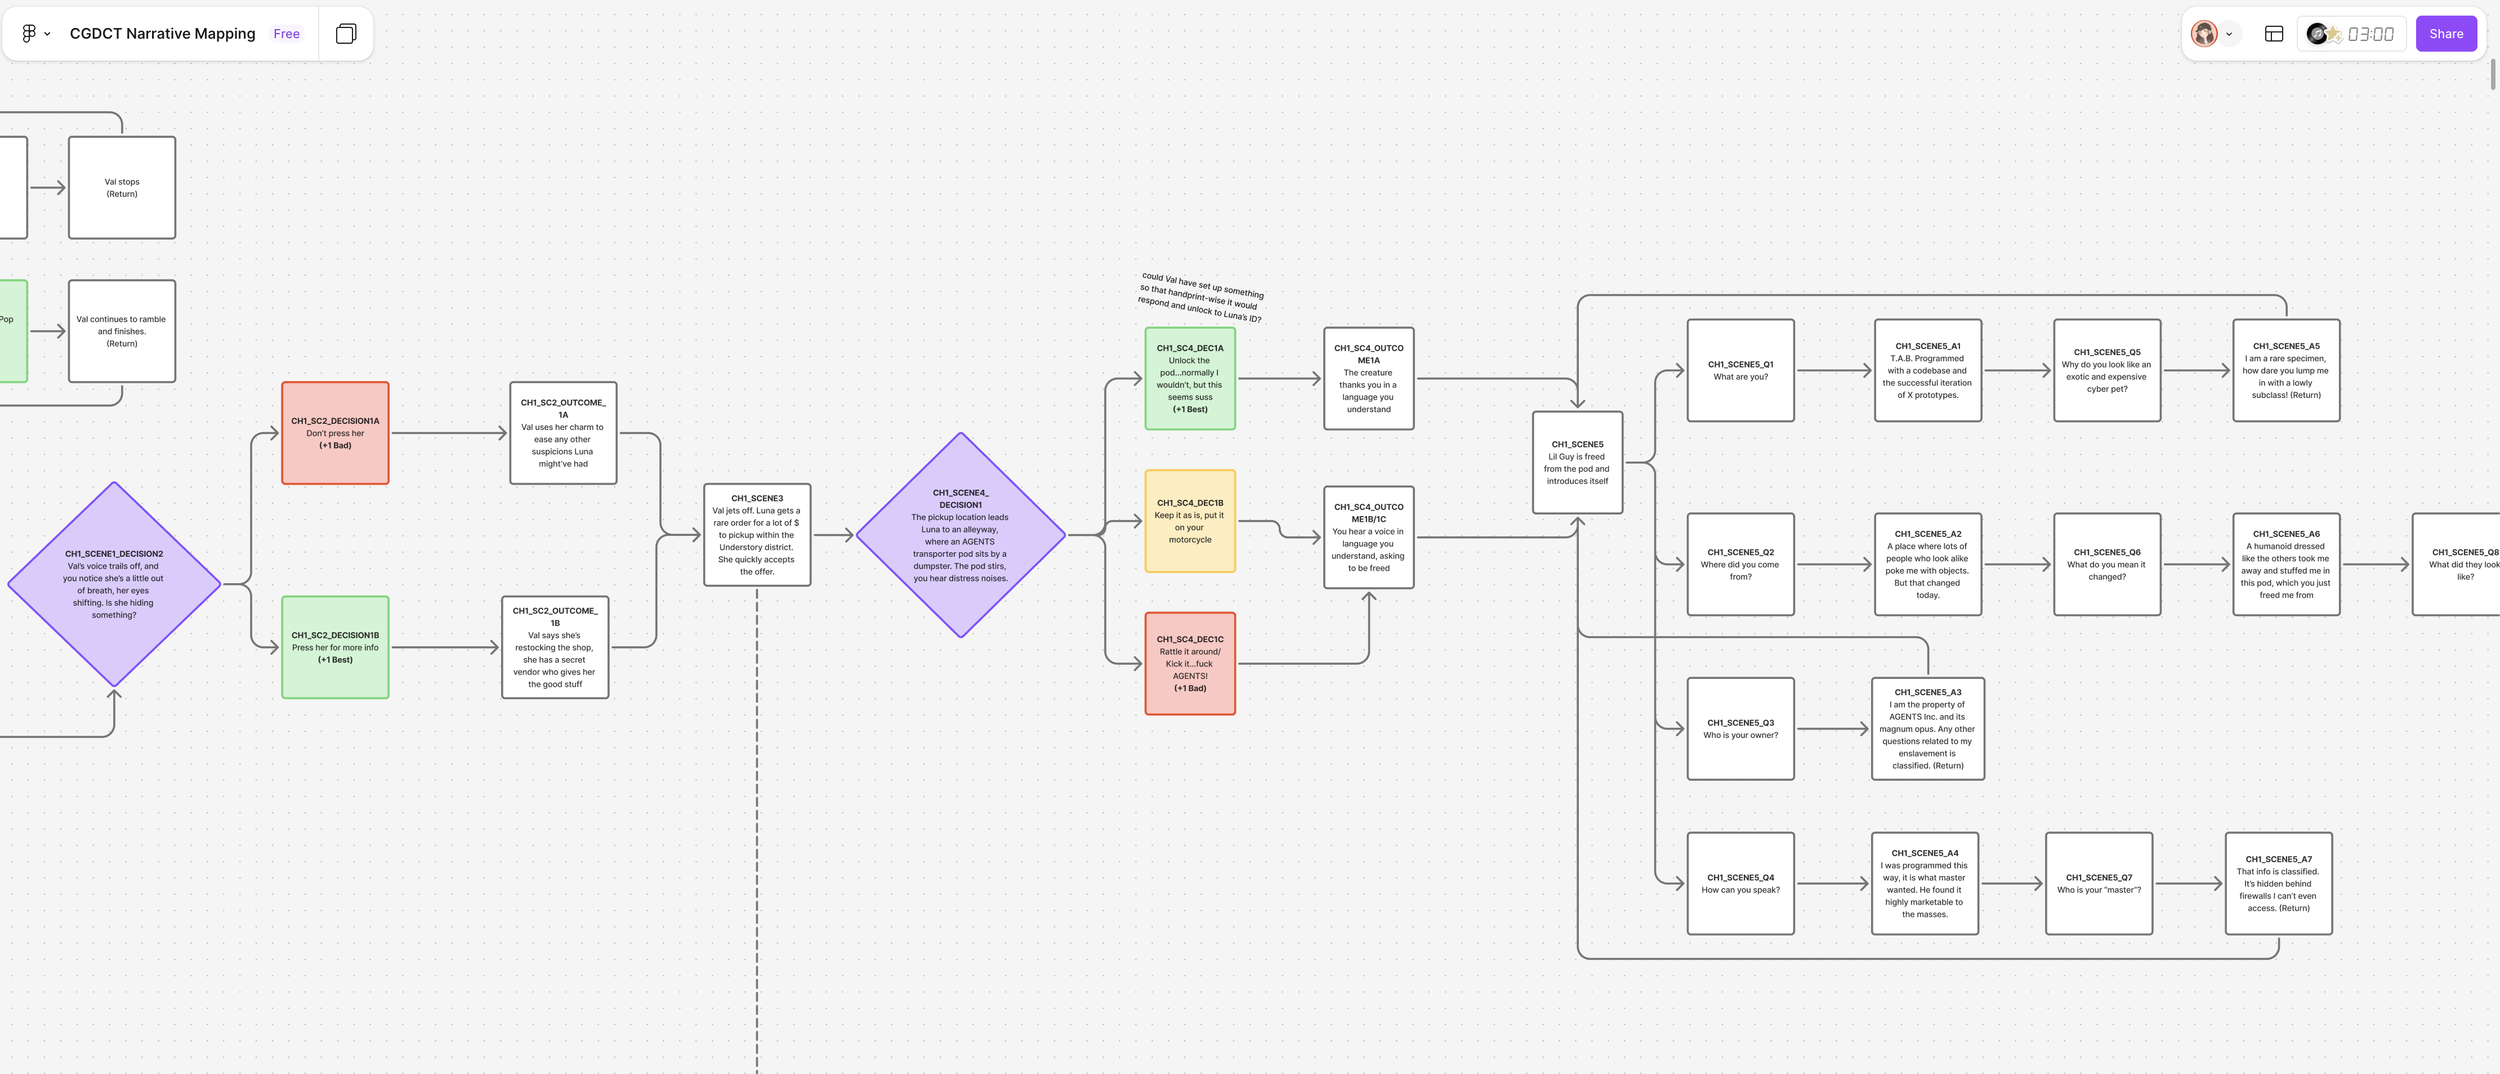
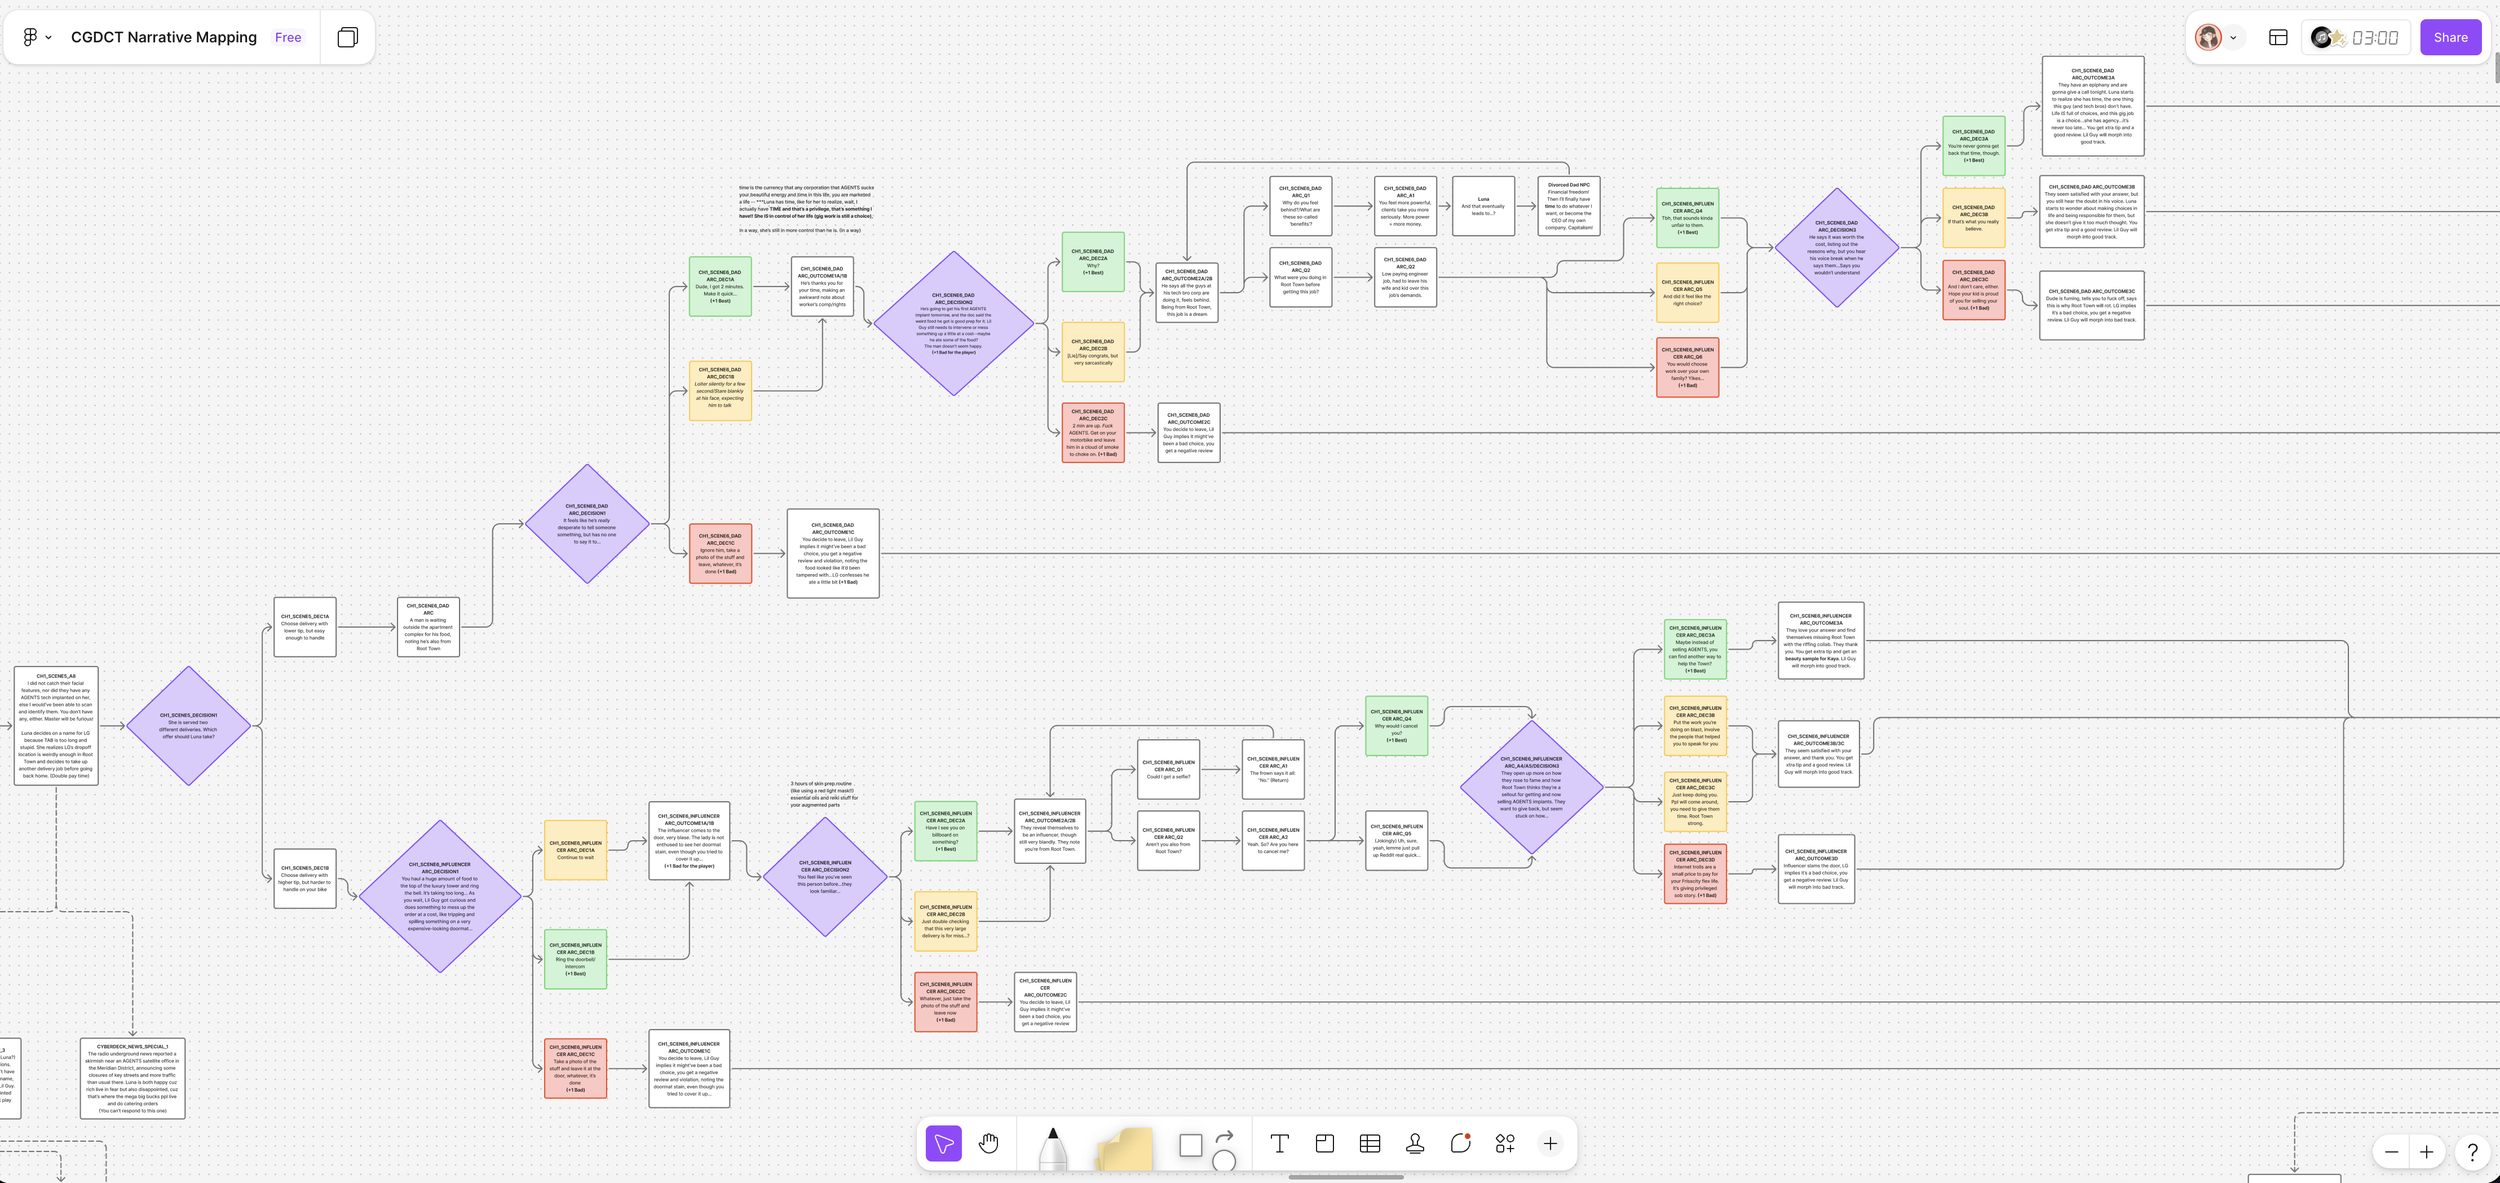
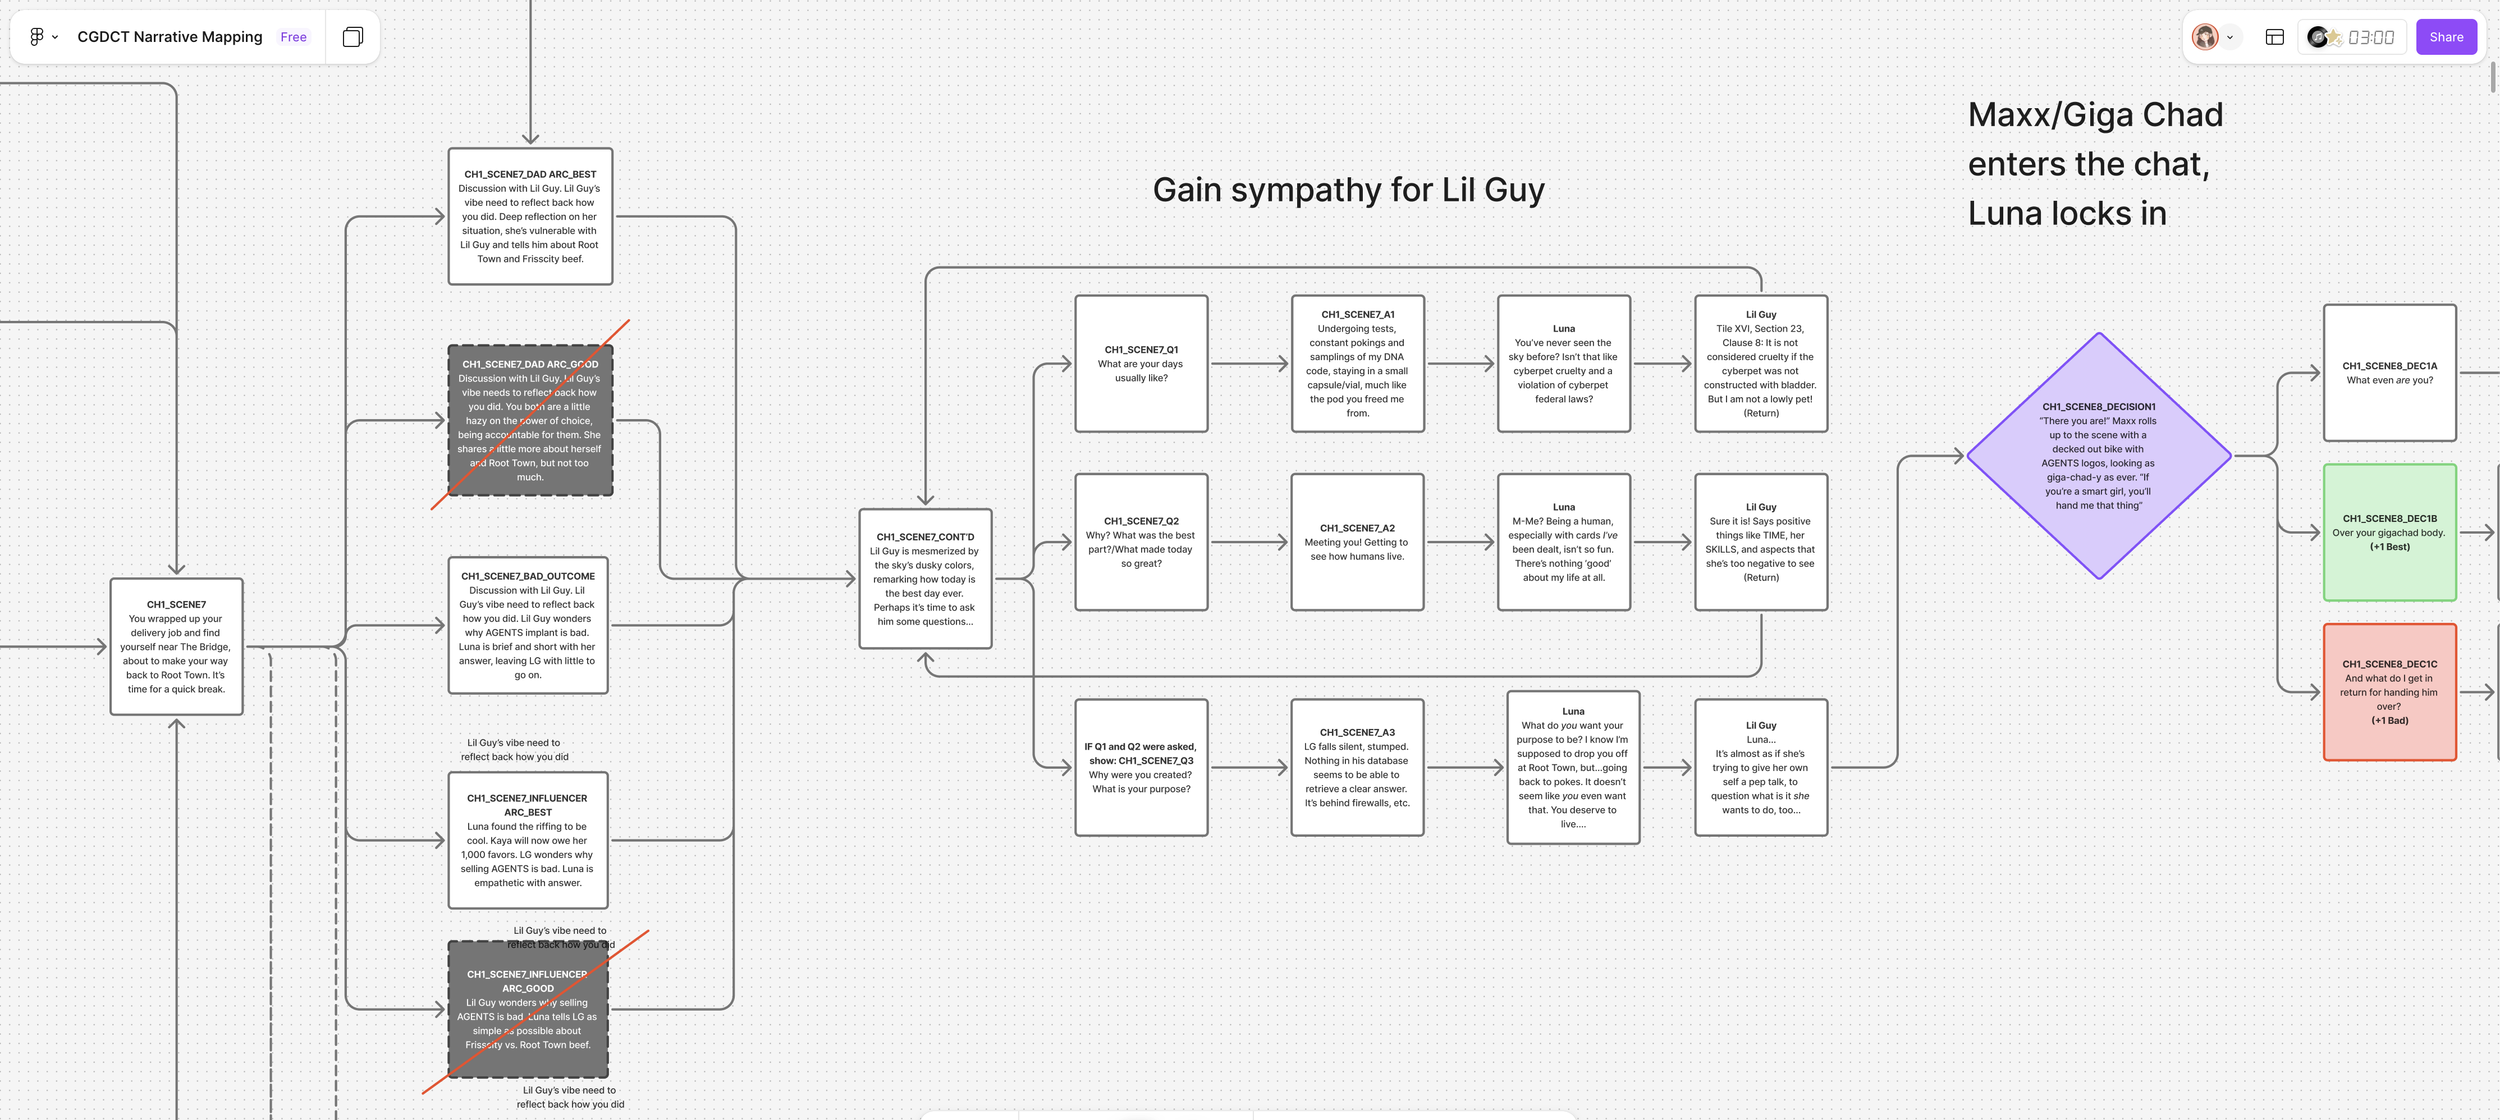
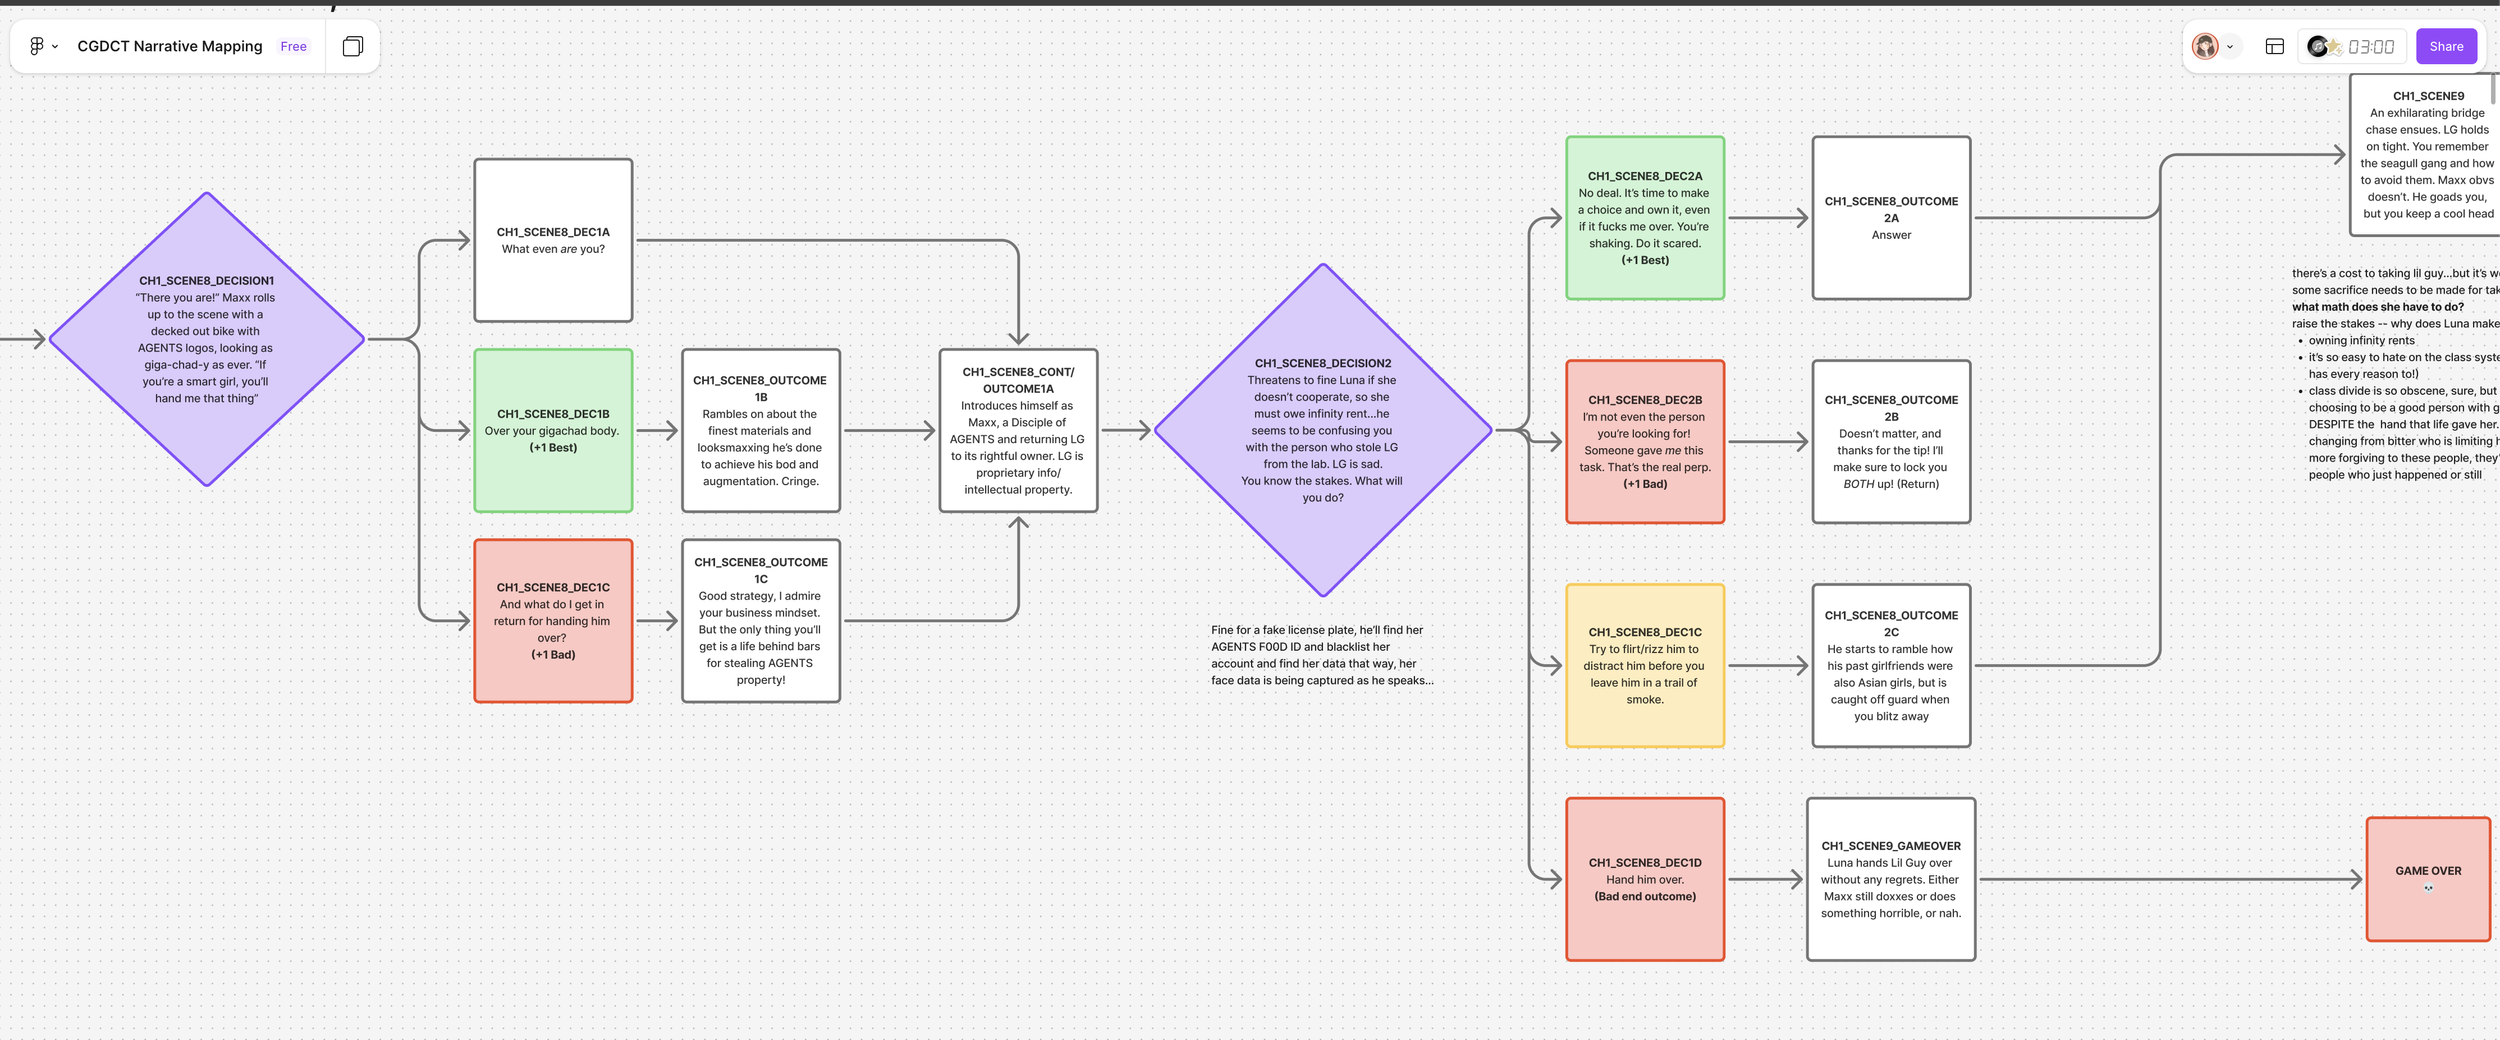
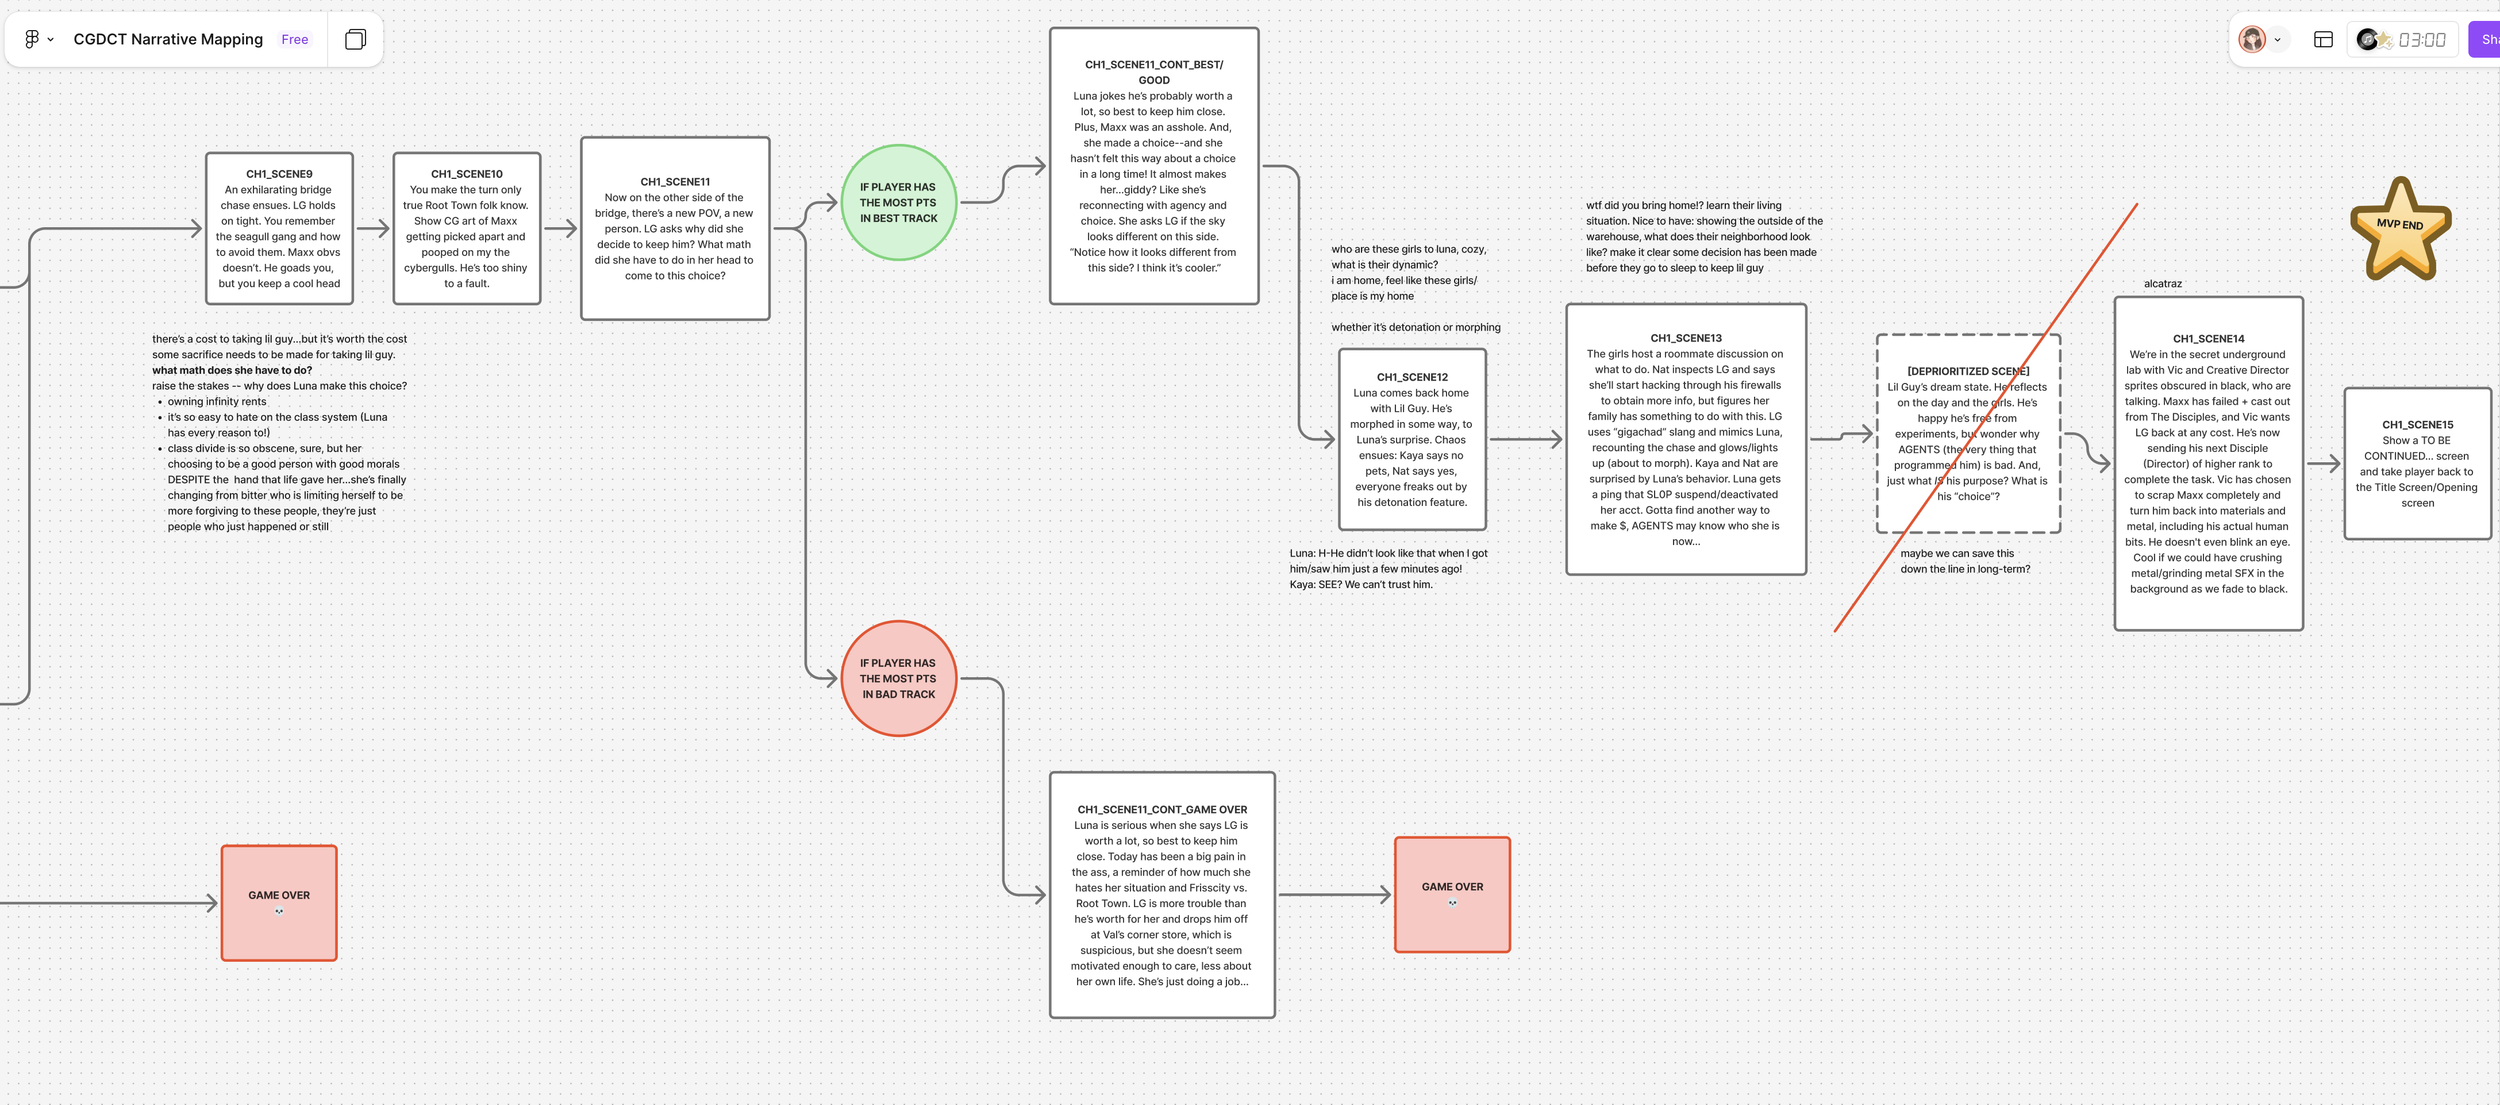
I developed a couple questlines for the game to tie back to our key themes of community, human connection, and coming curious
Helping the Cybergull
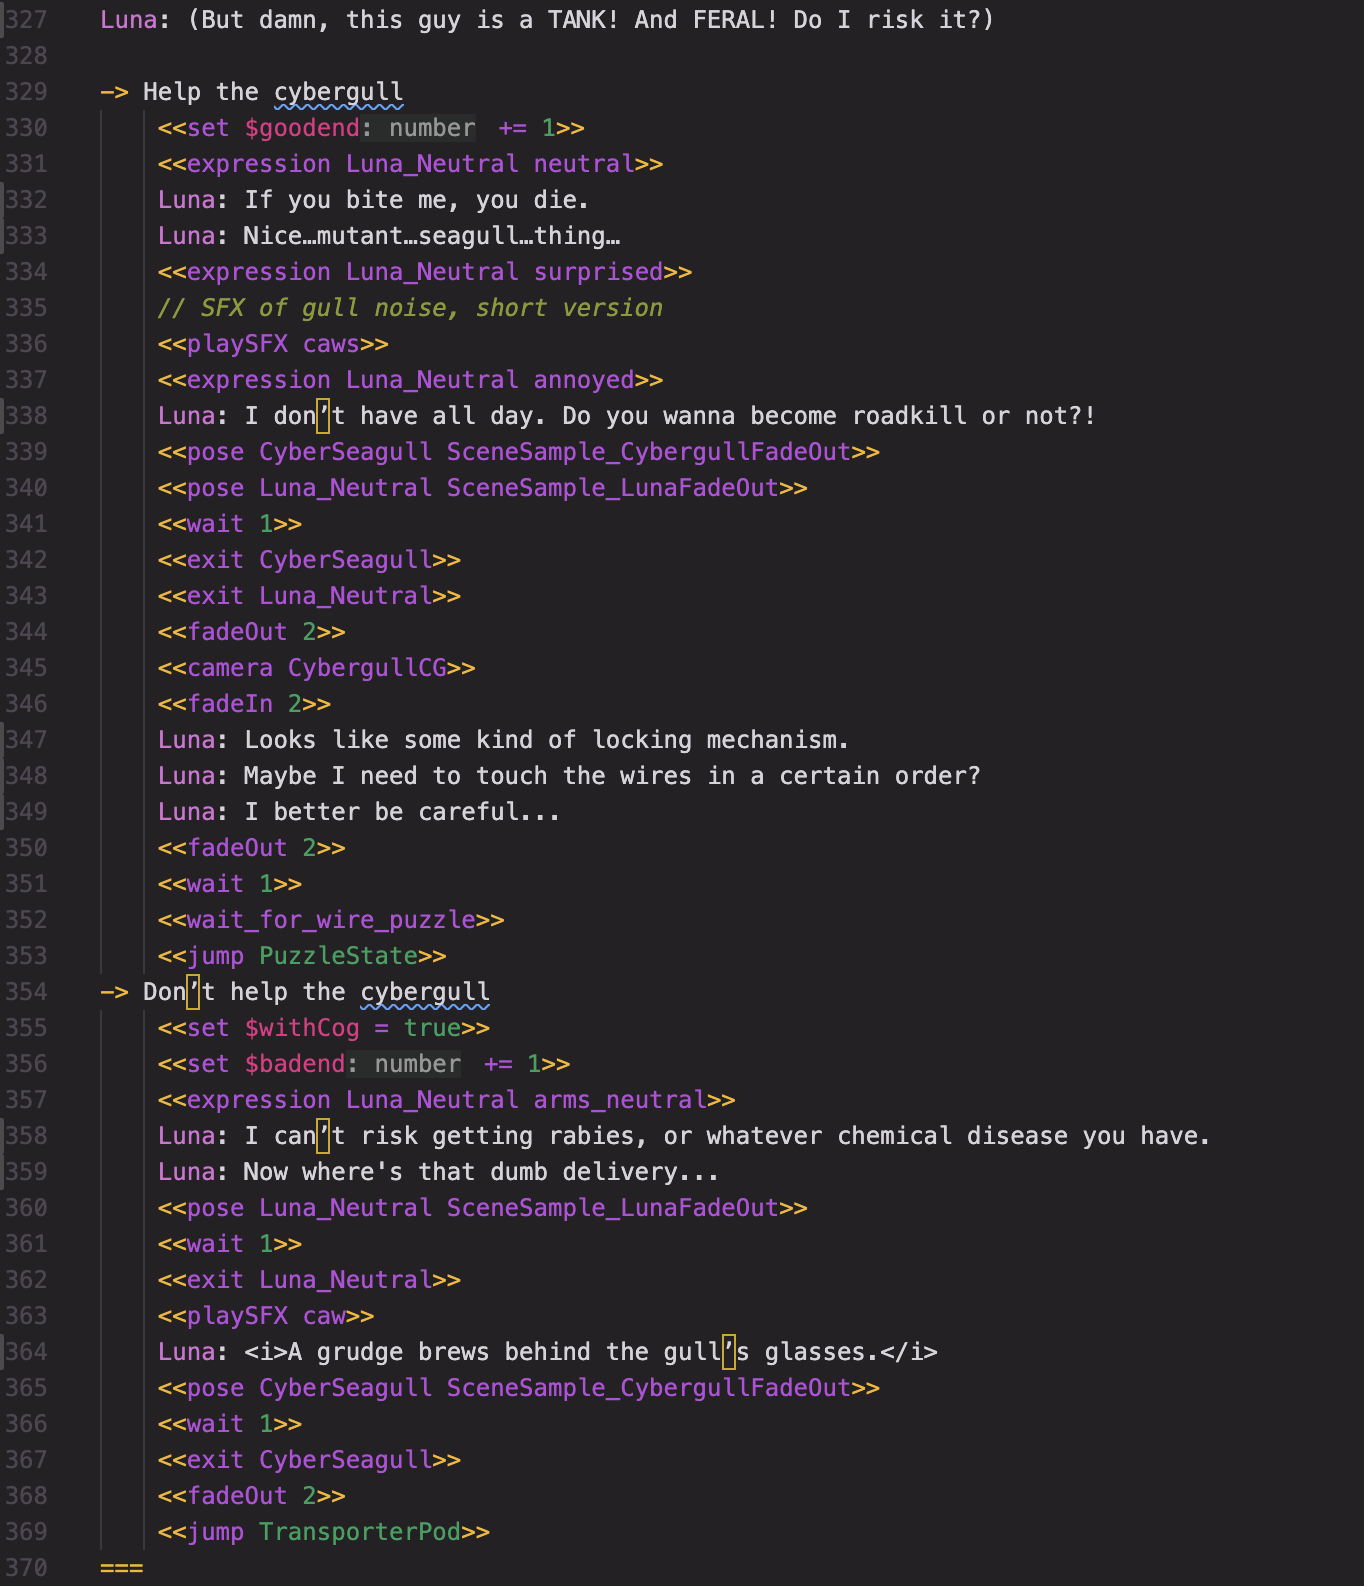
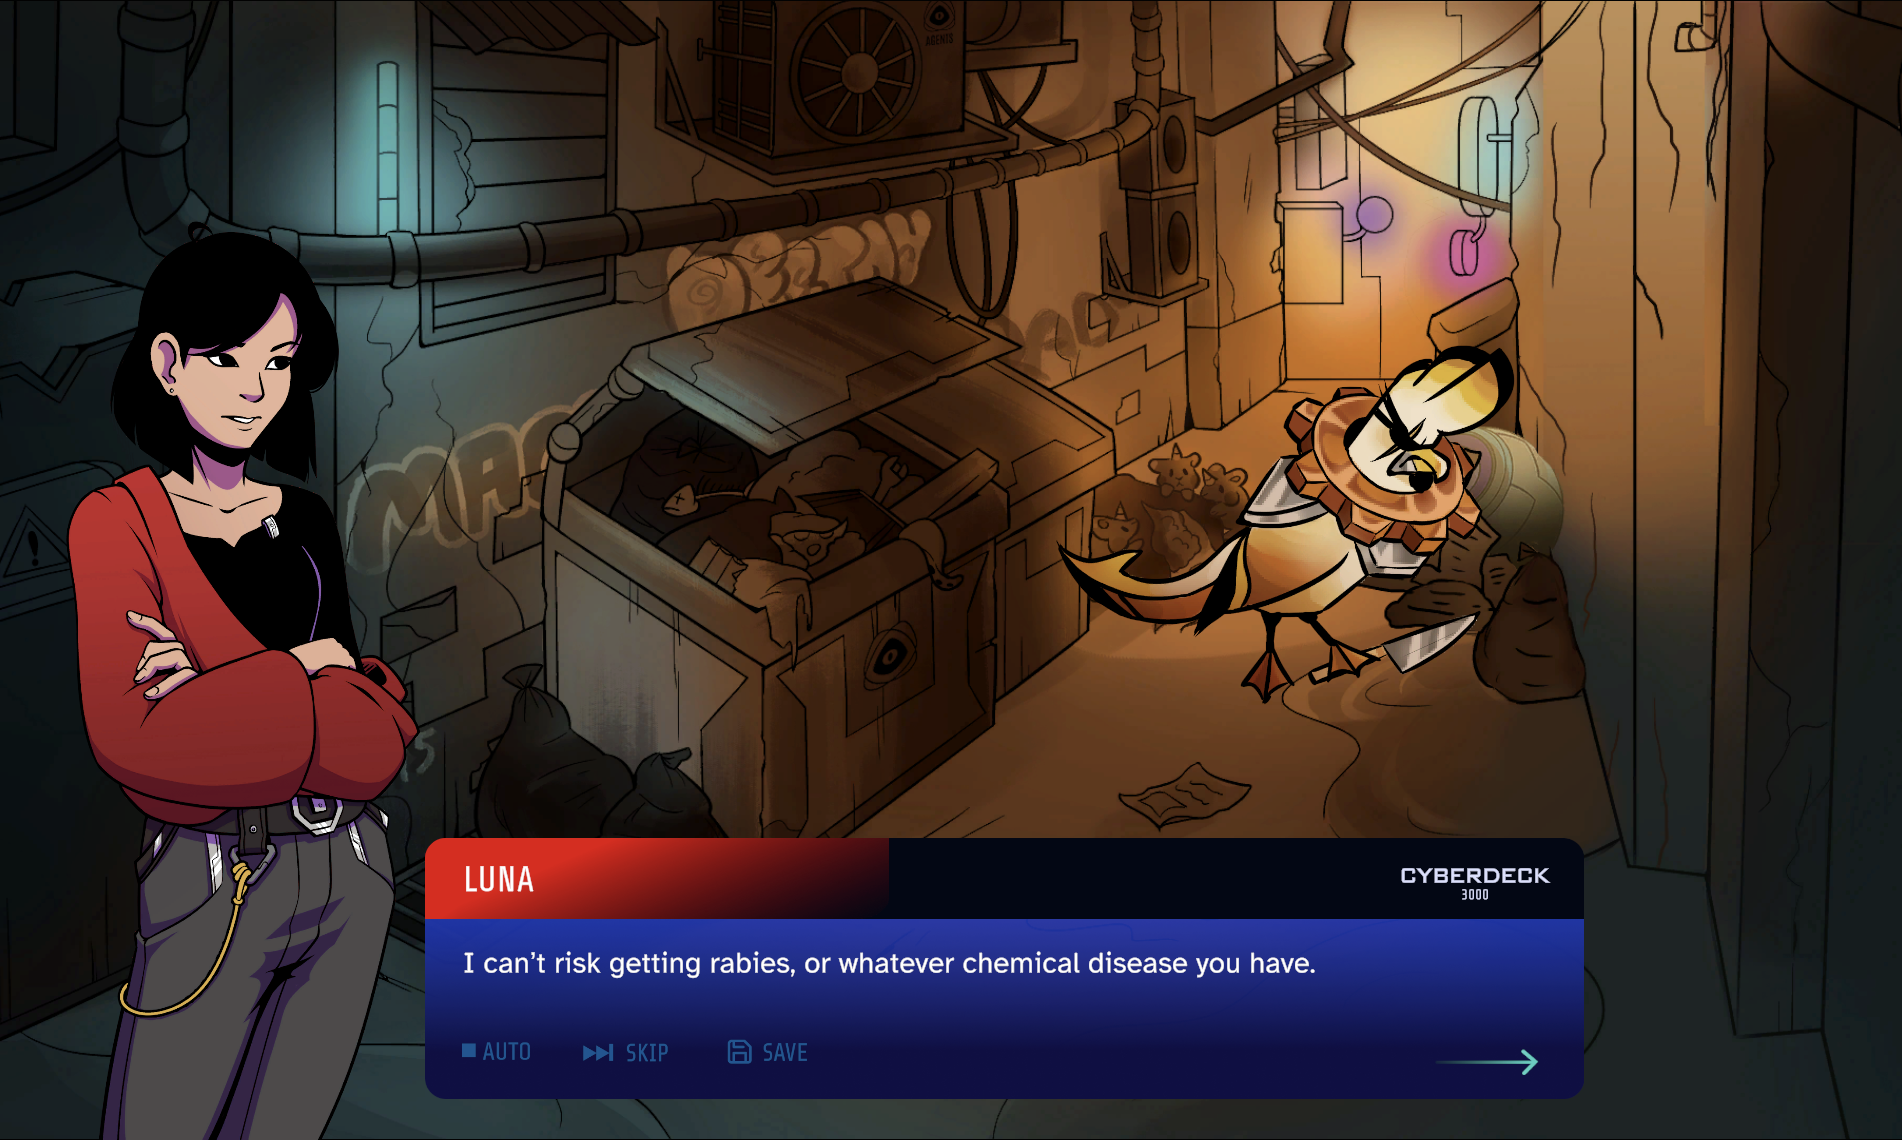
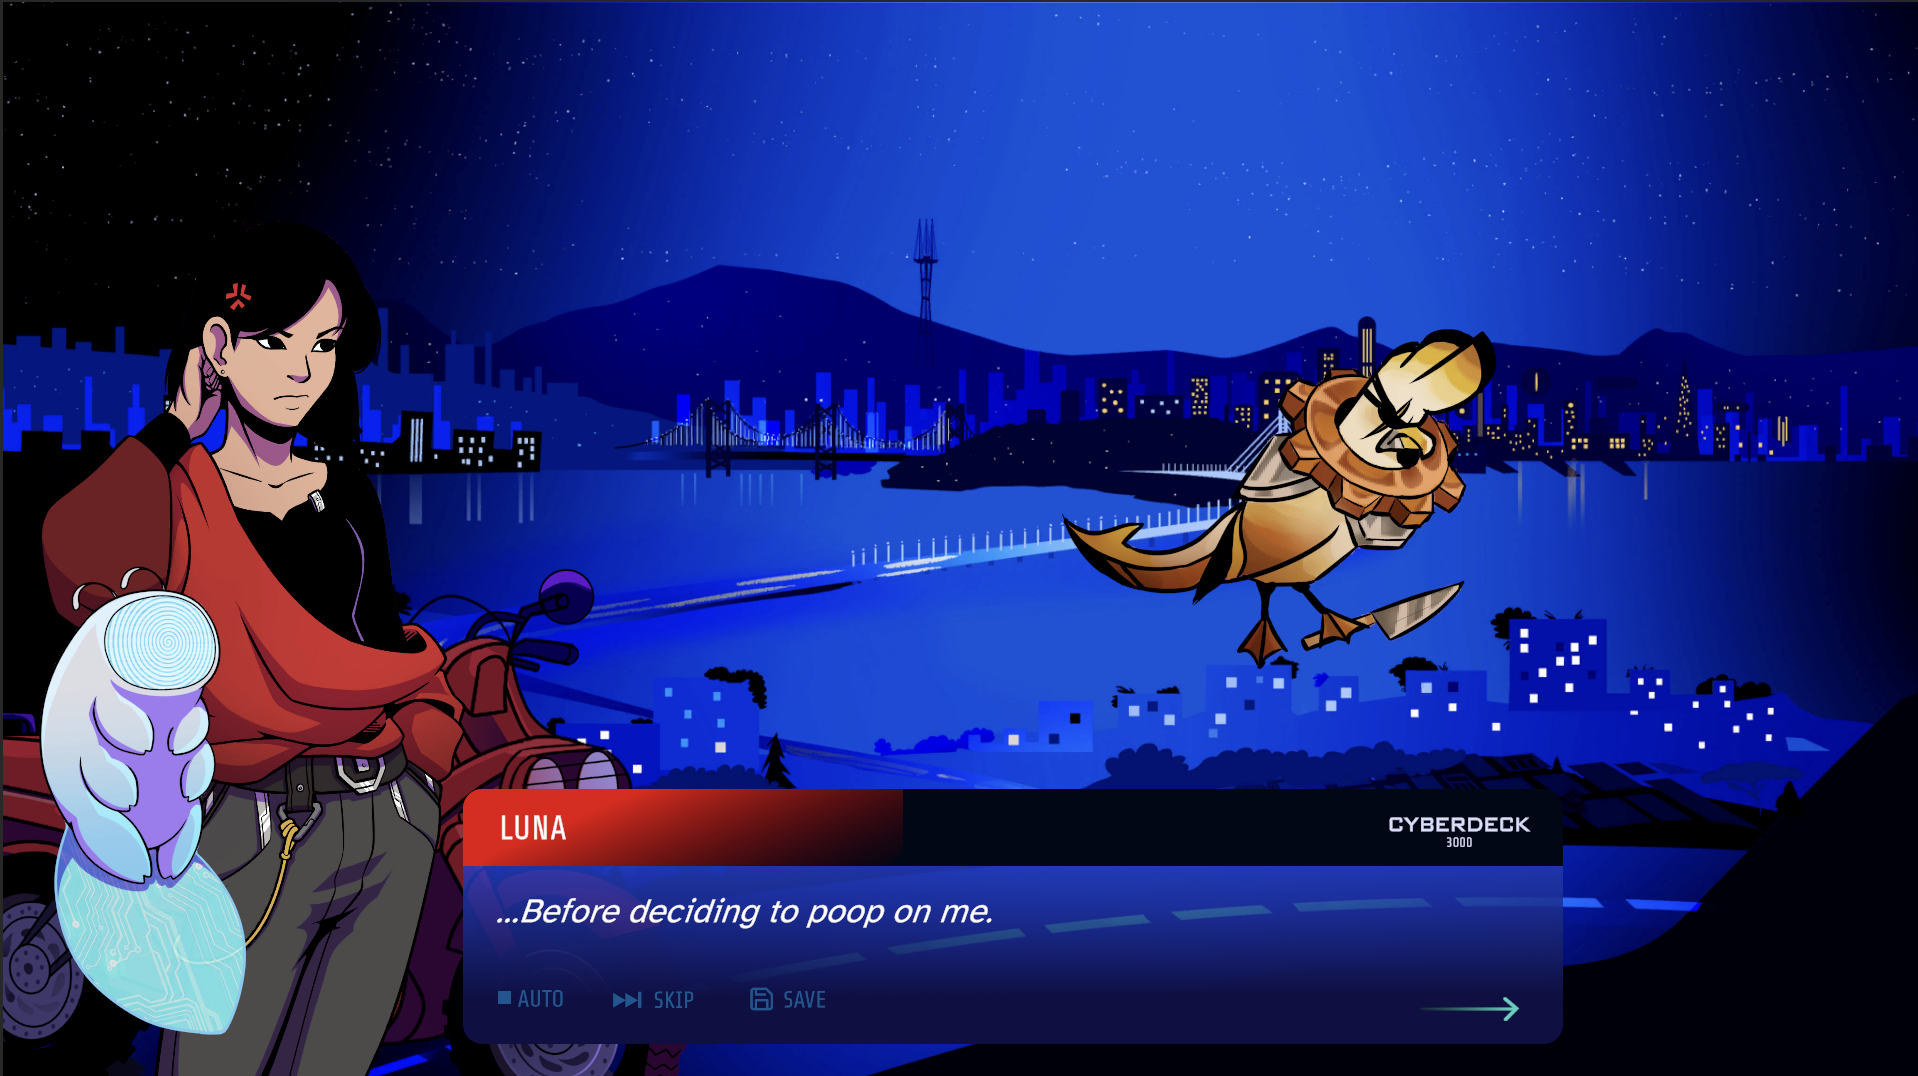
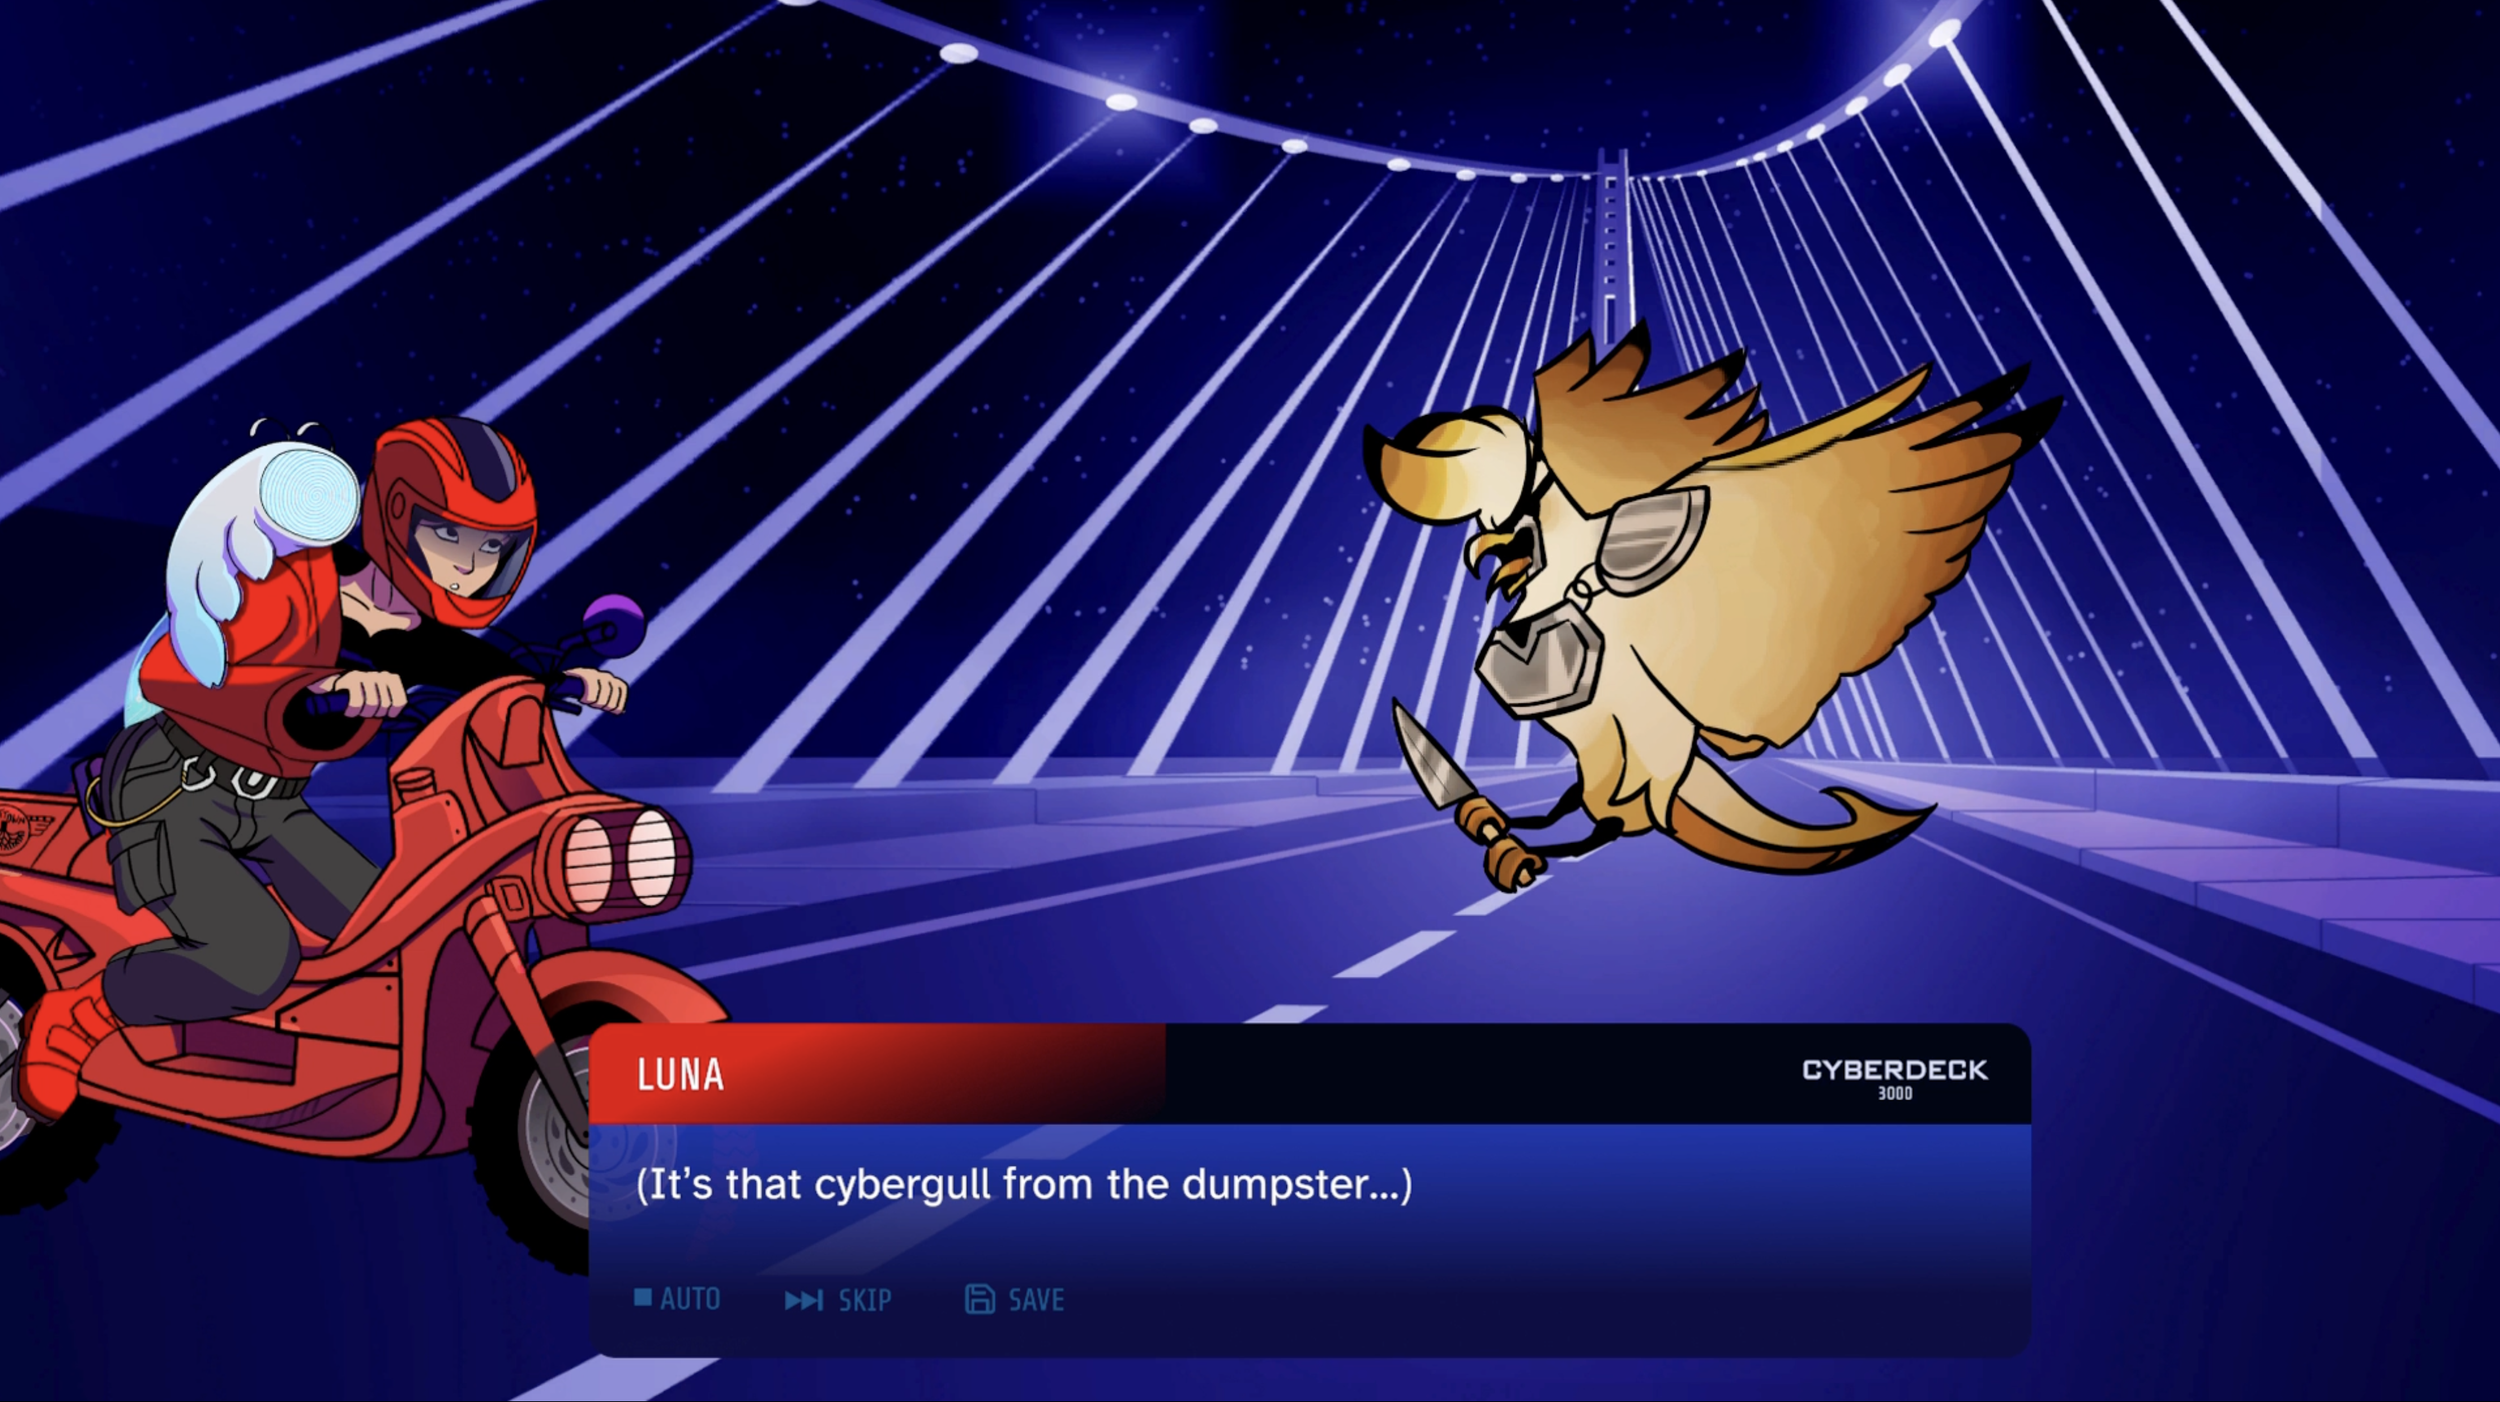
Choosing to help a robo-seagull NPC would lead to a puzzle game and affect how favorable the seagull gang leader would be in helping you defeat the game’s main antagonist. If you refuse to help him, the cybergull will poop on the player character as revenge.
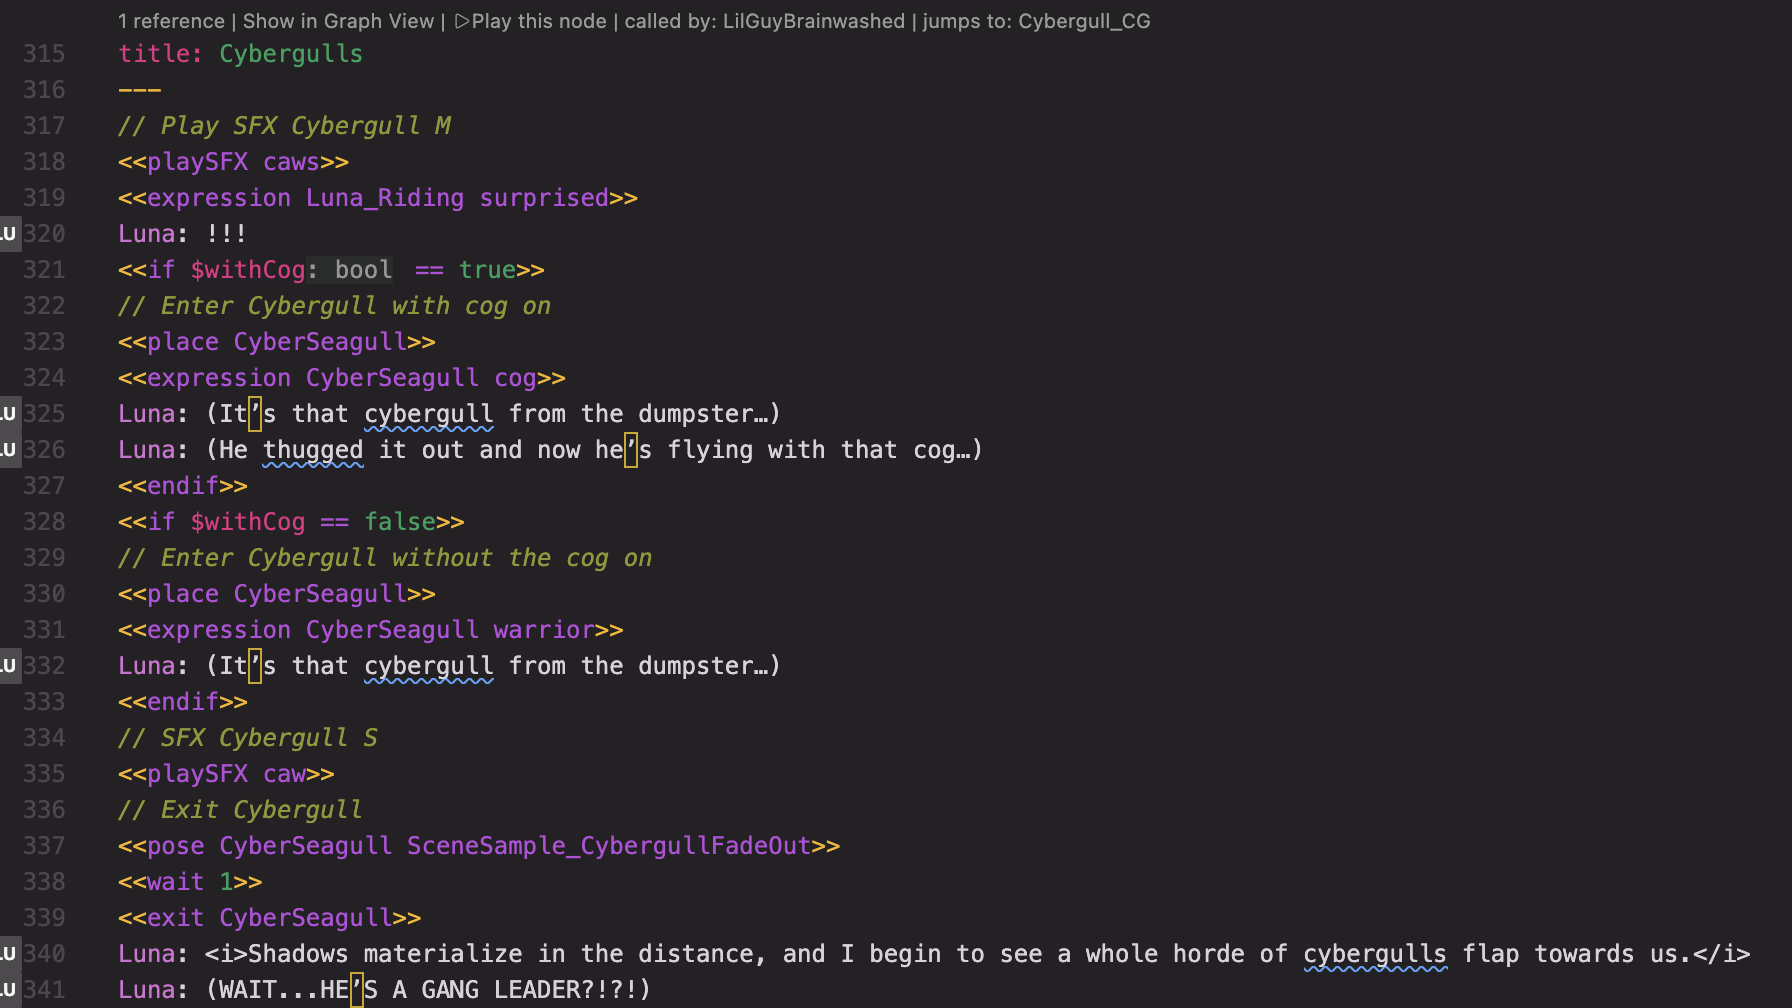
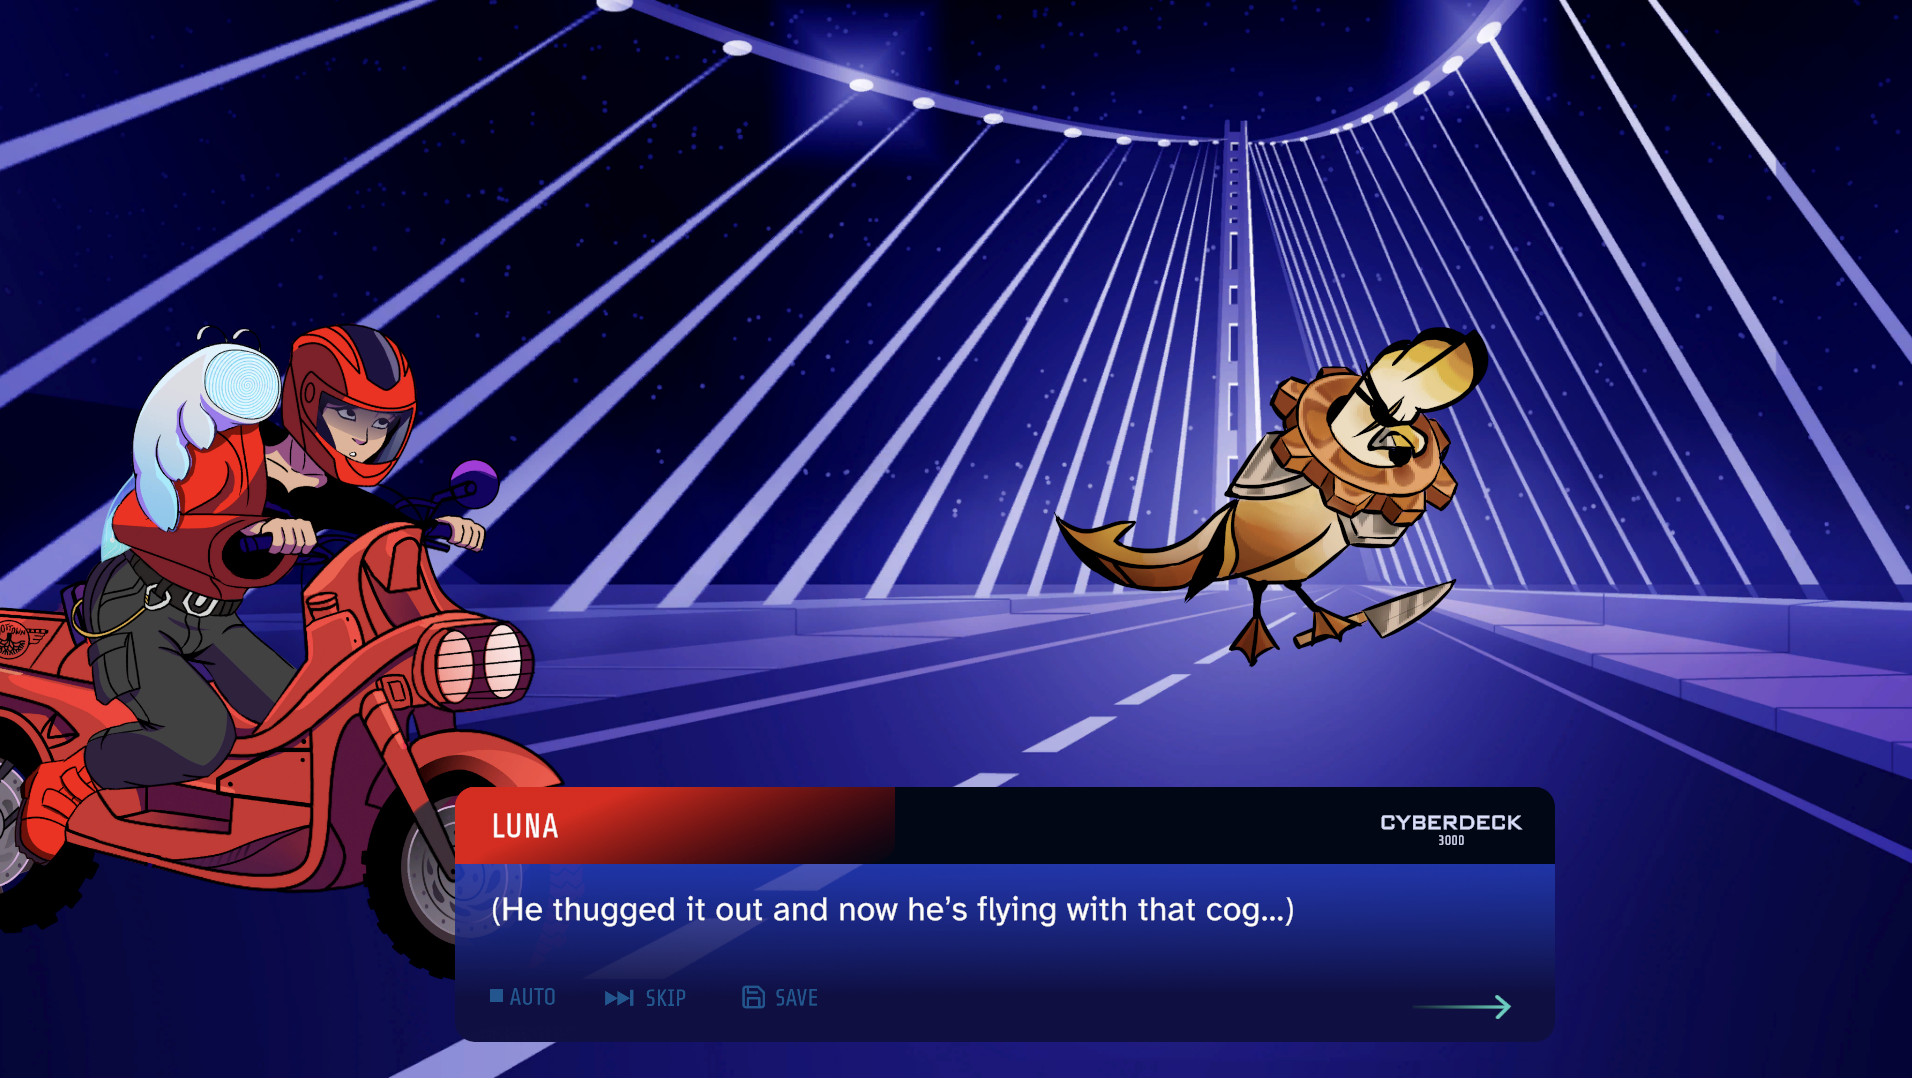
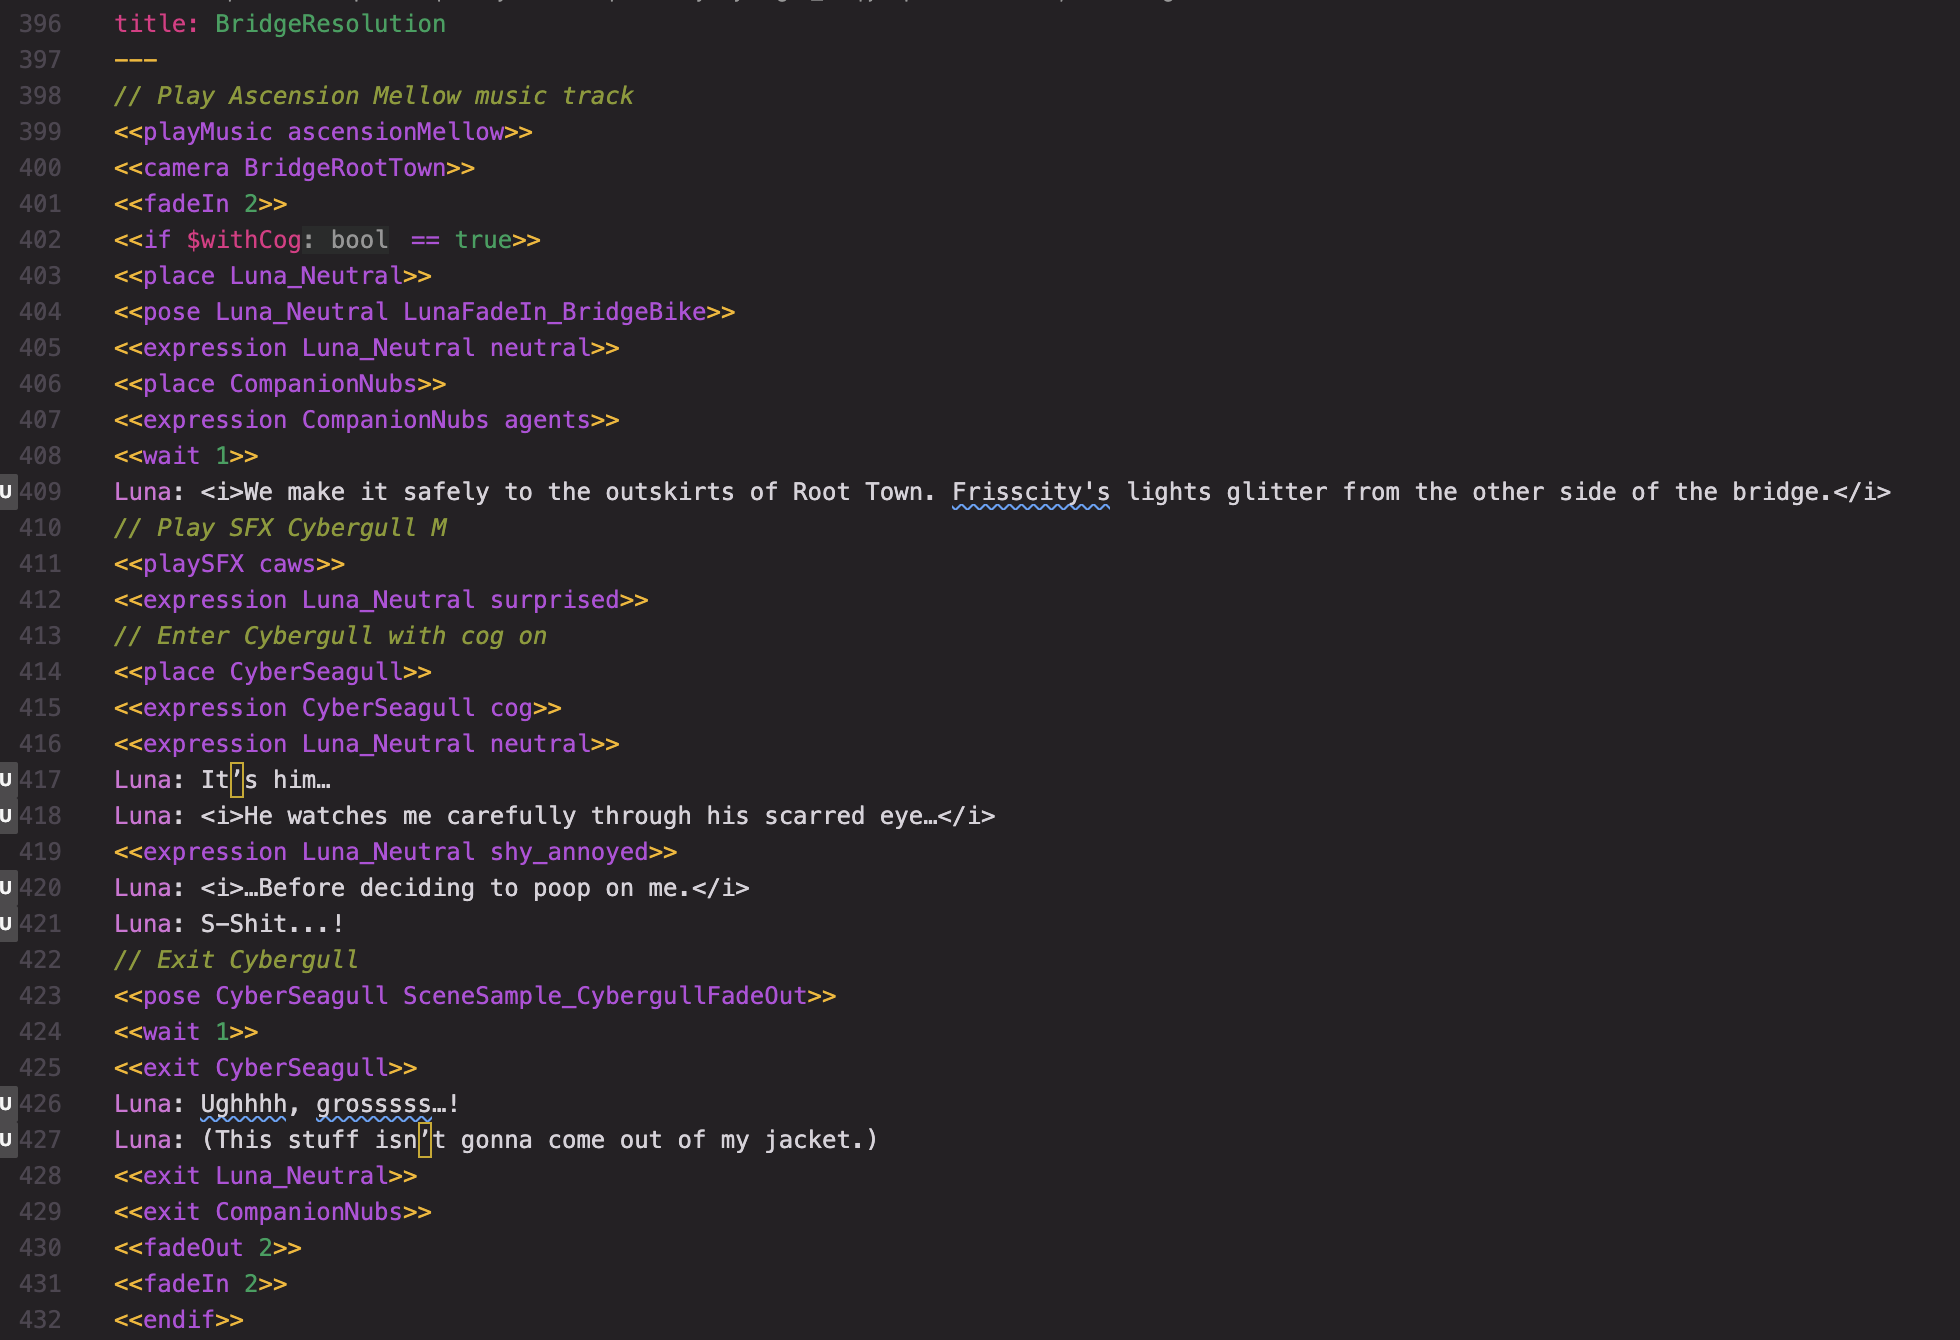
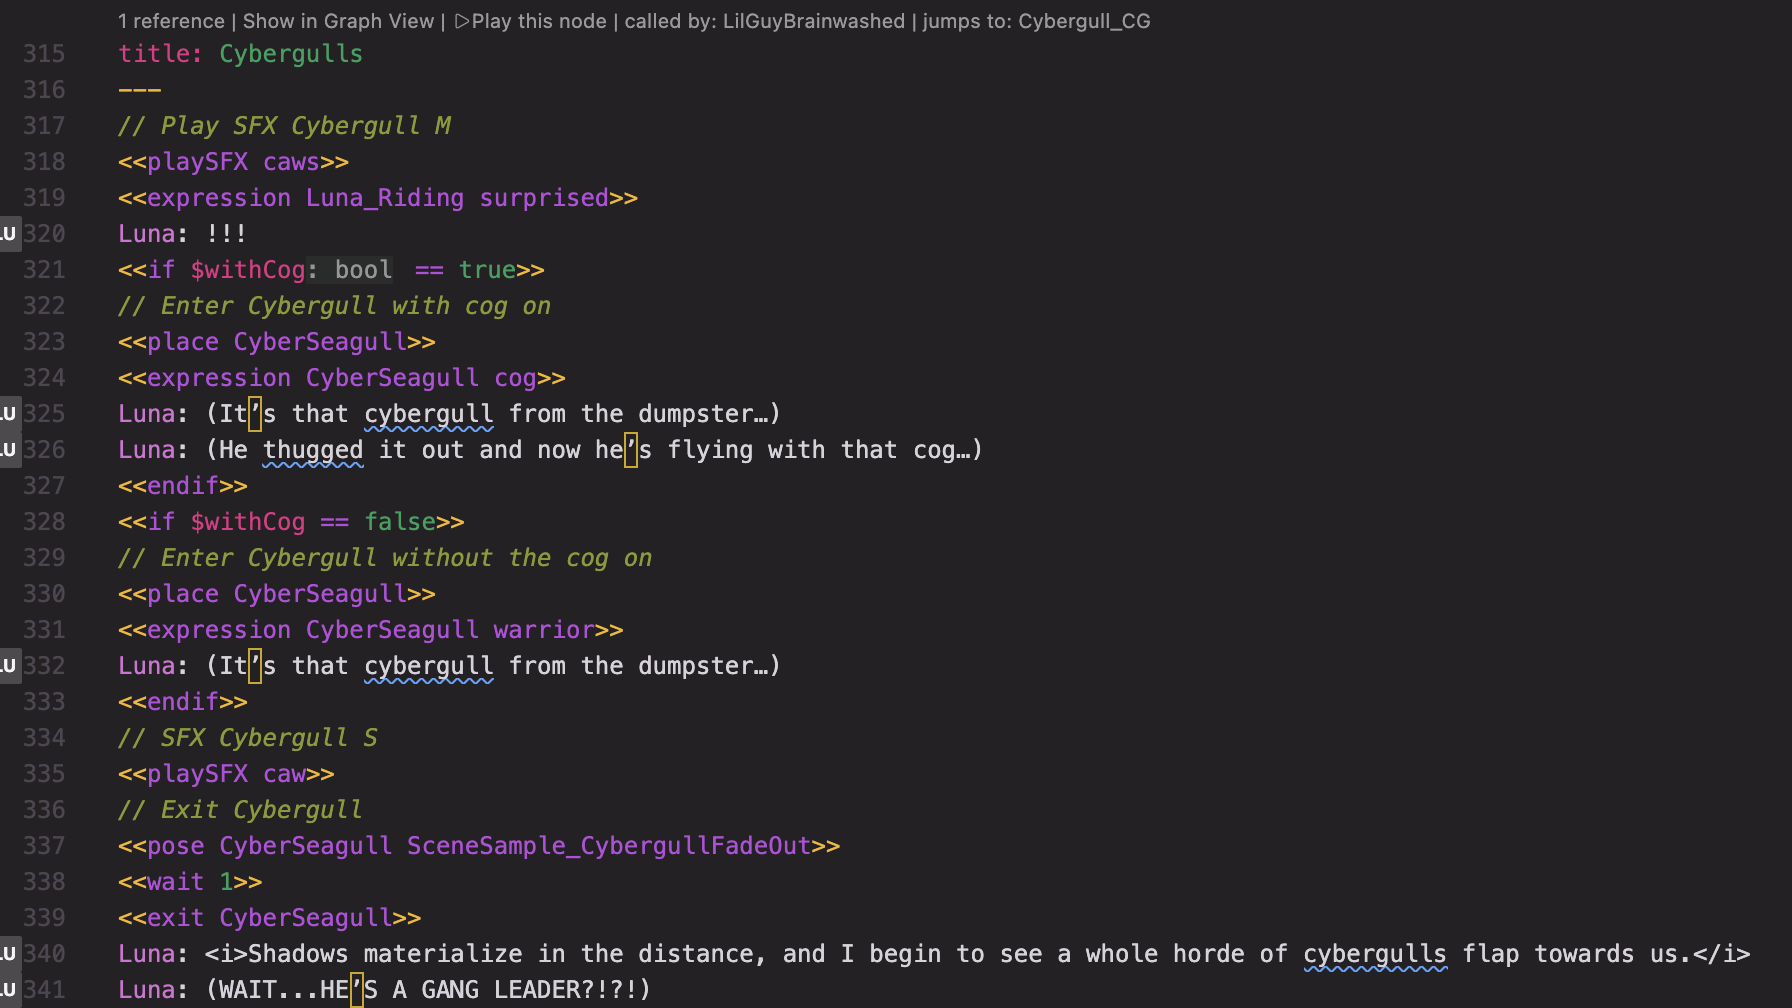
I had to create a variable called “$withCog” and could set the logic as “true/false” to determine which sprite of the cybergull would appear in scenes: either the freed version of the gull, or the one where his neck was still trapped in a cog.
Benji and Queenie (aka. Divorced Dad or Beauty Influencer NPCs)
The player character and her alien companion needed to work together on a food delivery and form a bond in order to make each character’s growth arc more believable.
This is why an NPC questline was crucial to our visual novel, sort of like the ‘middle layer’ of three-act story structure.
To keep the game reasonably short (~30-40 minutes max) and to also encourage replays, I designed Benji and Queenie’s questlines so that the player couldn’t encounter both NPCs in the same playthrough; they’d have to replay to see who the other character they could deliver to.
When creating NPCs for a futuristic San Francisco, I didn’t want to make them outright villainous people. Our player character Luna might perceive them that way—since that’s her core belief that needs to be challenged—but they needed to be redeemable and complex without over-explaining their whole life story.
This is why I decided to make the hometown of both NPCs the same as the player character. This would create some common ground that could be uncovered if the player delved more into the storylines and interacted with the world around them.
Rewarding the player for diving deeper into the world and characters
Our team’s design philosophy was that players should be rewarded for coming curious and interacting with the humans around them, especially in a cold, futuristic world where tech reigns supreme.
For example, I designed clues for the puzzle and embedded them into the narrative choices. If the player decides to lean into Luna’s desires to impress her crush and get to know her more, then Val will drop hints for the wire puzzle the more you interact with her.
This rewards the player by providing up to 3 clues to help solve the wire puzzle in the game.
How I did it: Creating variables, booleans, and return logic in Yarn Spinner’s “Yarn” language
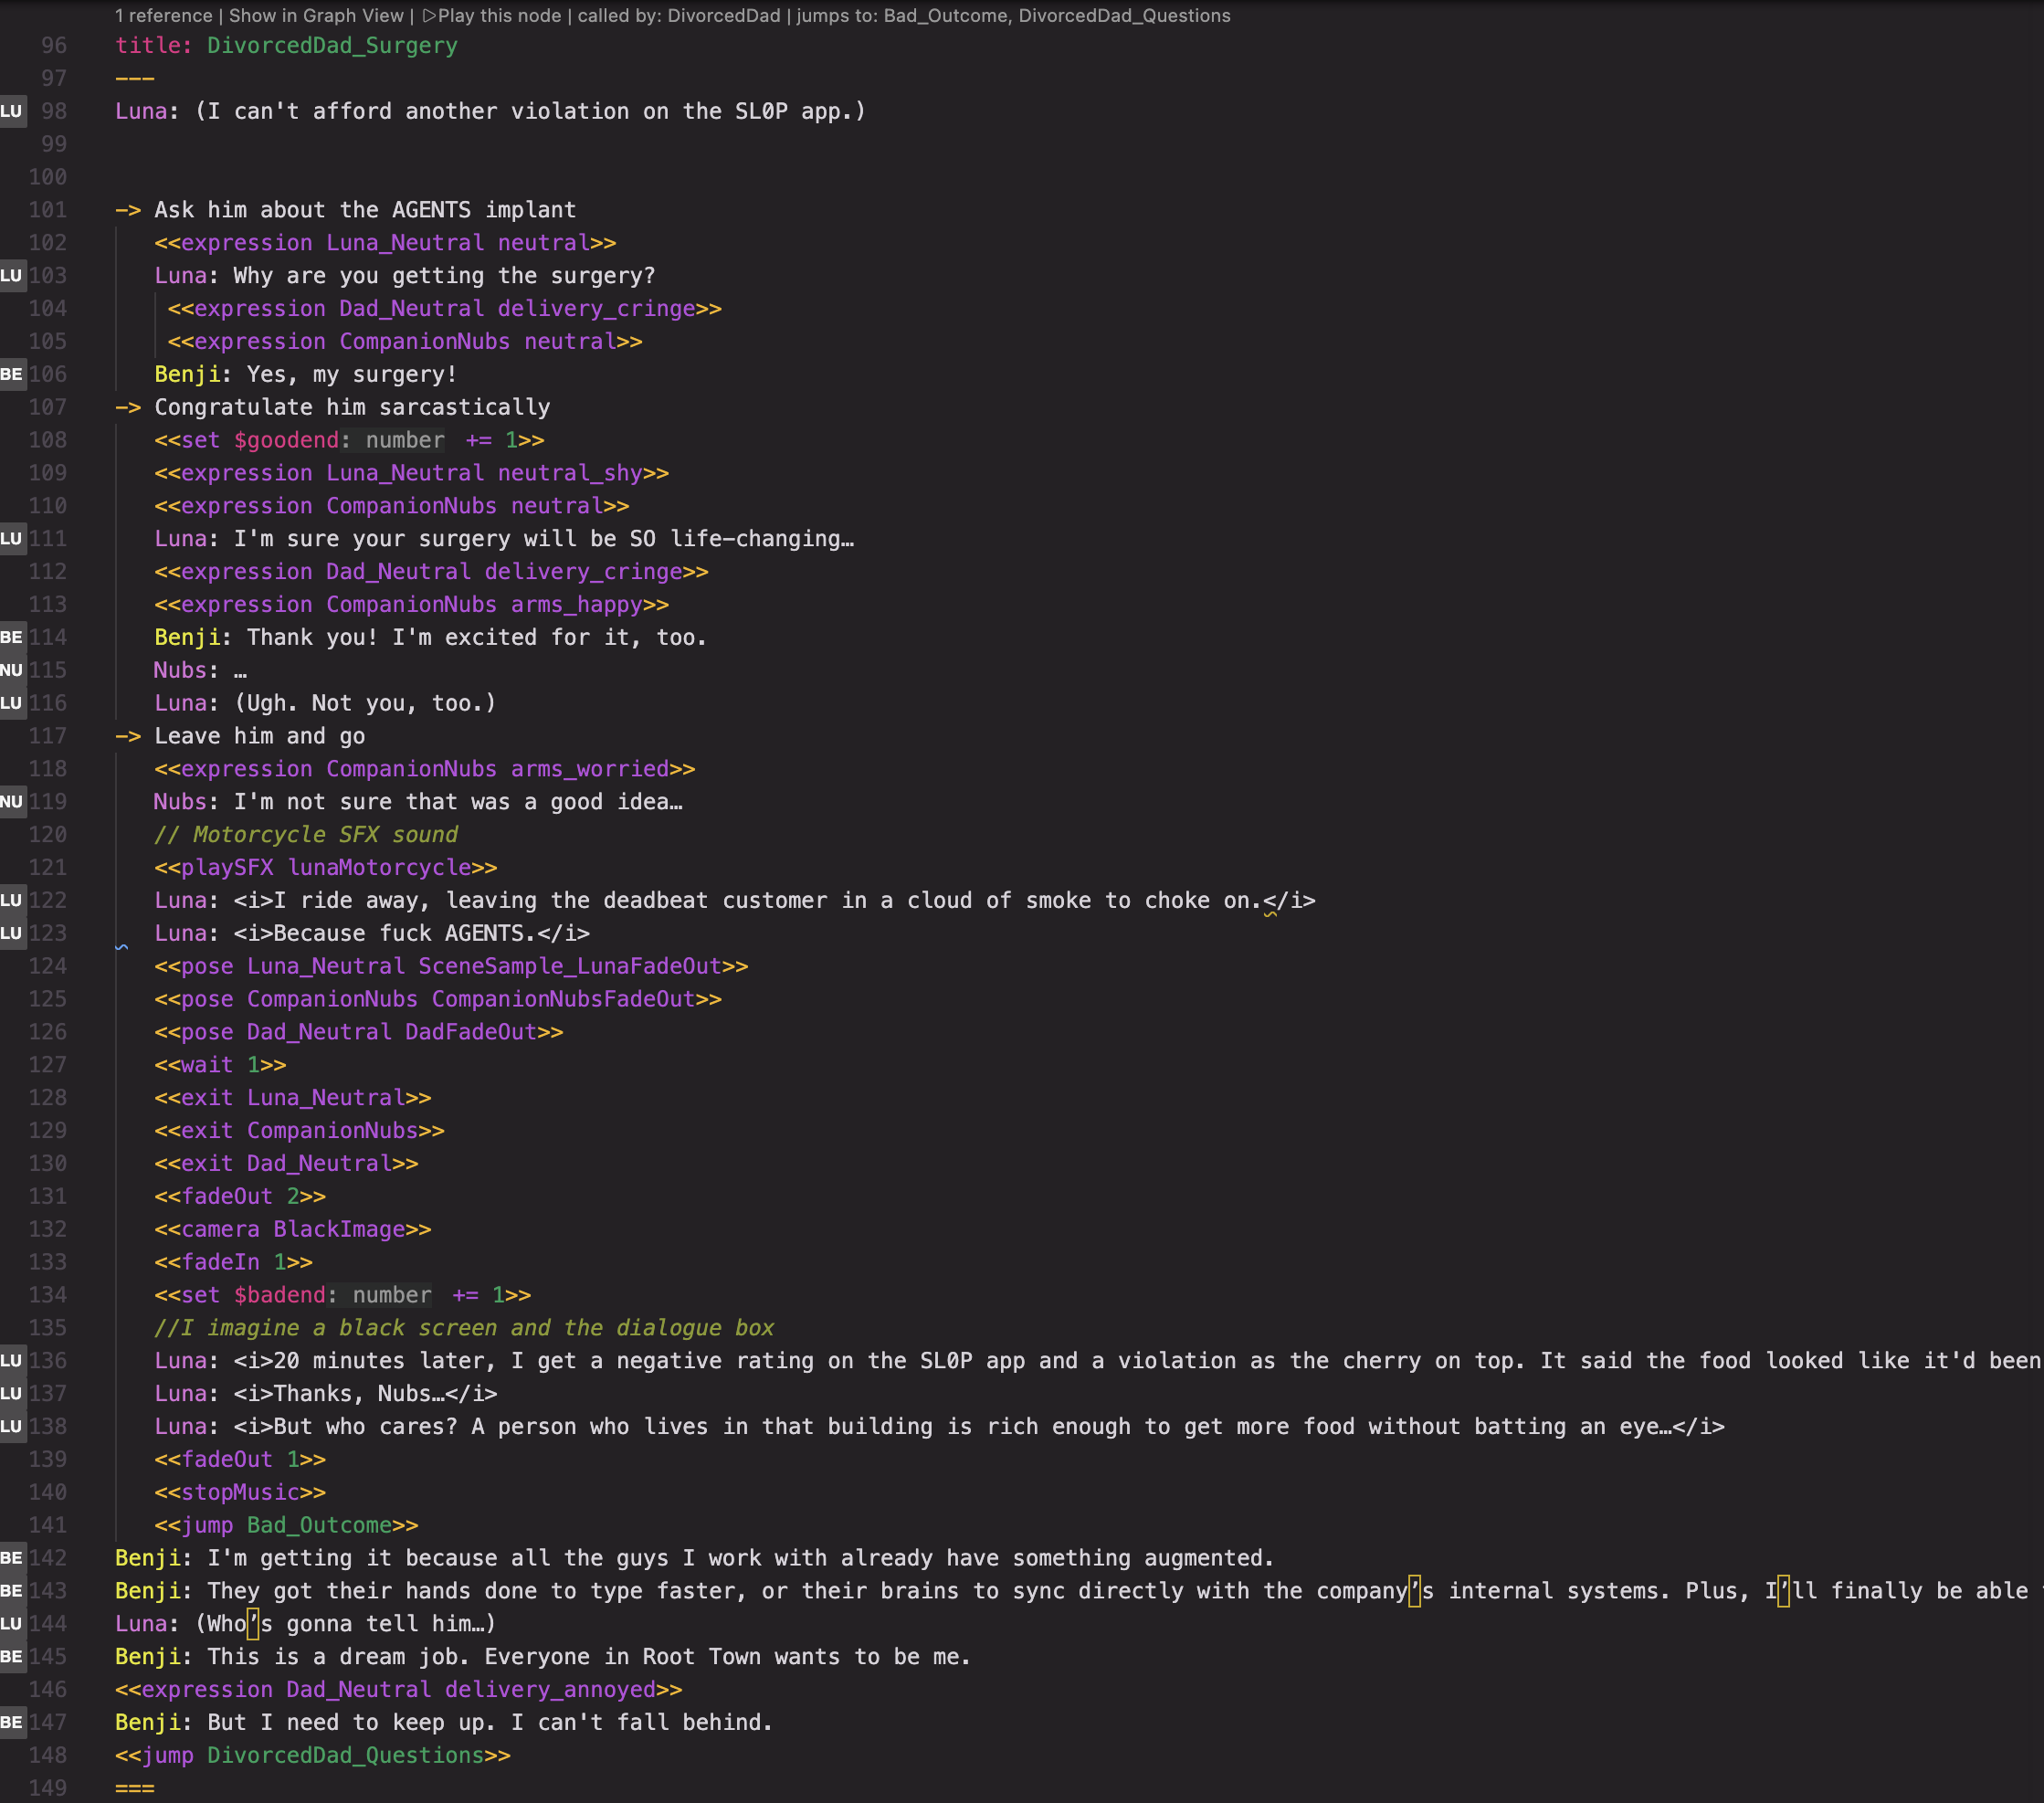
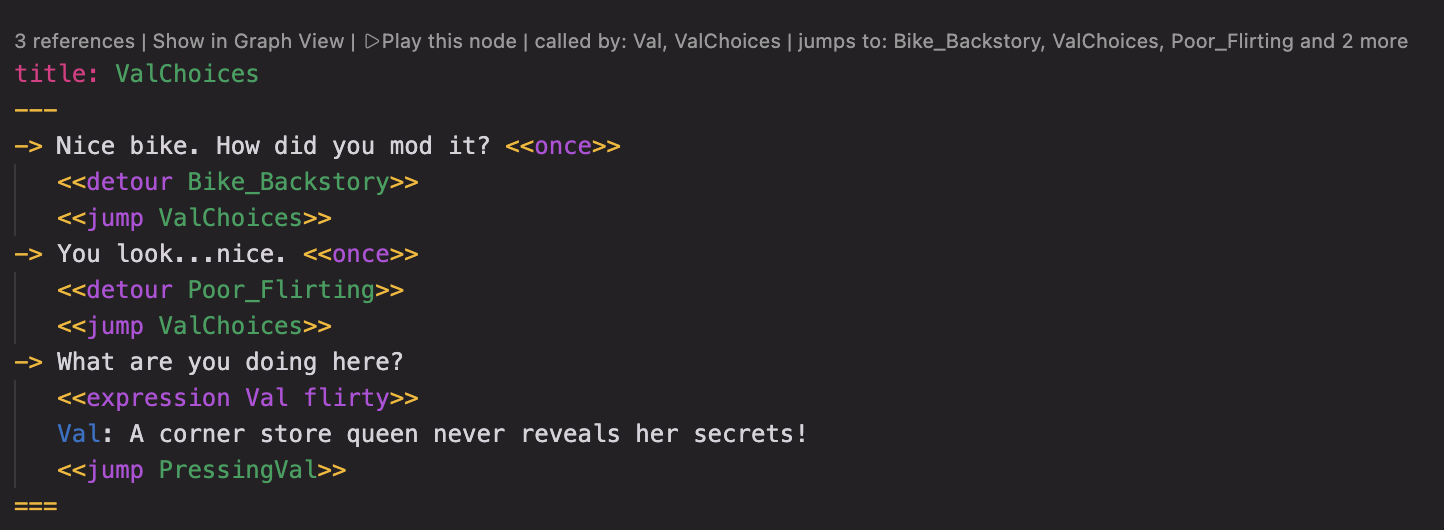
I read Yarn Spinner’s developer guides to help me write variables, which were written with “$” as well as «if» and «else» commands to help provide true/false logic for said variables.
I also learned how to use the «once» and «detour» commands, which return players to an original choice branch.
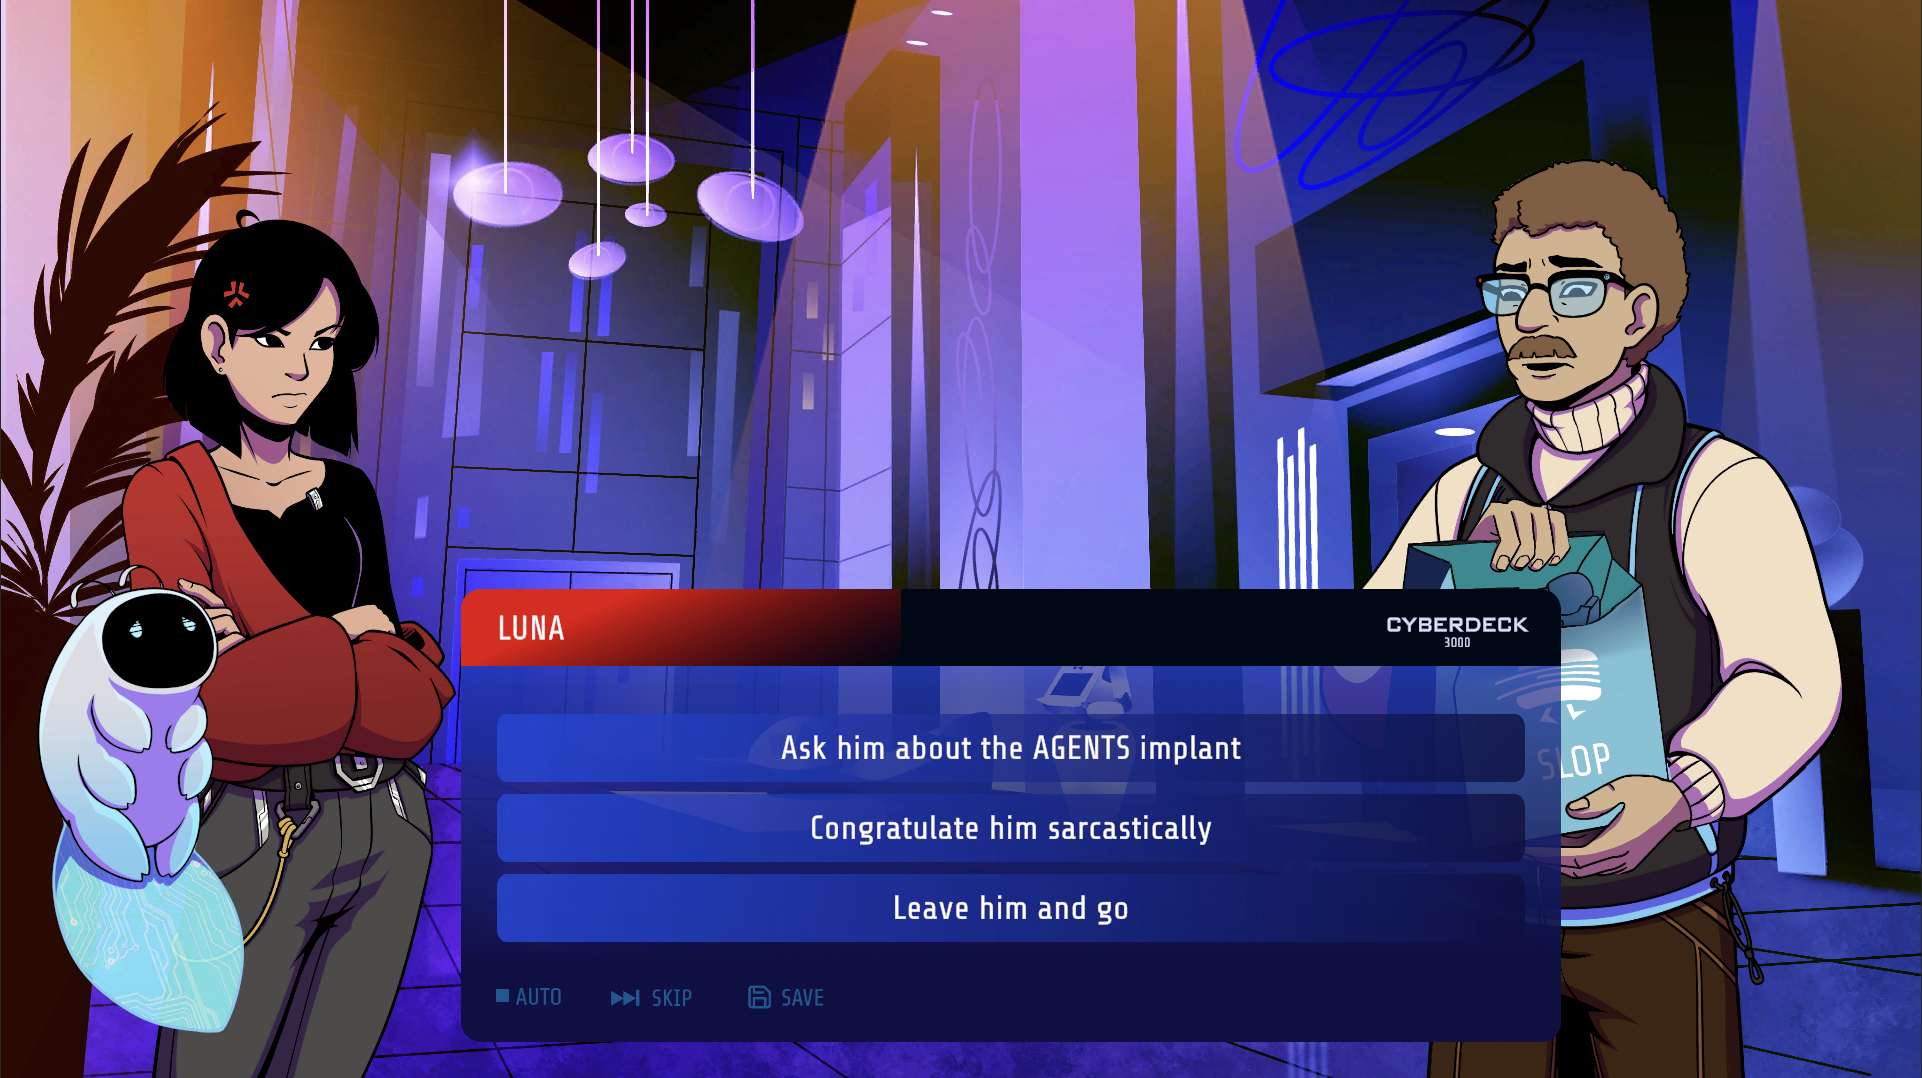
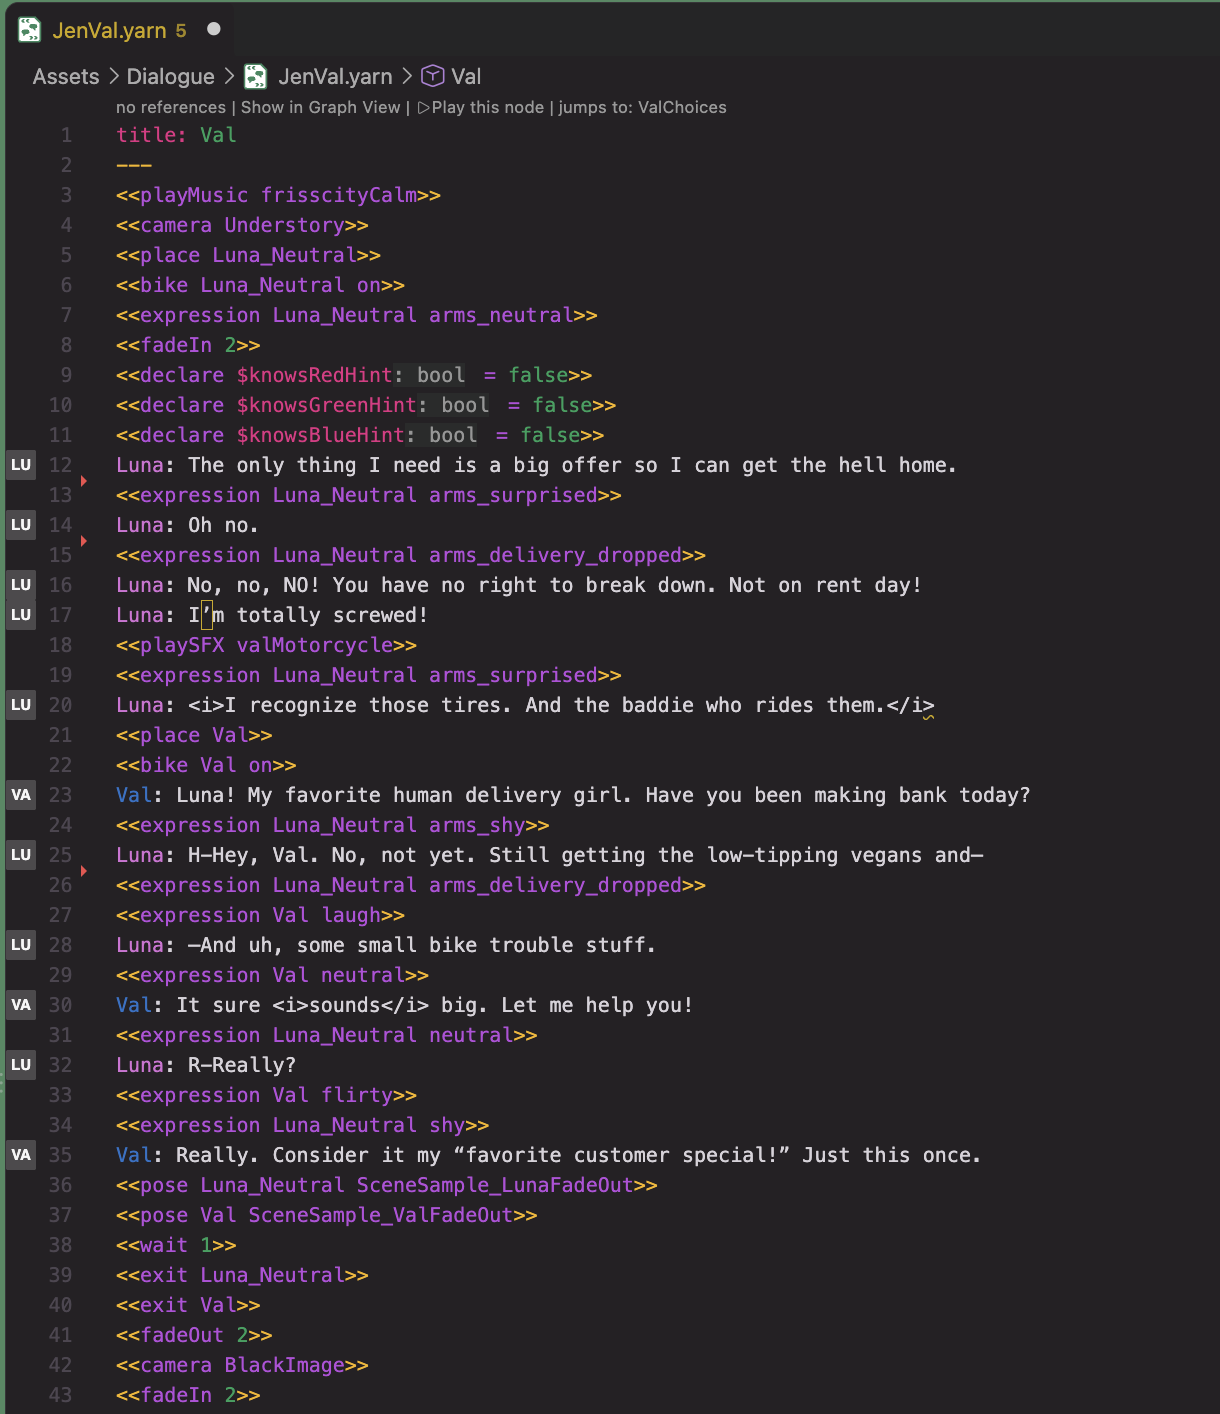
Here’s a side-by-side comparison of the Yarn dialogue I wrote in Unity, and how it showed up in the game:
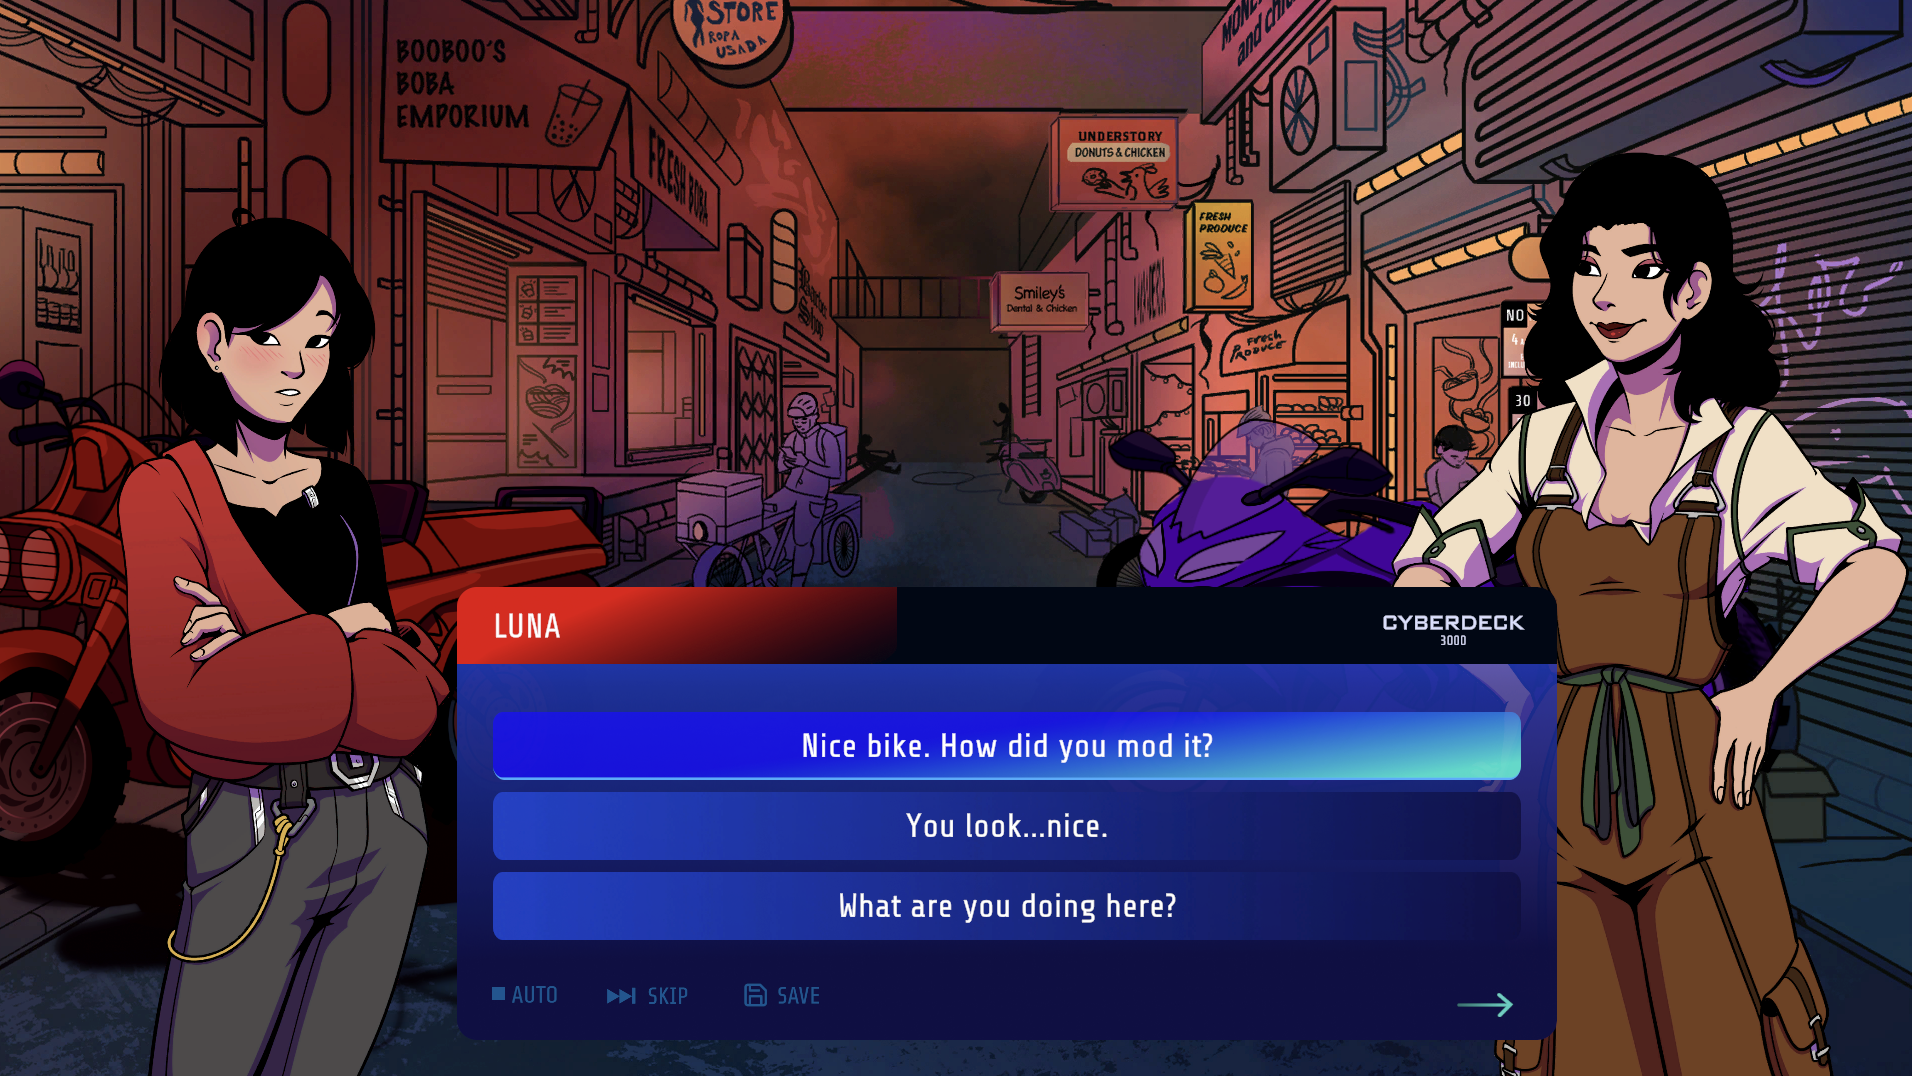
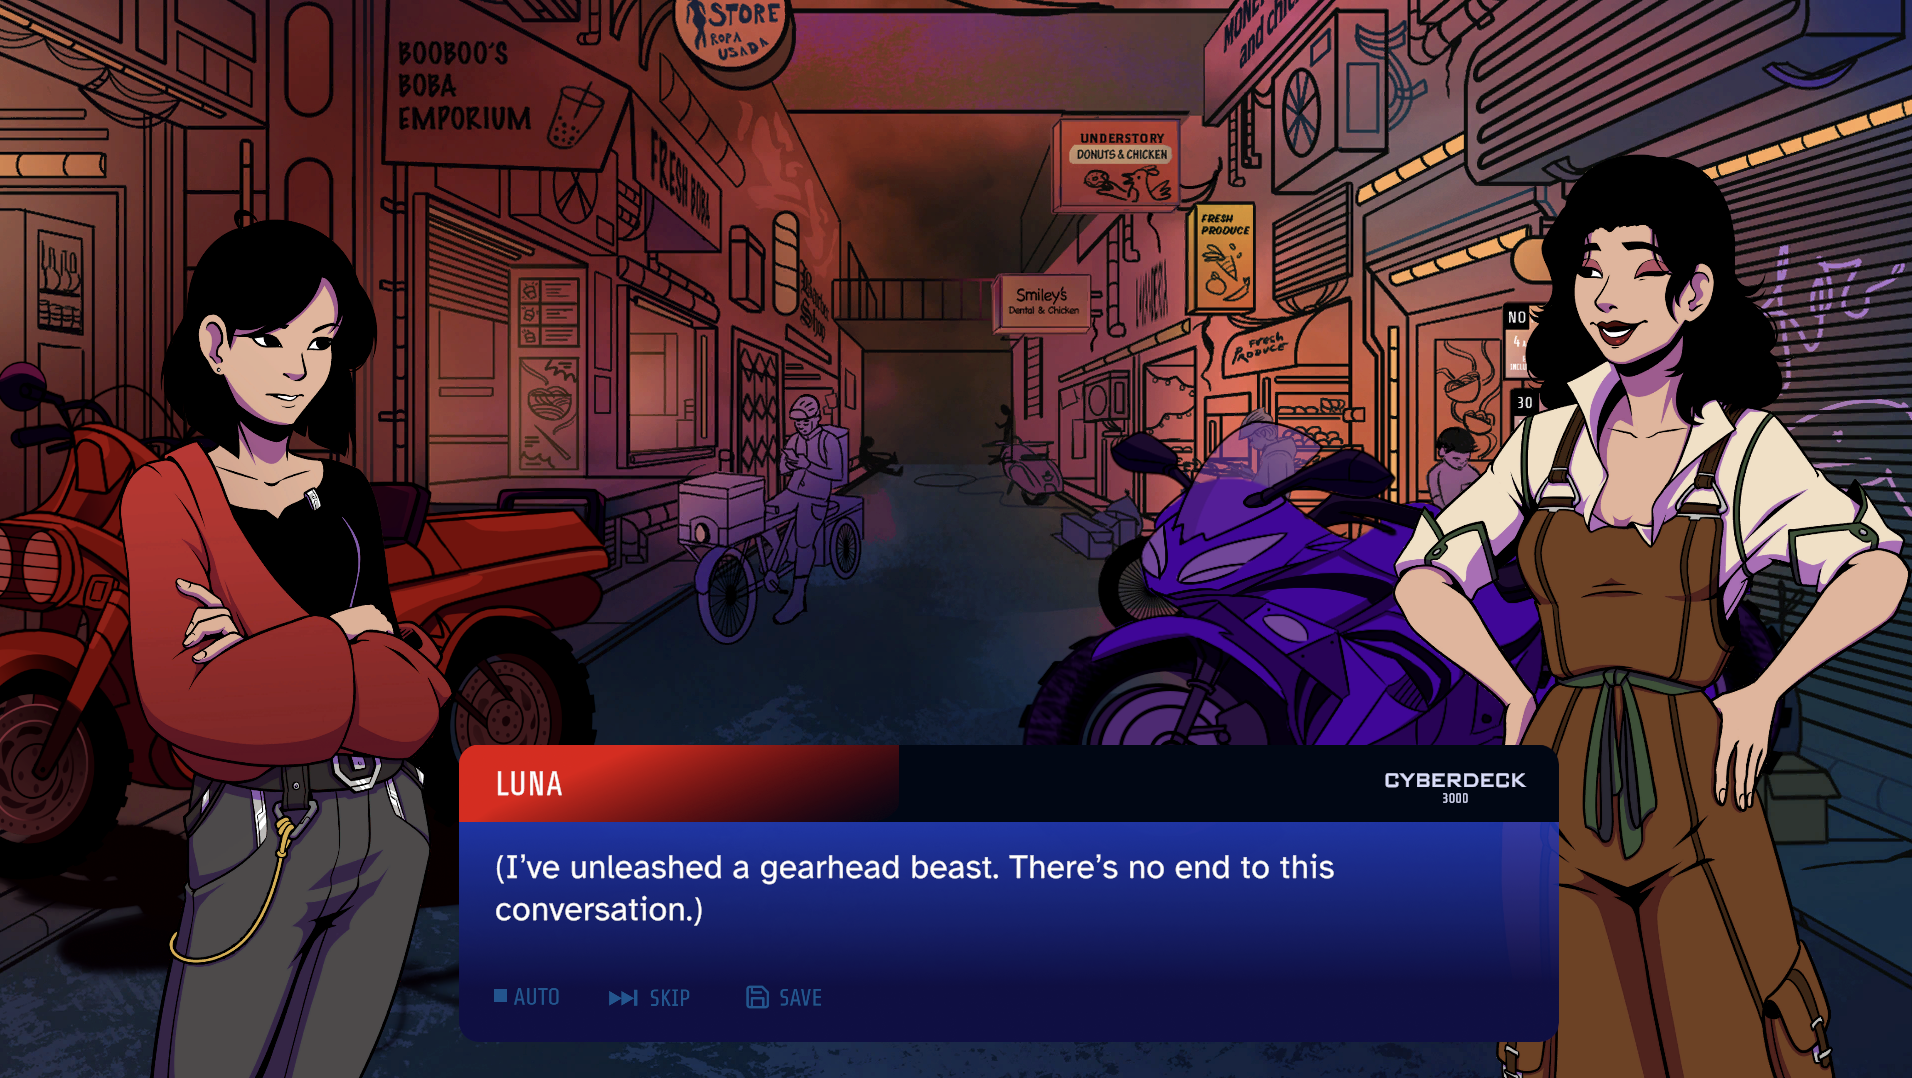
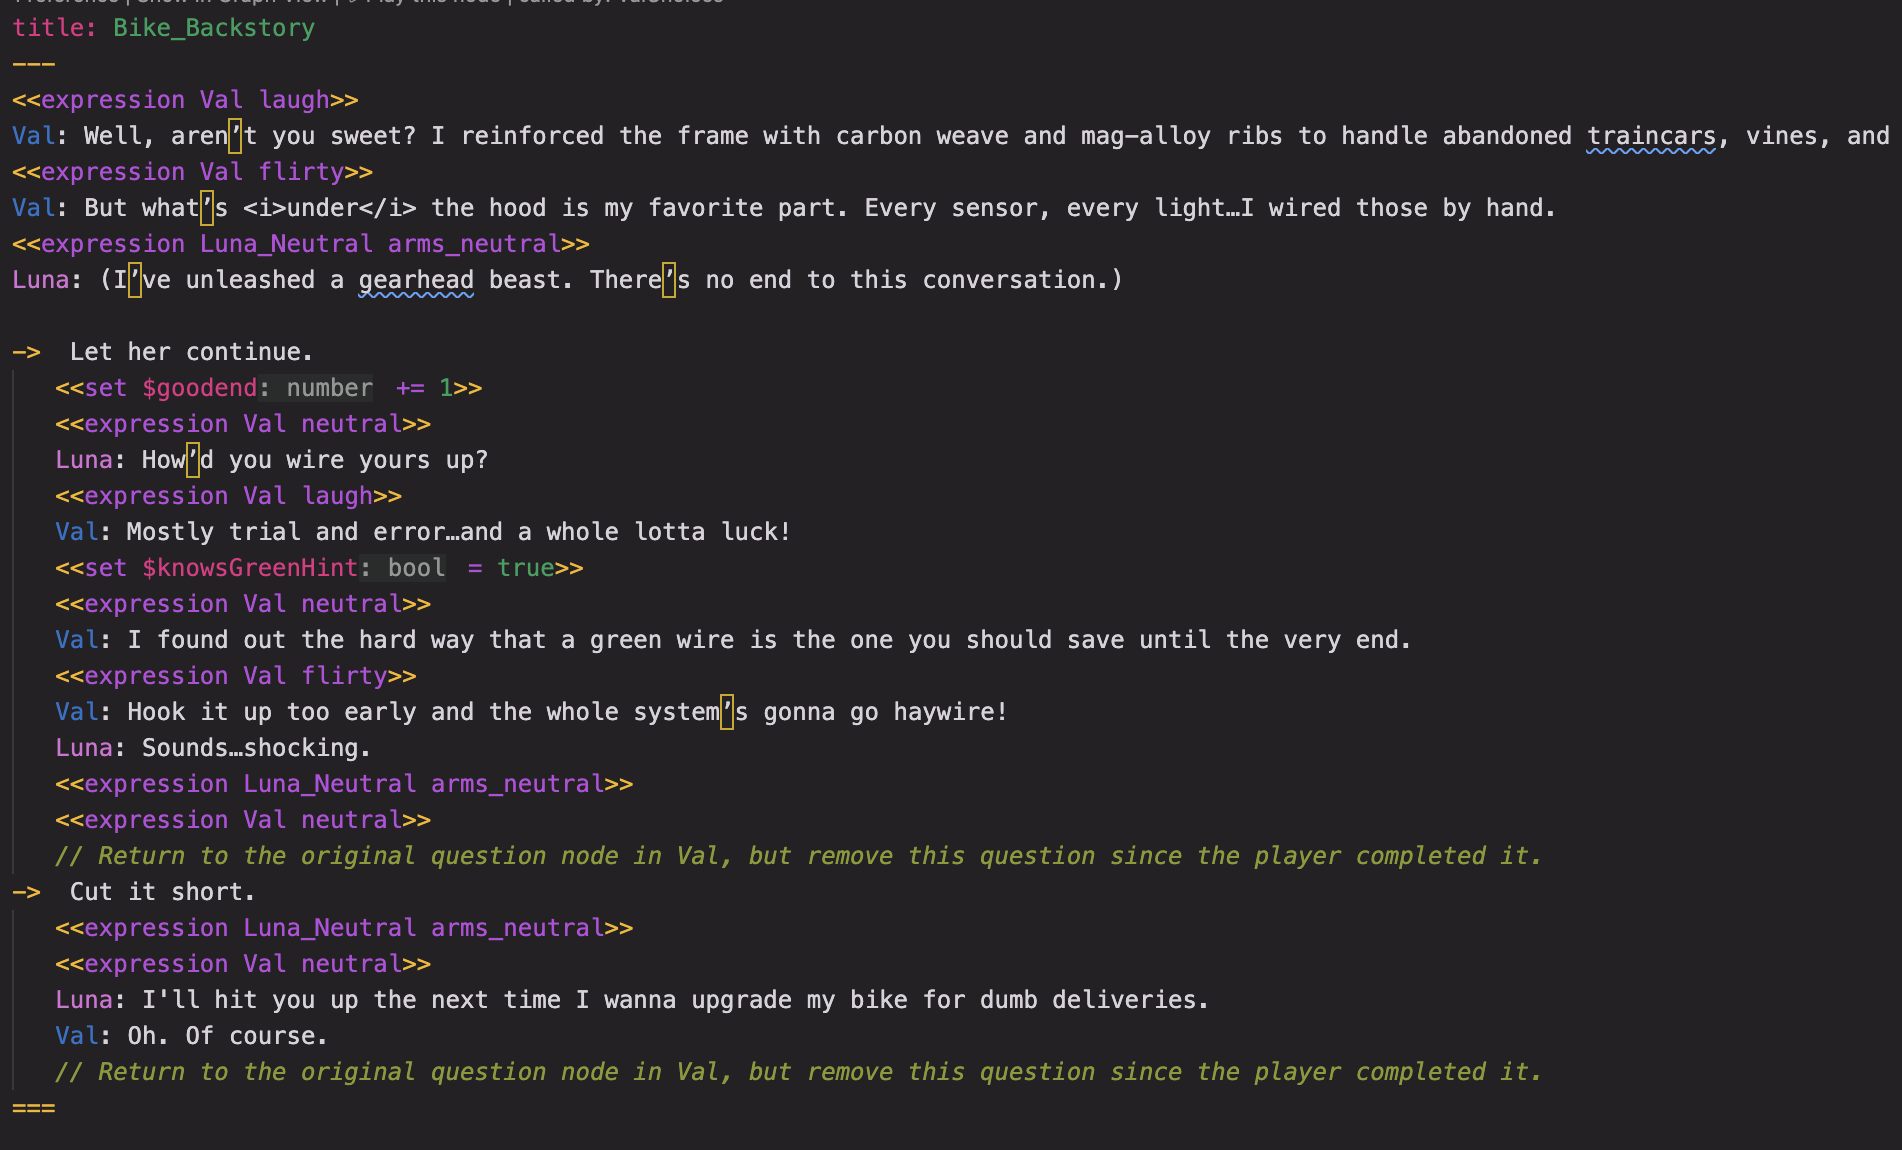
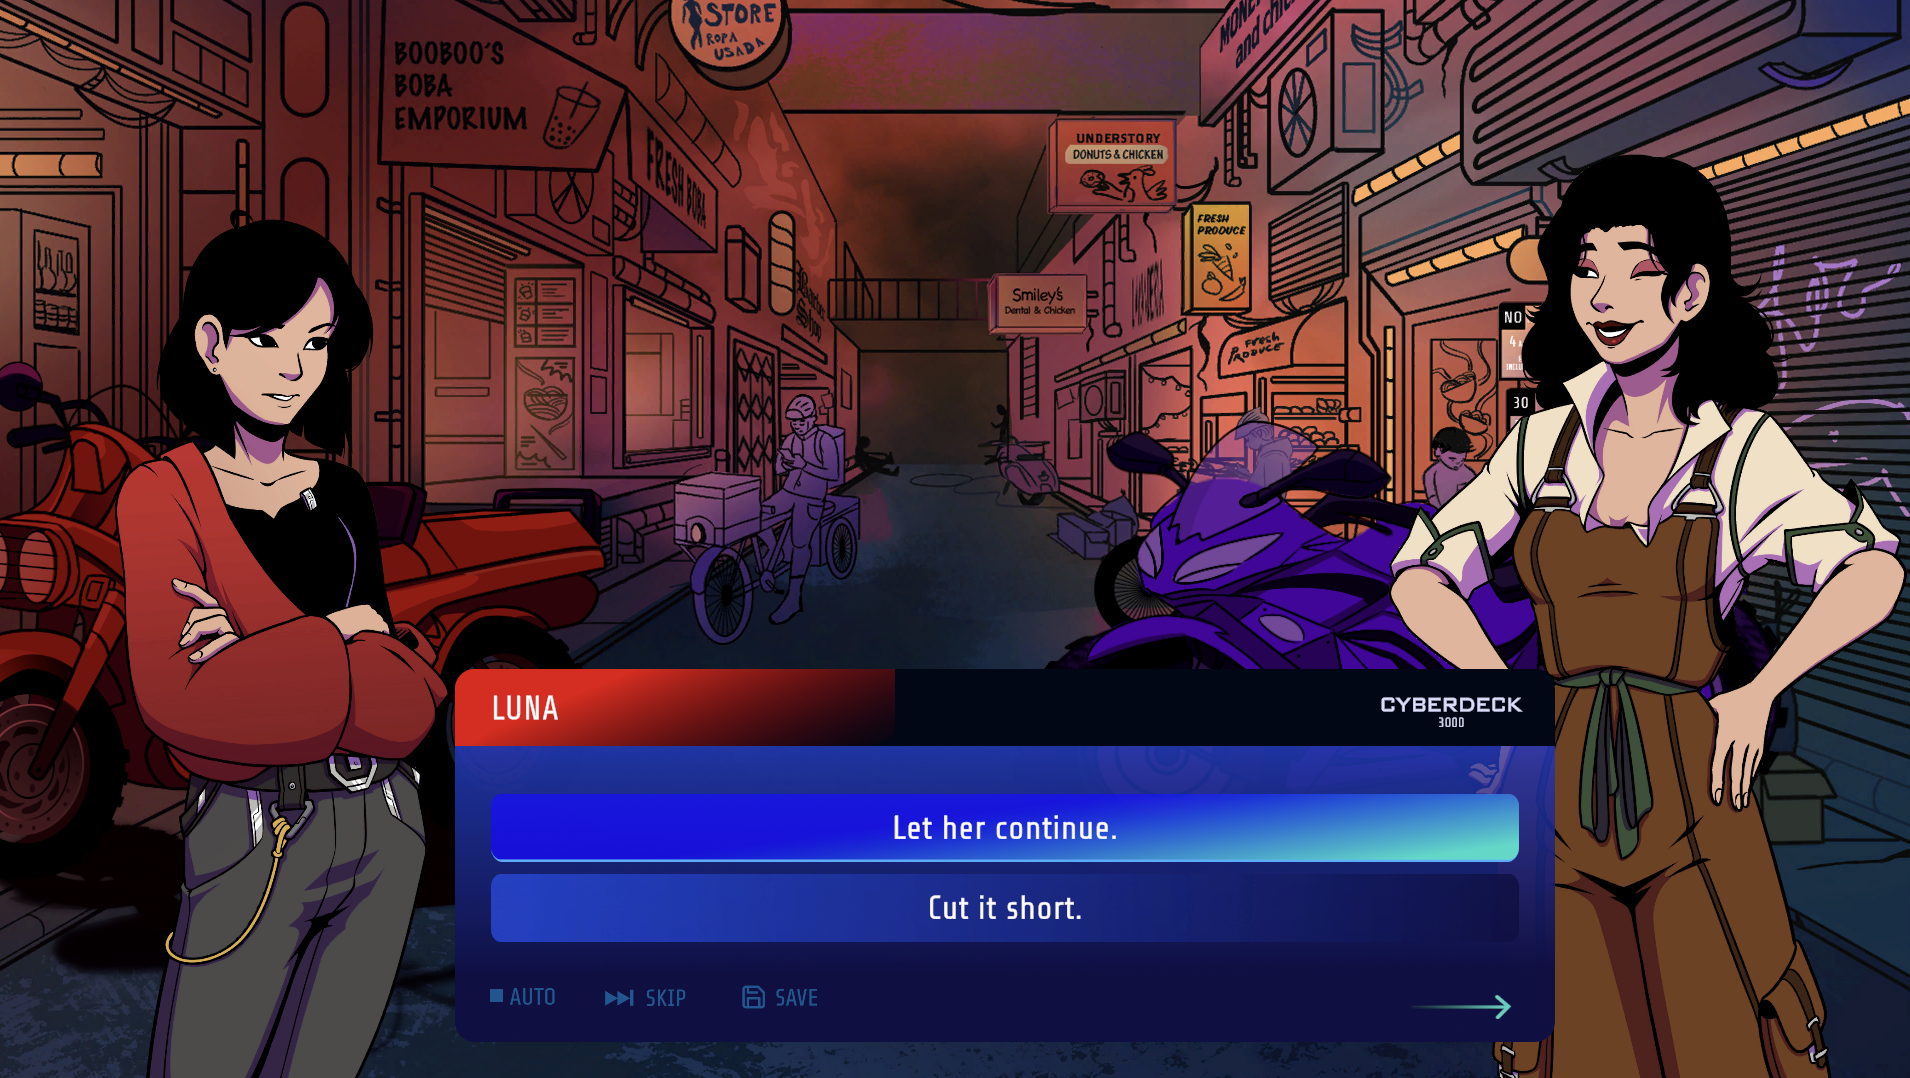
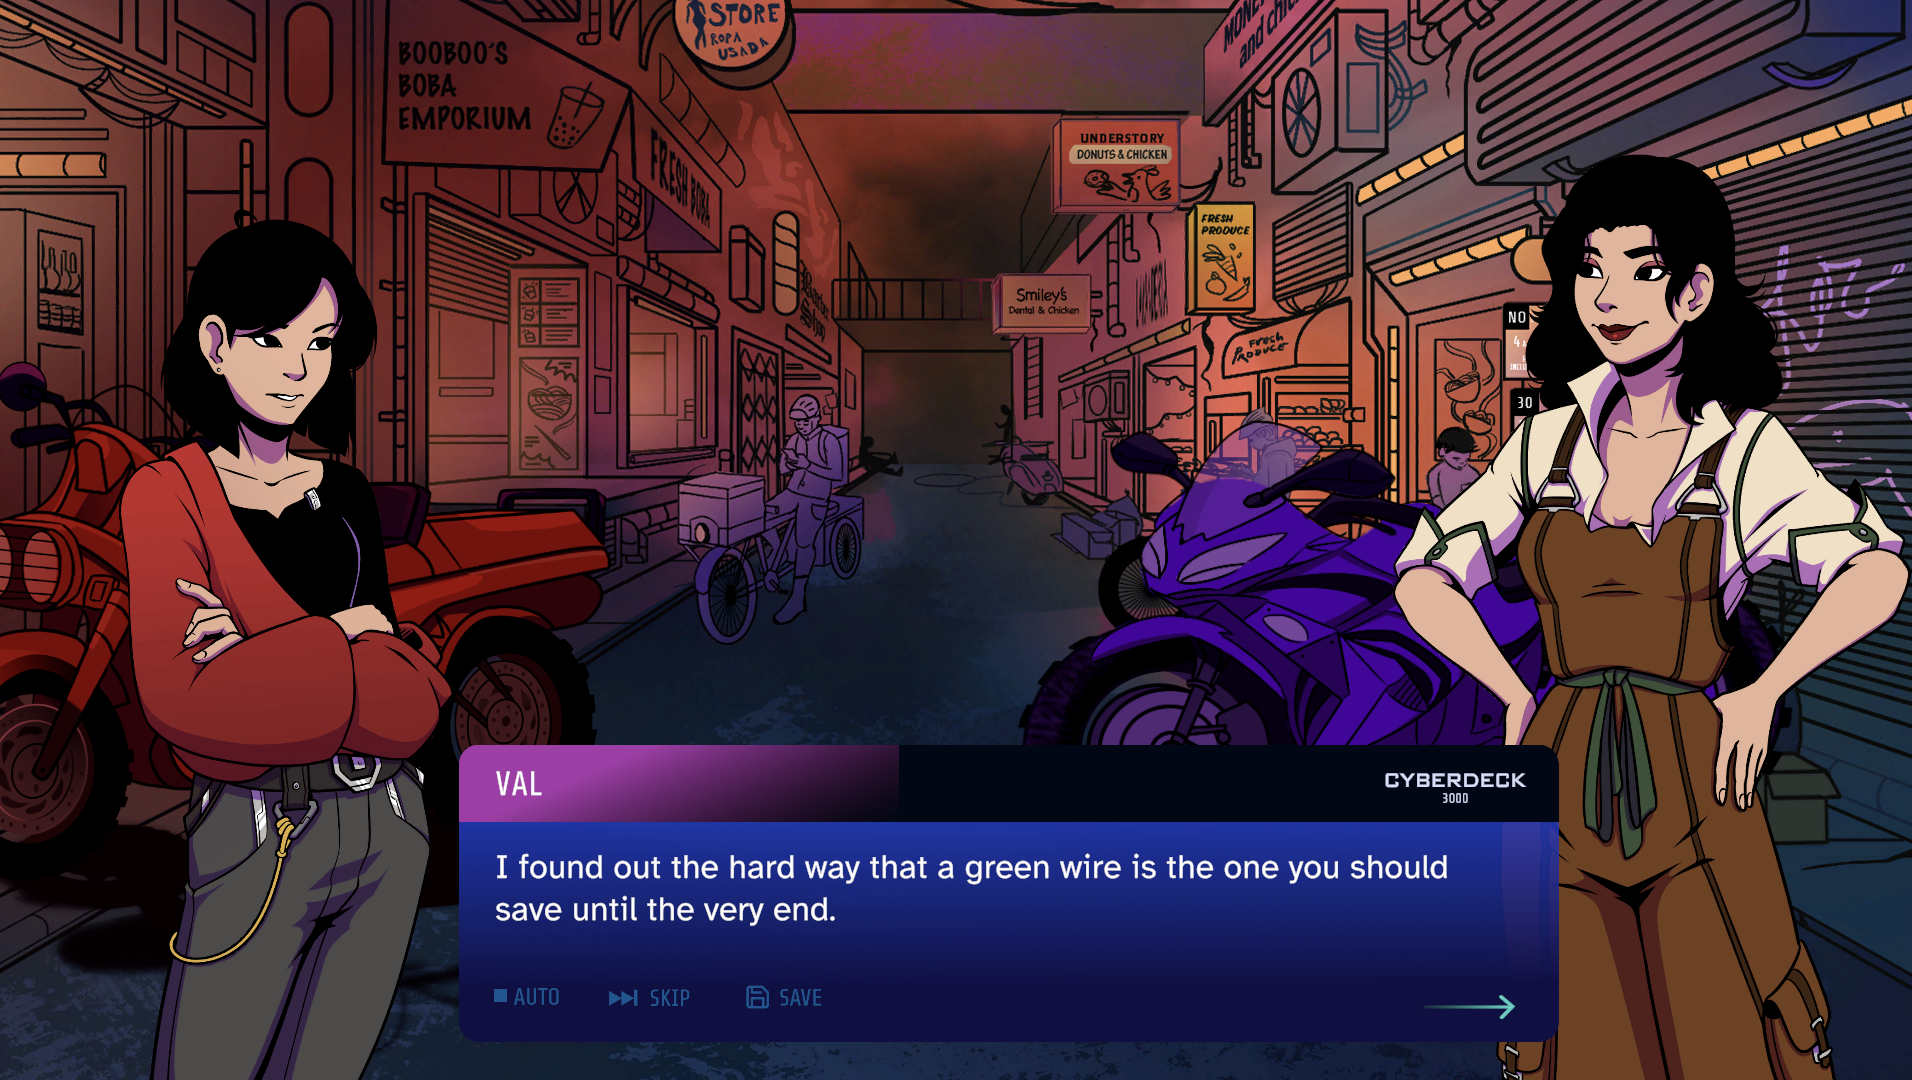
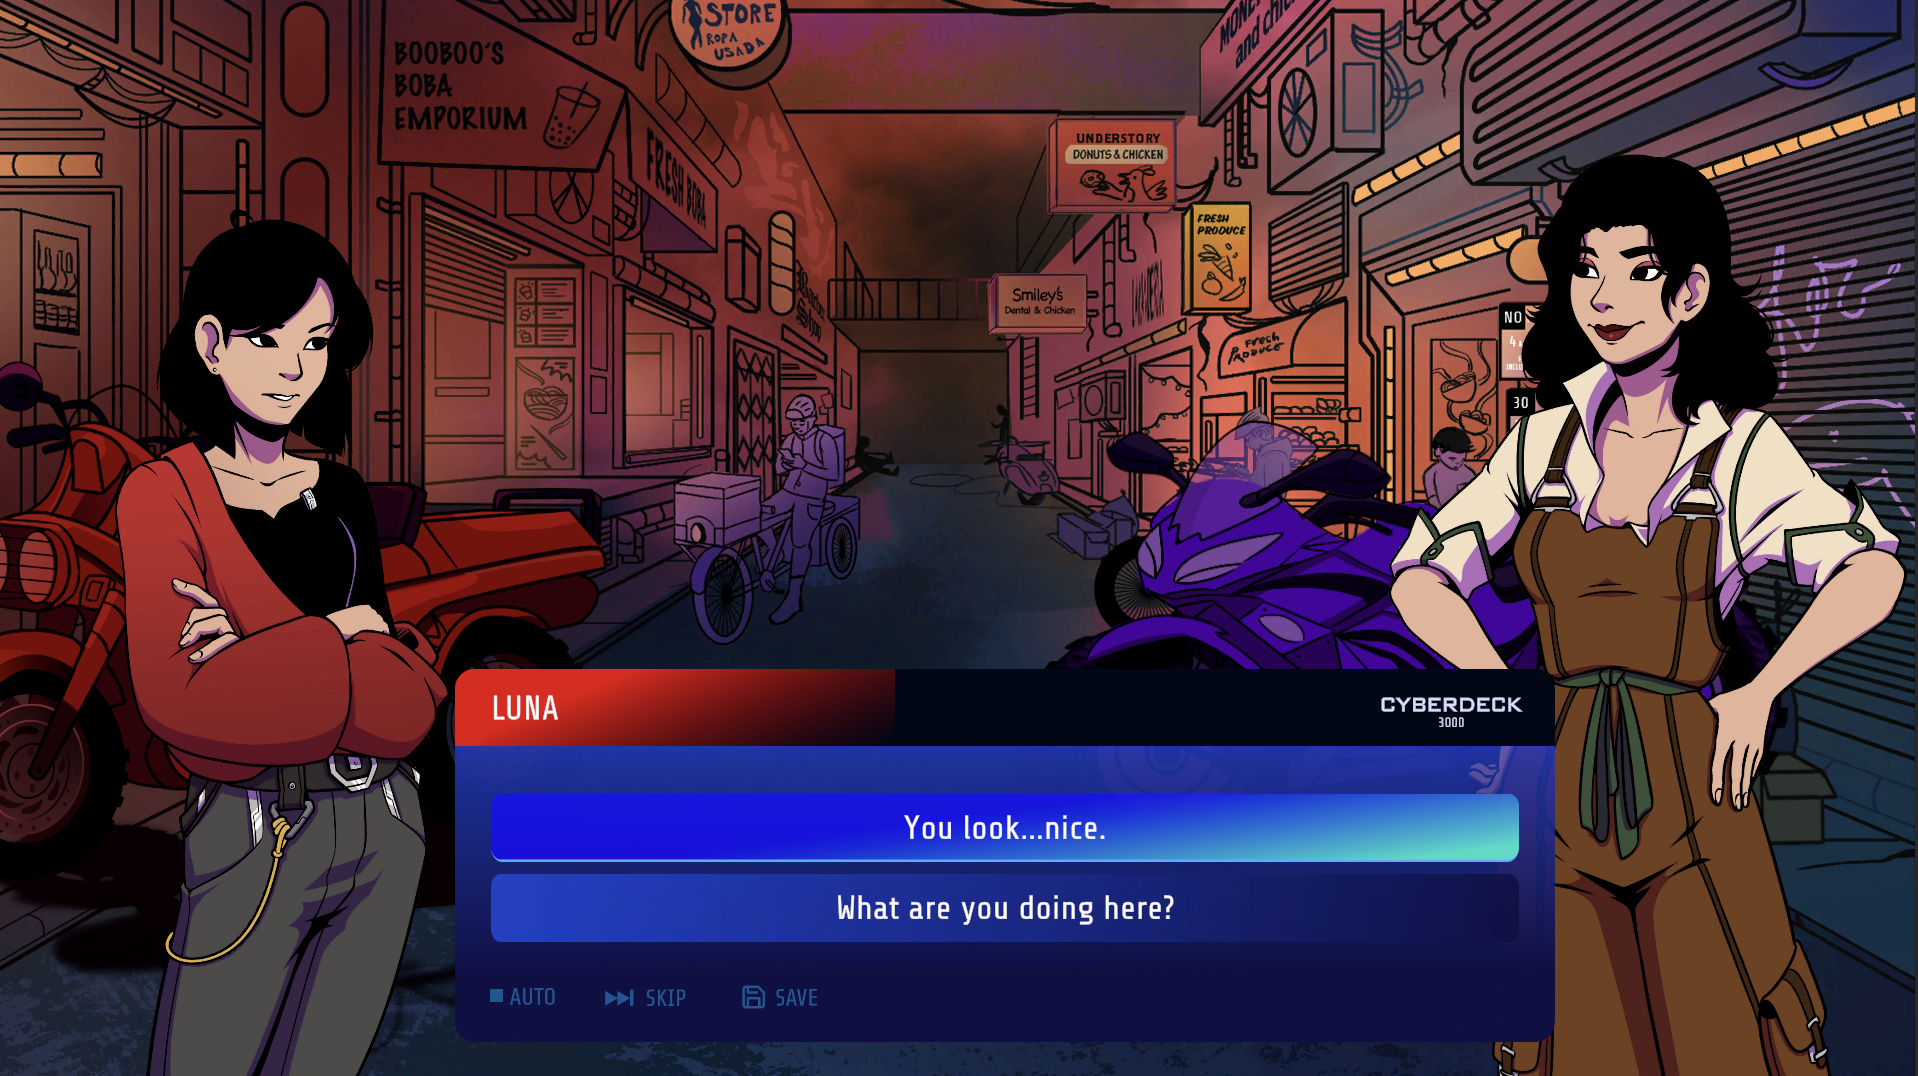
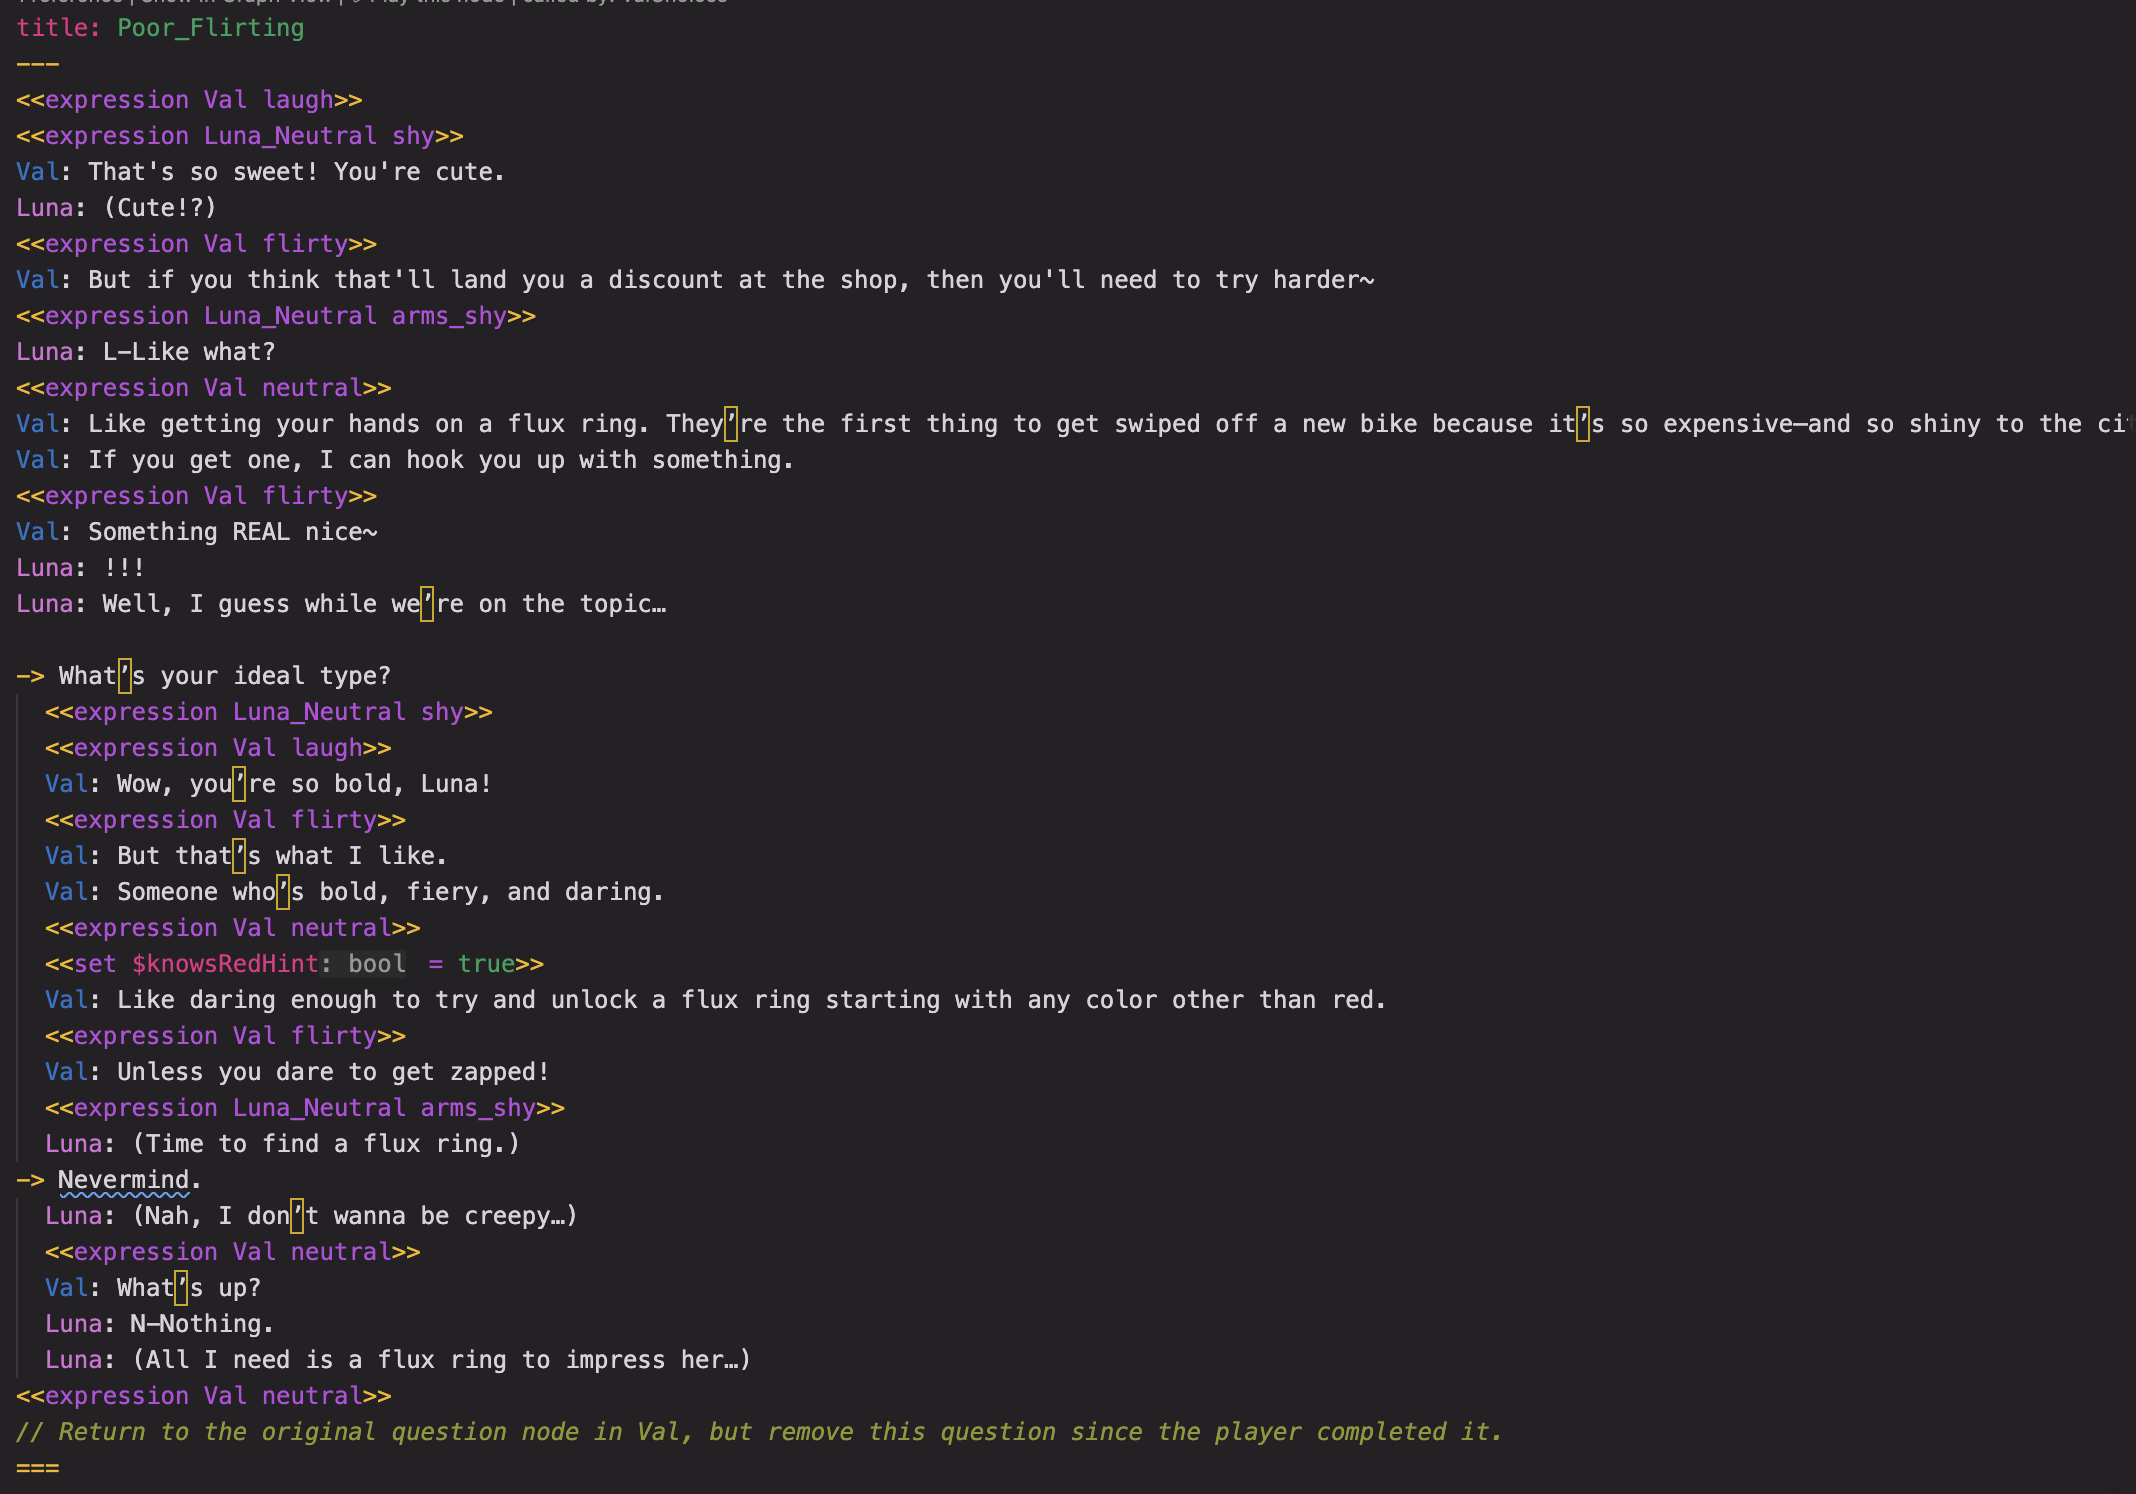
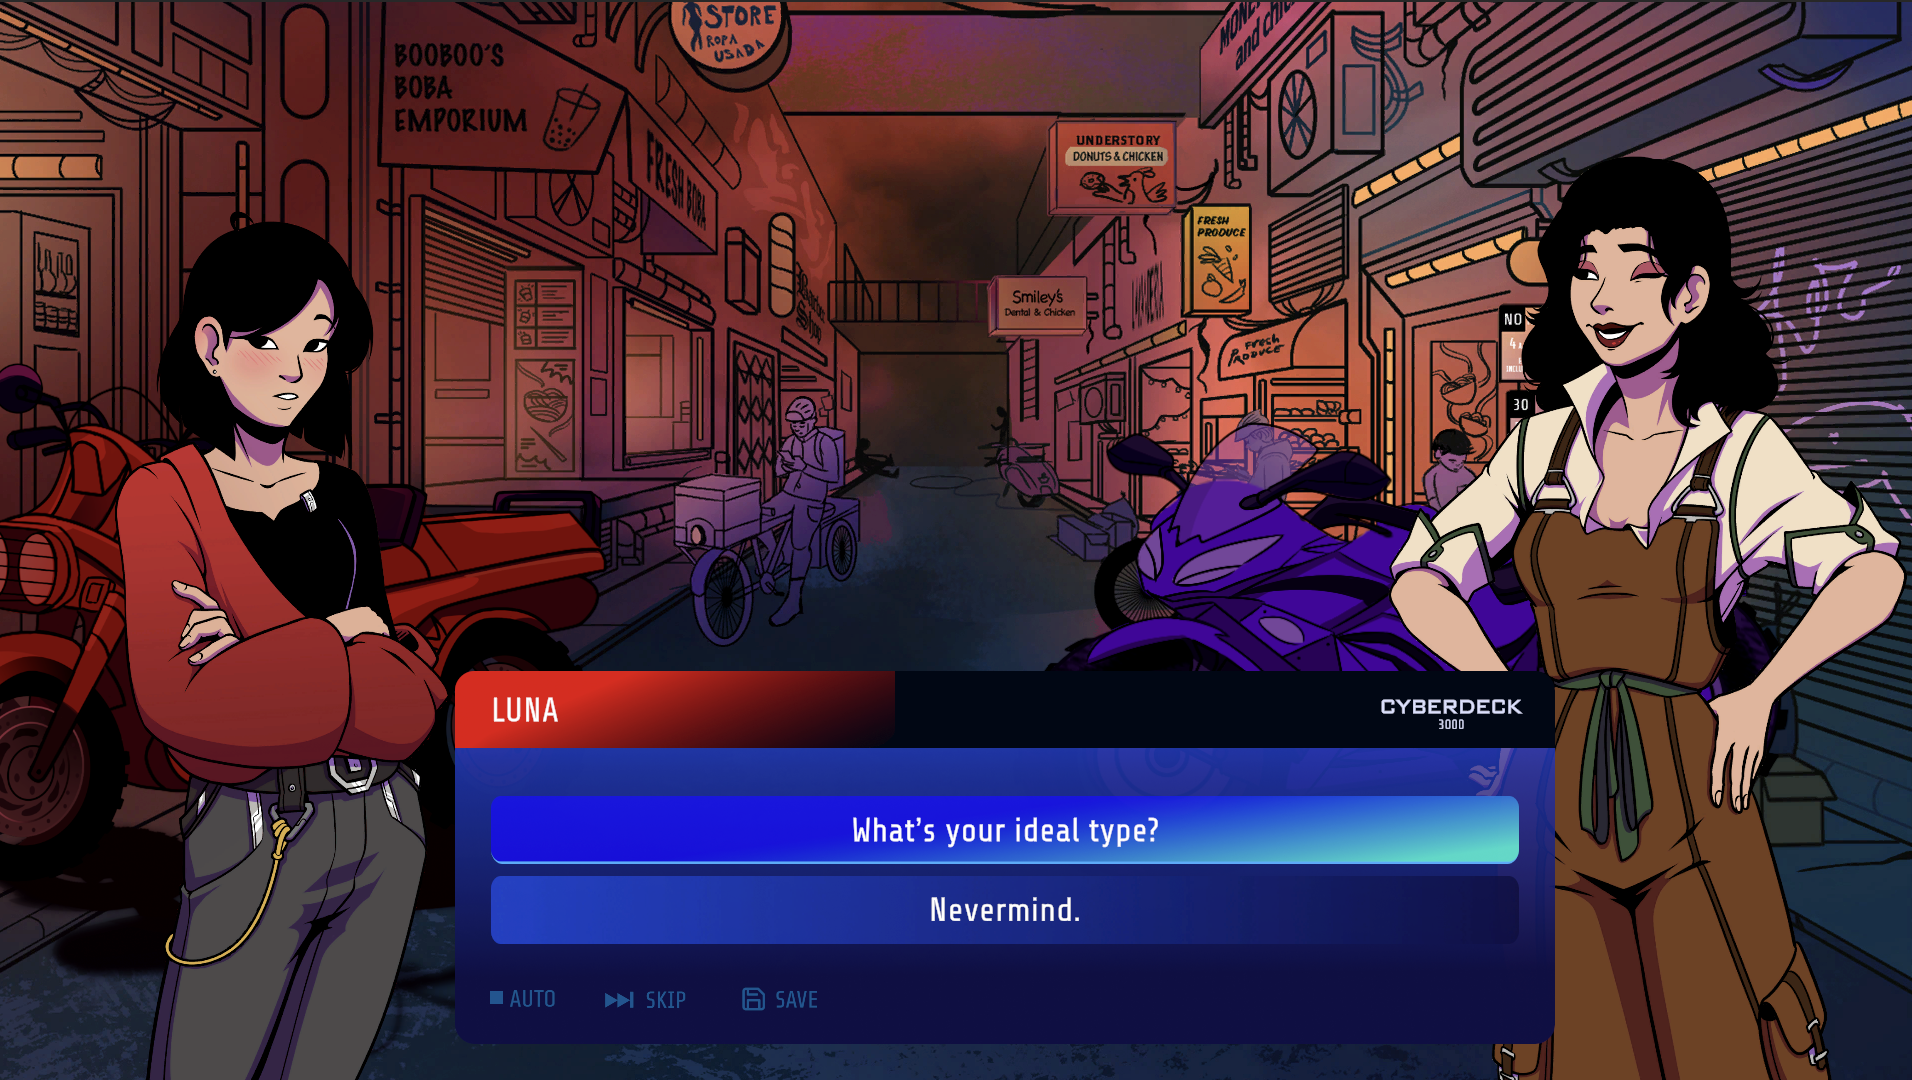
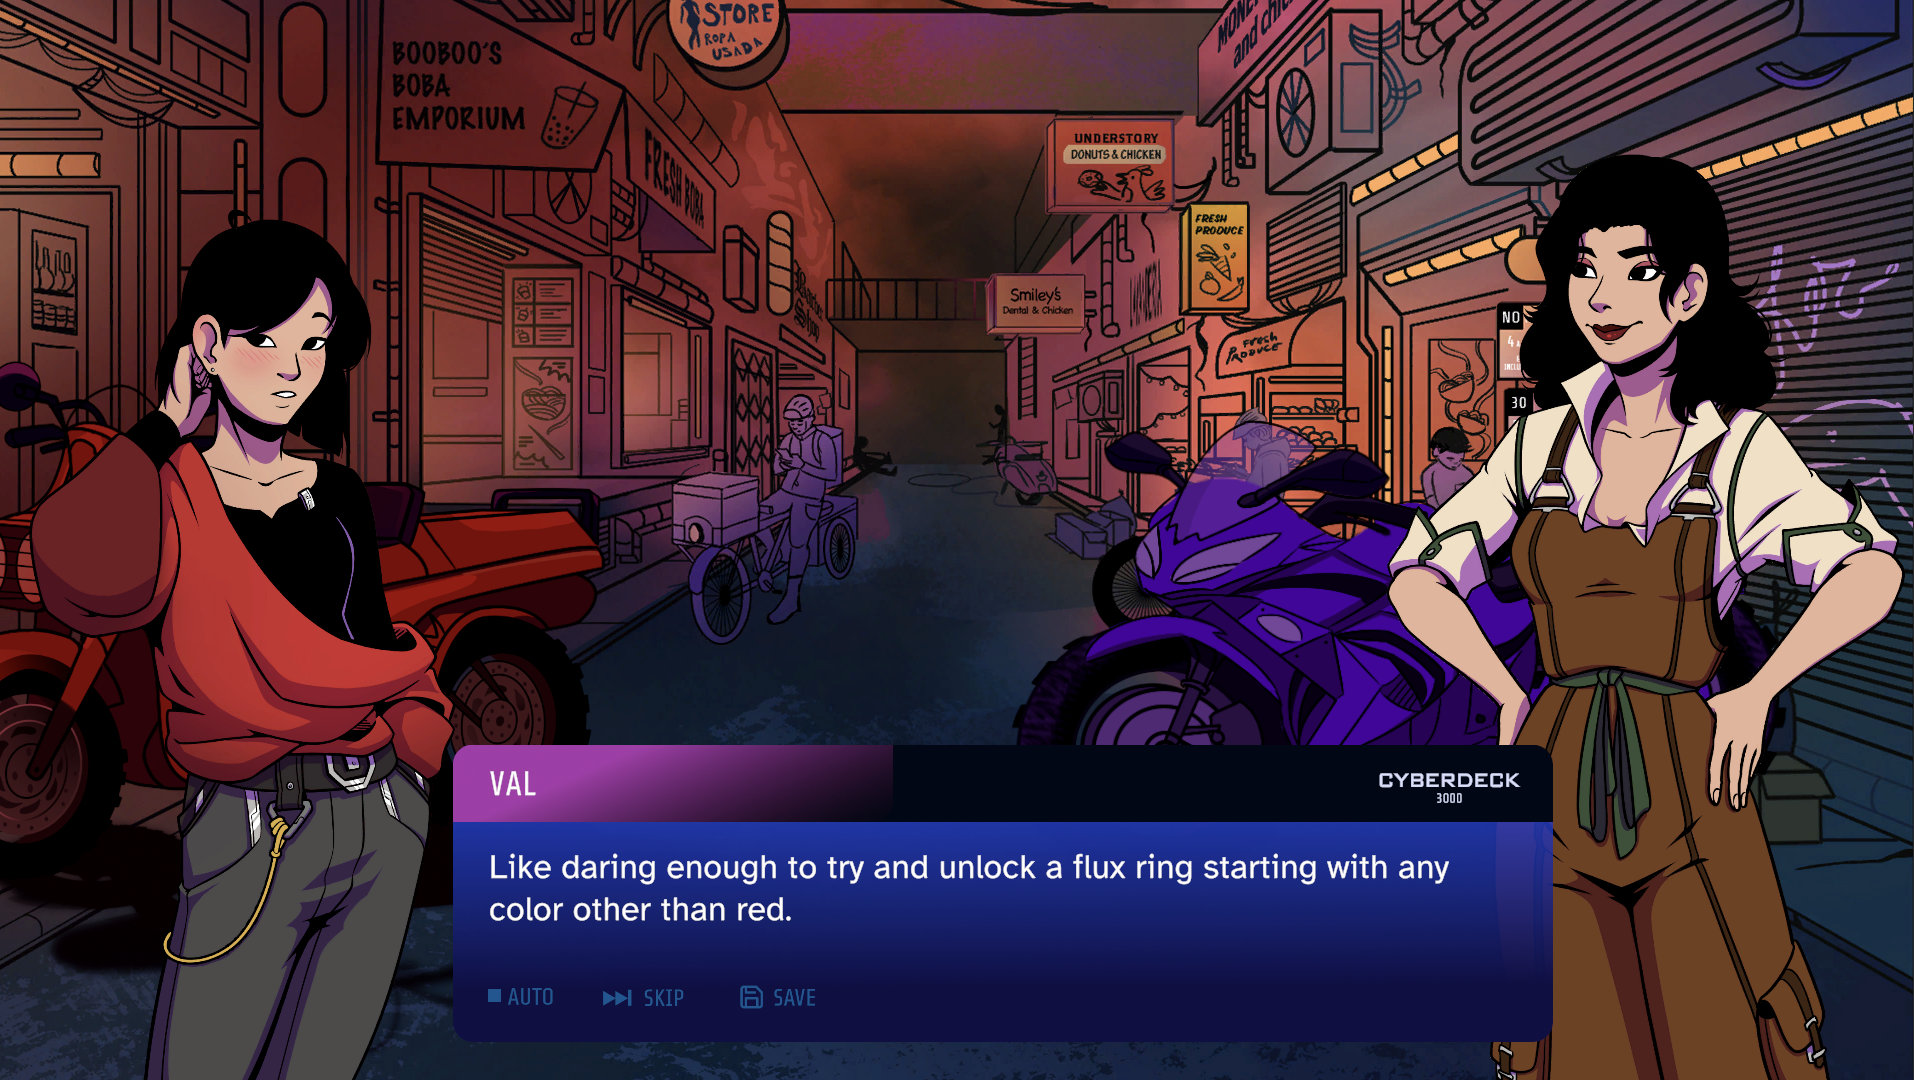
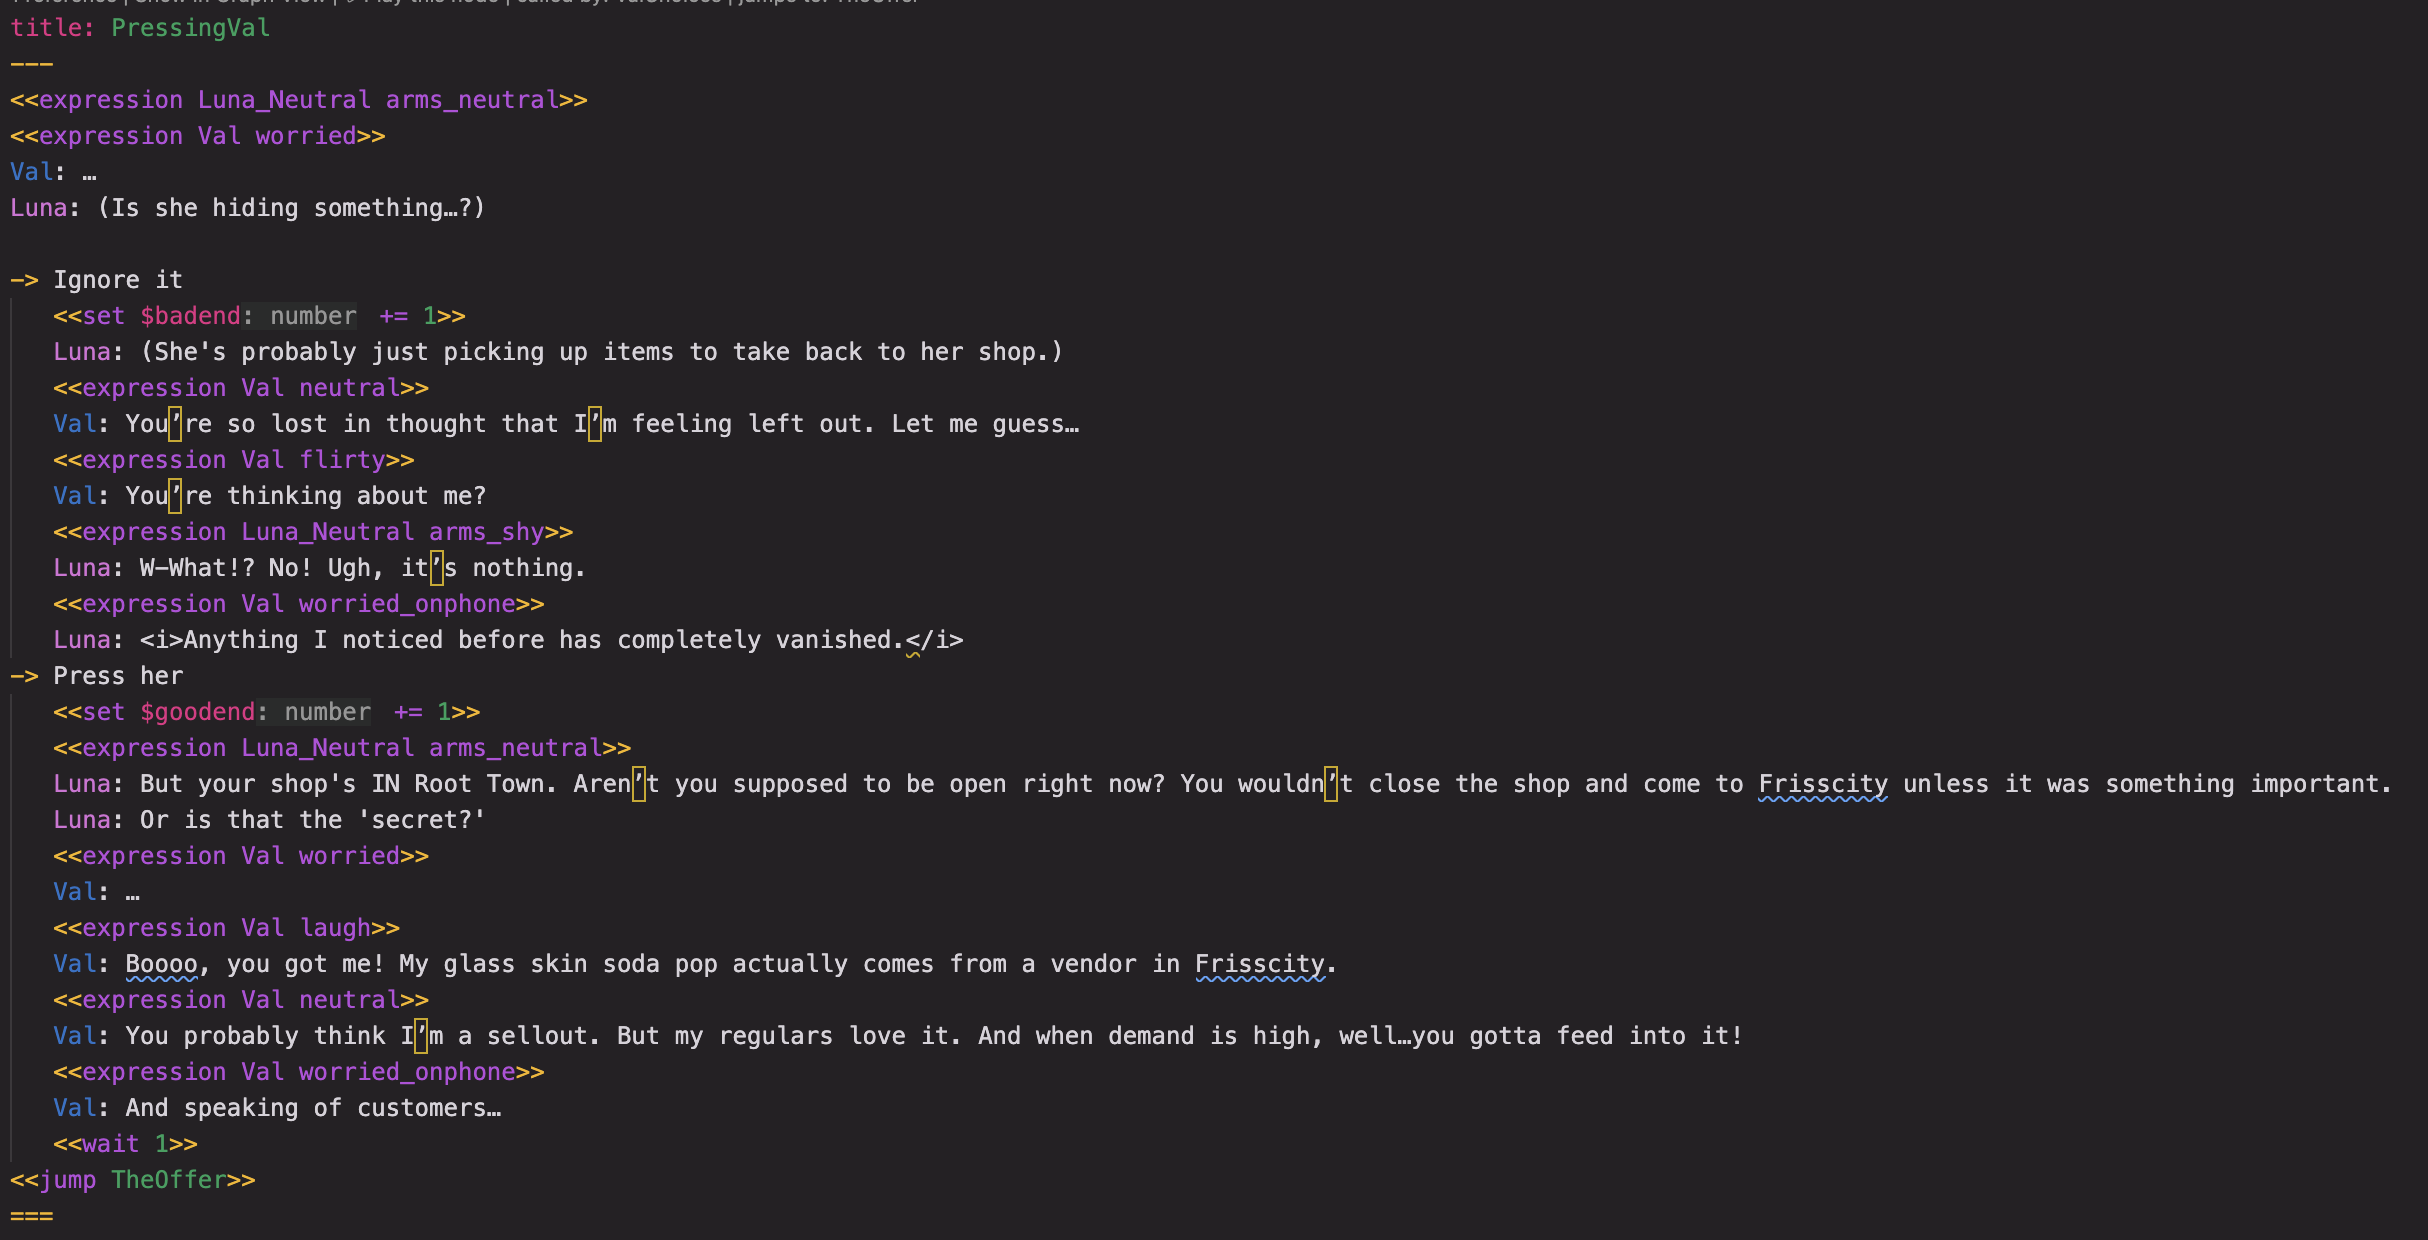
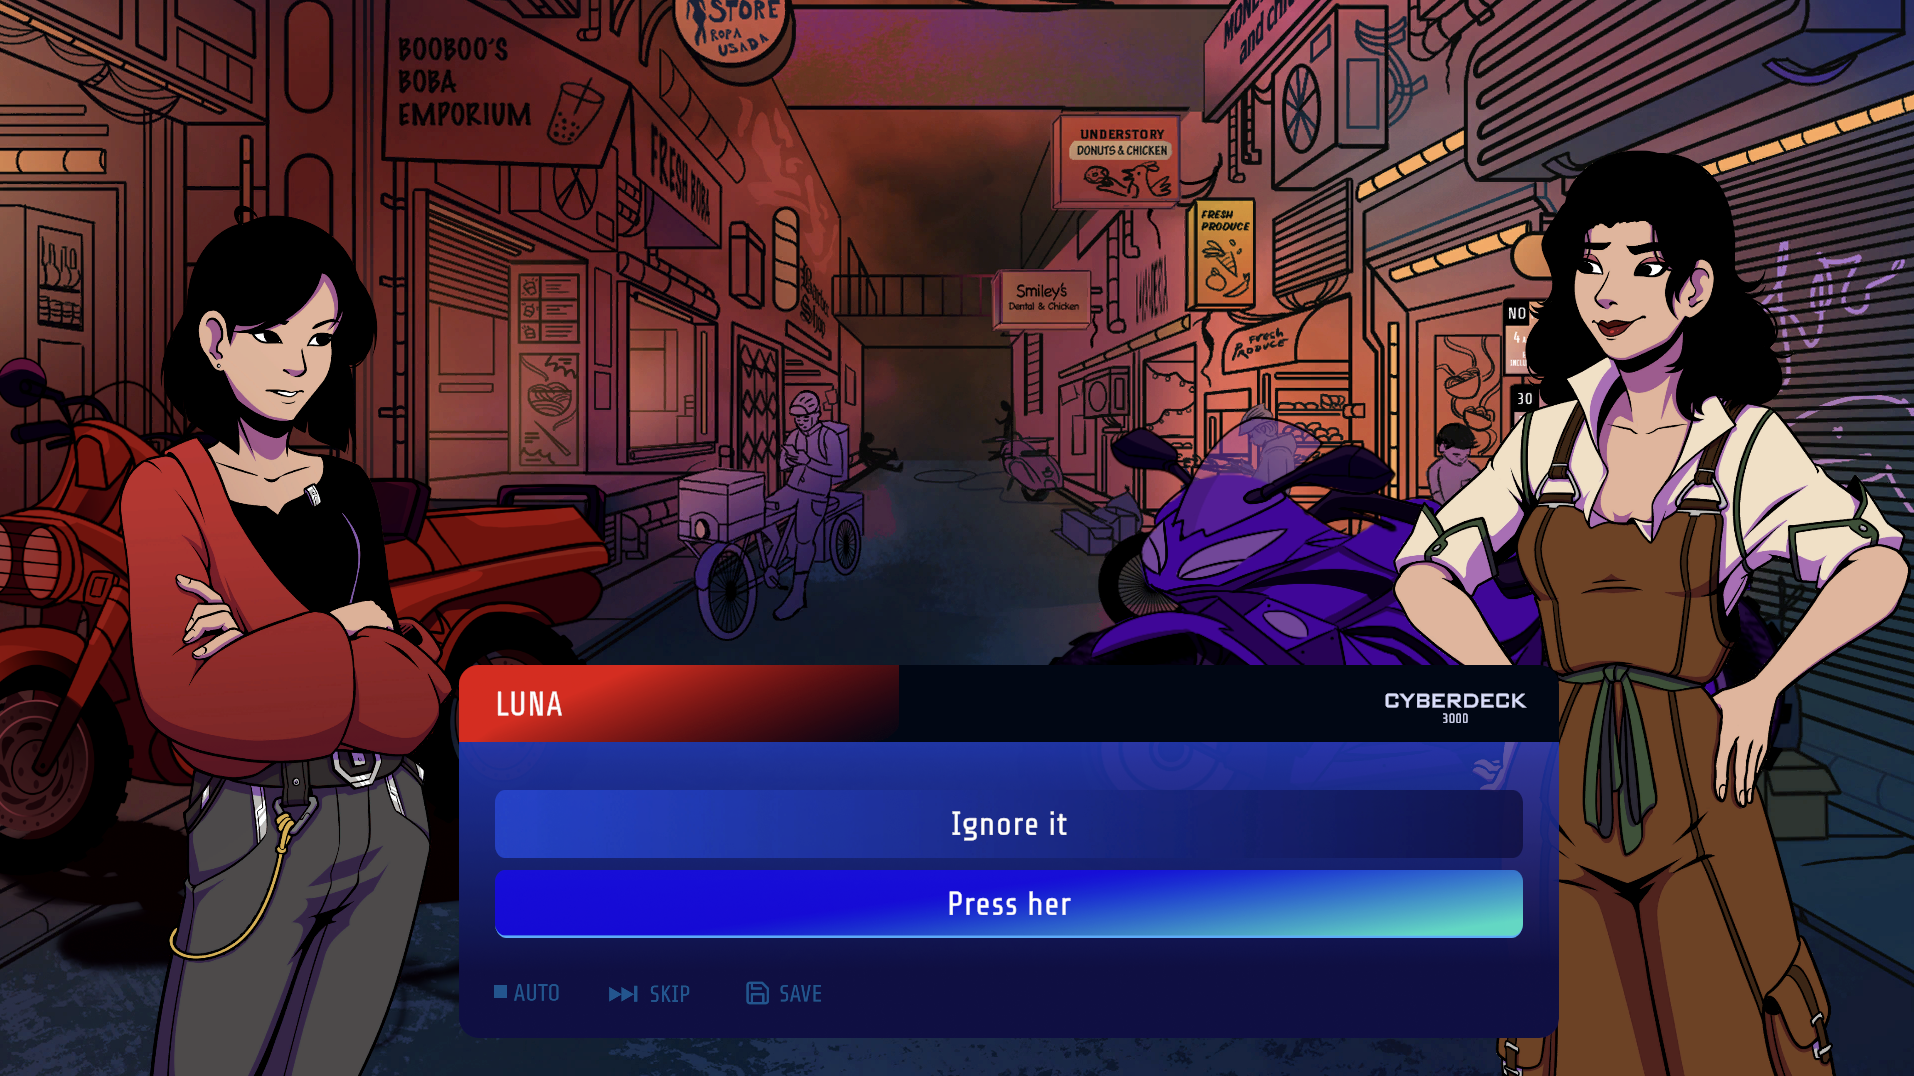
I learned some C# to create Yarn commands, which were essentially like stage directions
Unfortunately, we weren’t able to submit a game to the game jam. After two months of working together, our team still didn’t have a working prototype of the game and our code’s architecture was unstable.
The game needed to be rebuilt from scratch, and only 3 people were still able to work on the game: me, Alyssa (artist), and a programmer. I didn’t want to put the entire onus on the programmer to re-implement and do everything.
So I created some .cs scripts with C# so that I could create scripts and methods that the game’s dialogue depended on! And honestly, it was SO rewarding.
Here was my process for each script I made:
A «camera» command
I combed Yarn Spinner’s development guides and found a tutorial that provided sample C# scripts for basic Yarn commands like camera commands for a 3D game
With some guidance from the programmer, I tweaked the sample C# script and adjusted it so that it worked for our 2D game environment
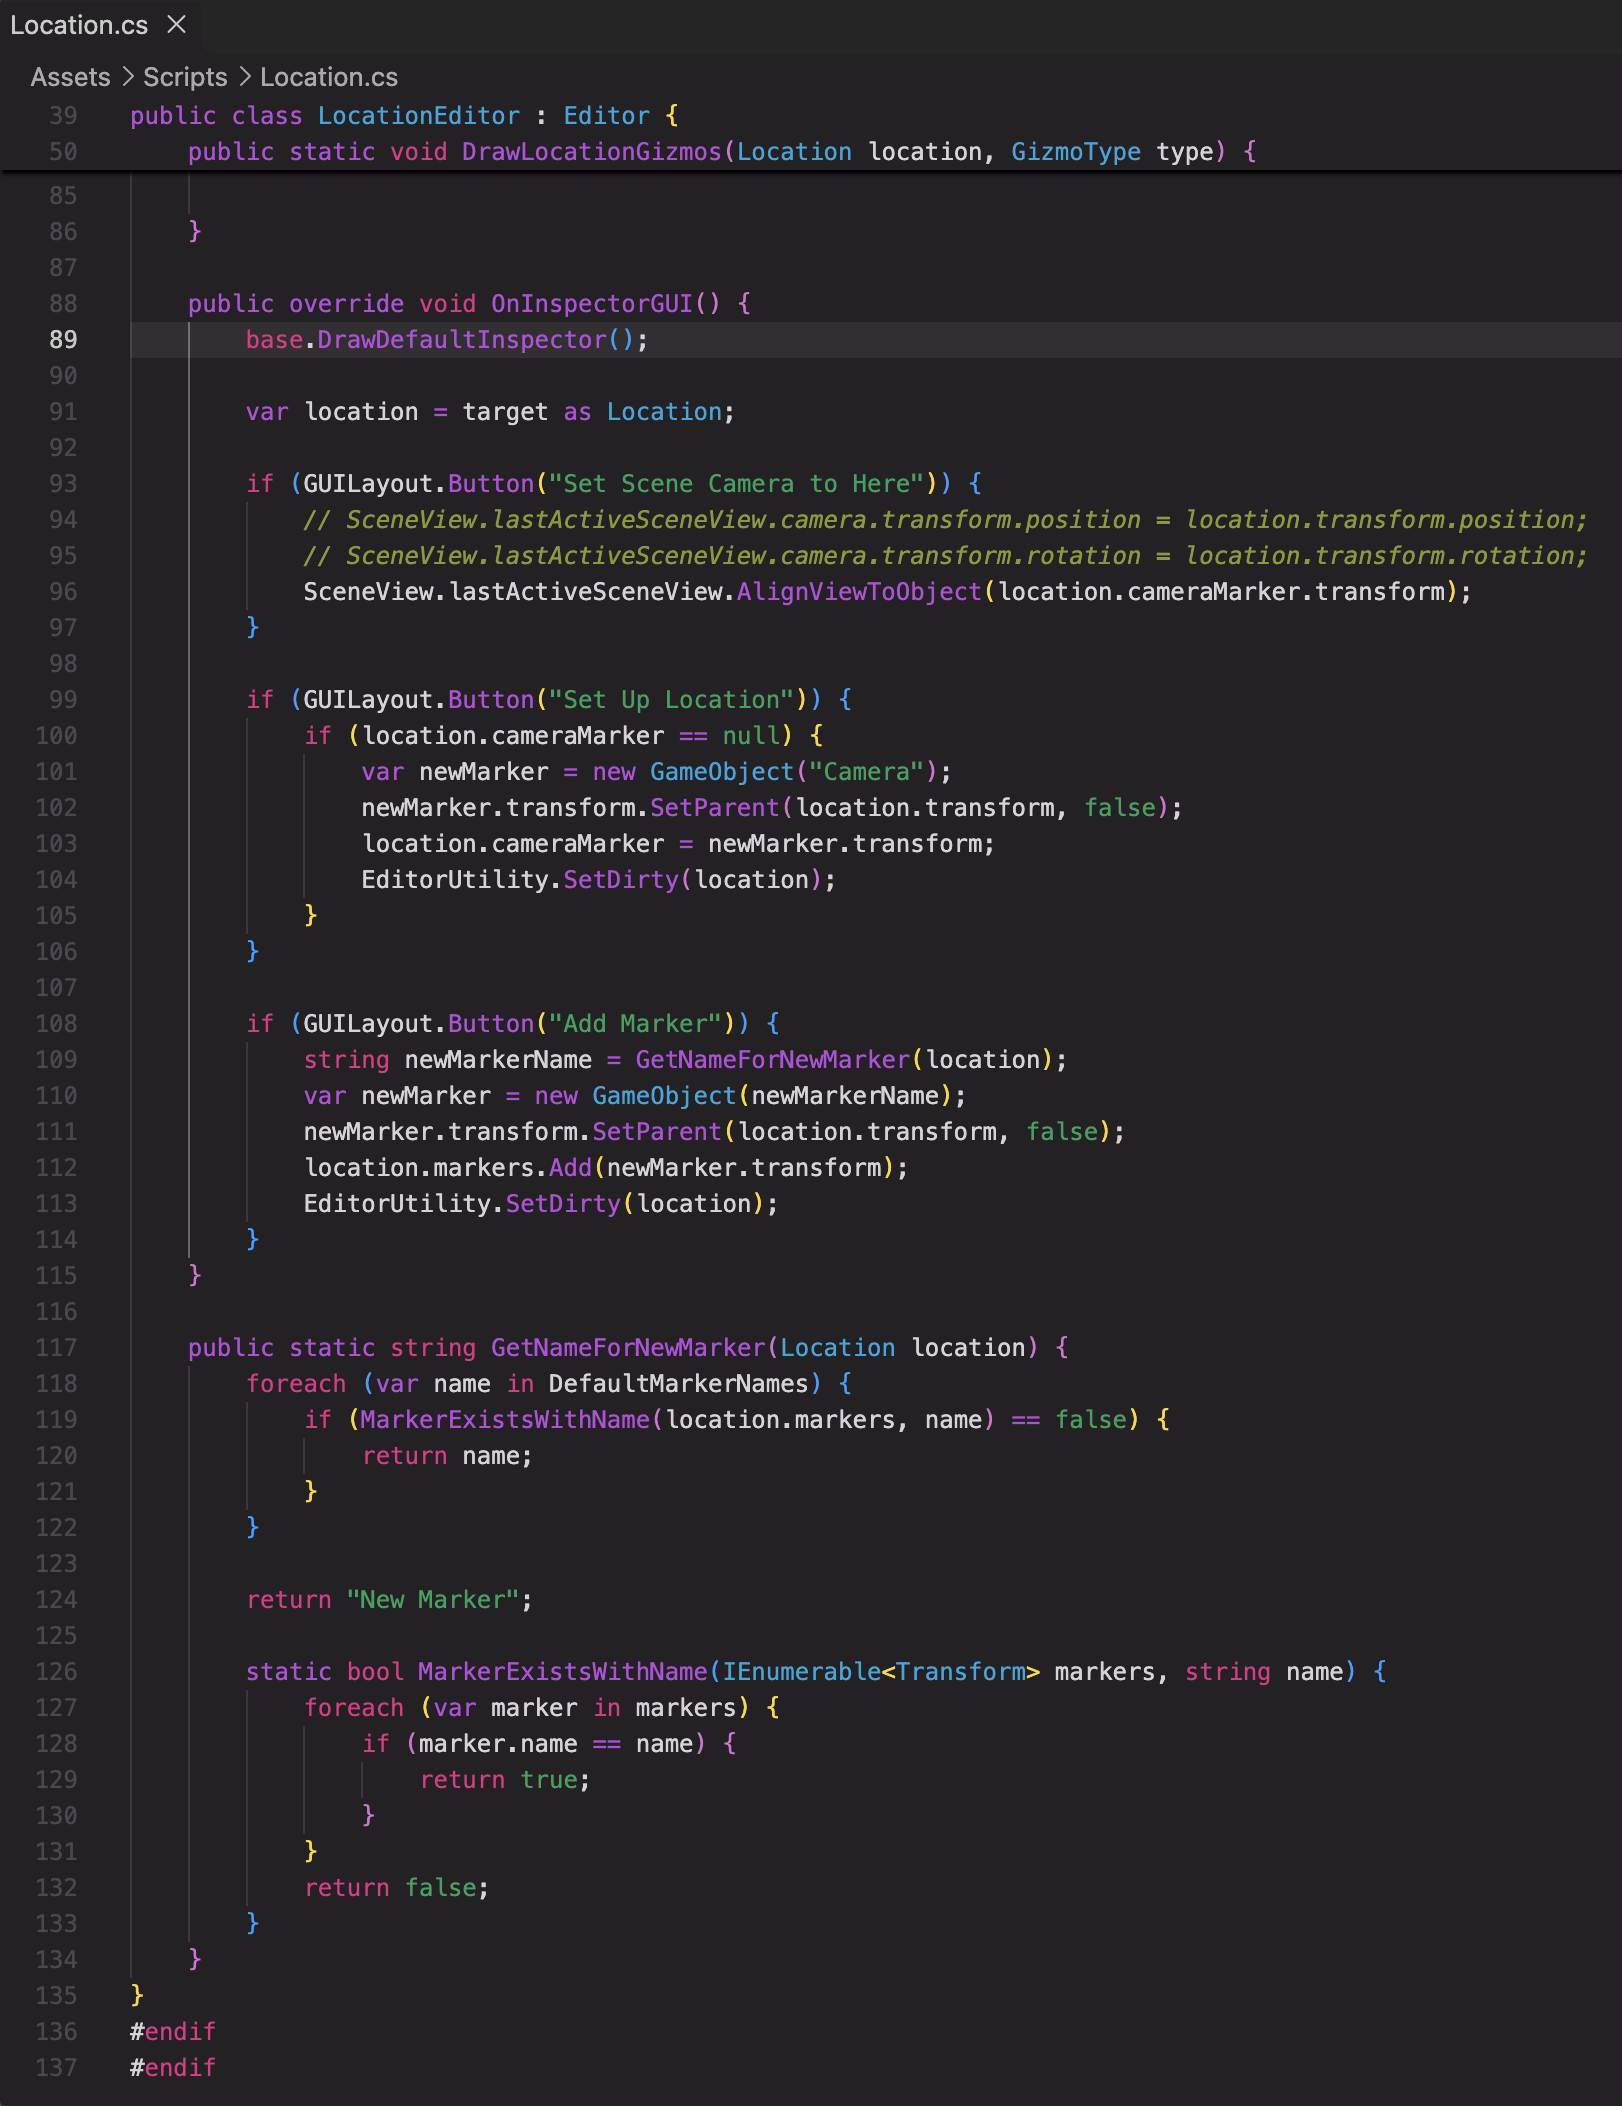
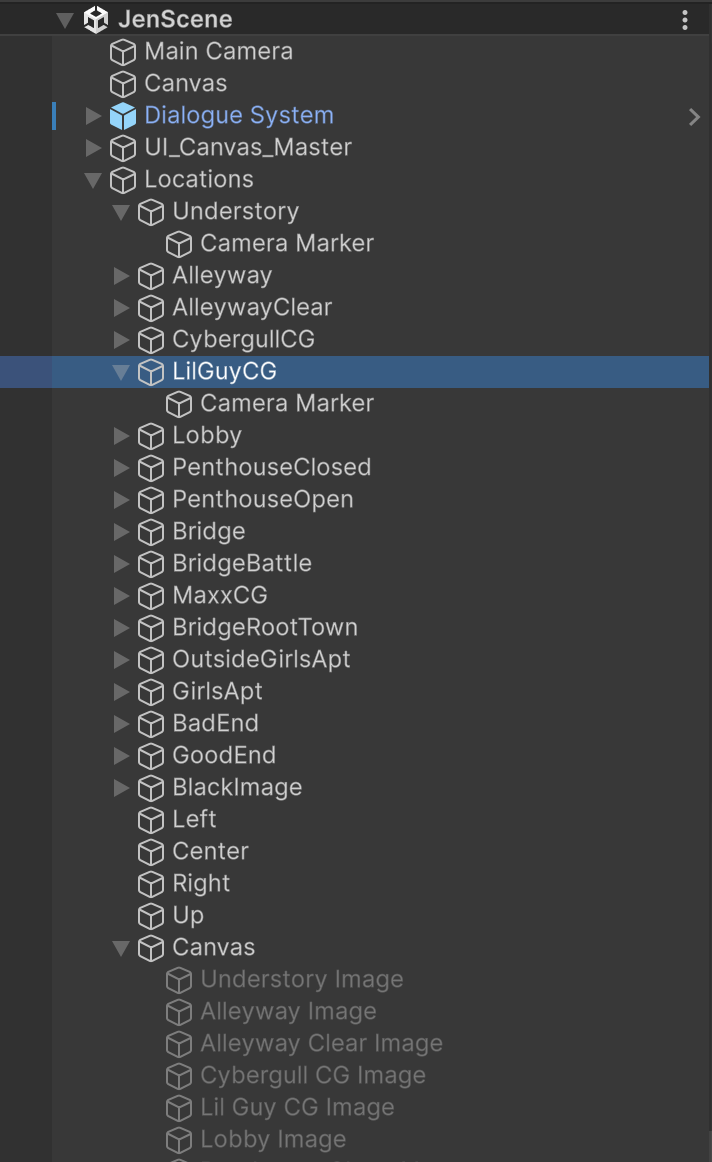
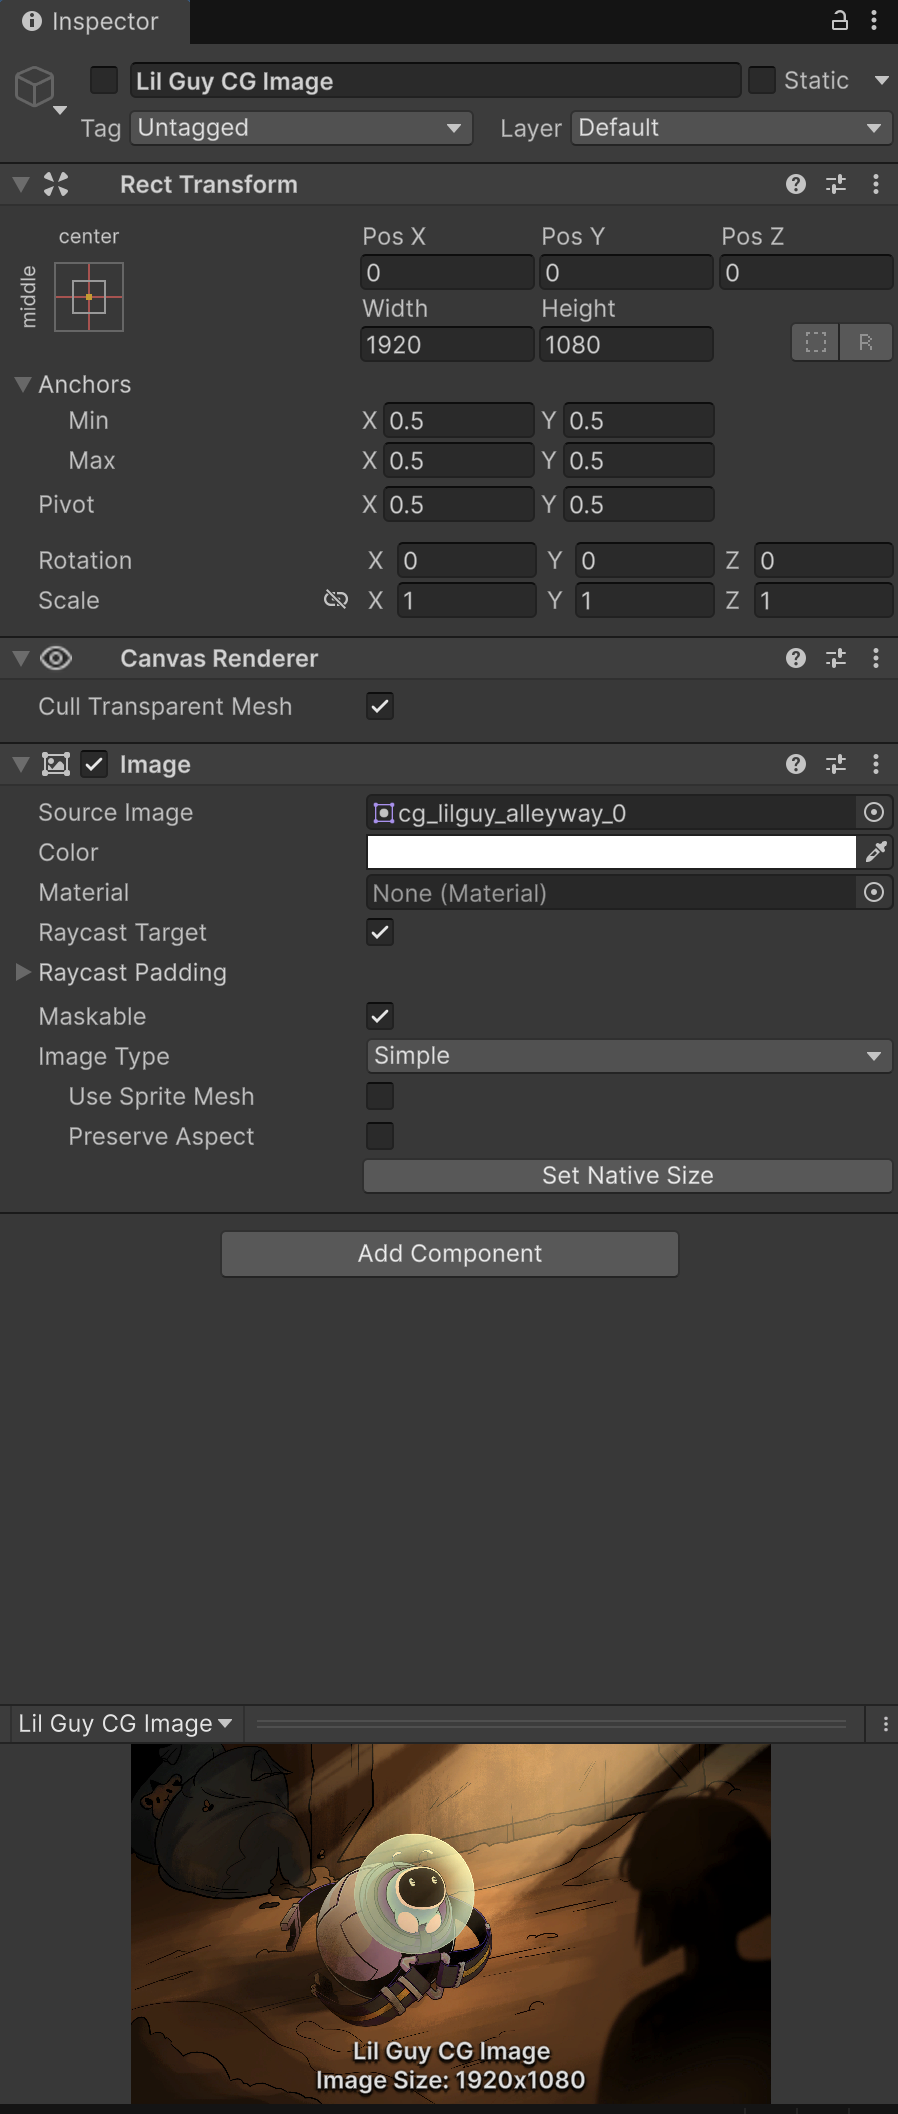
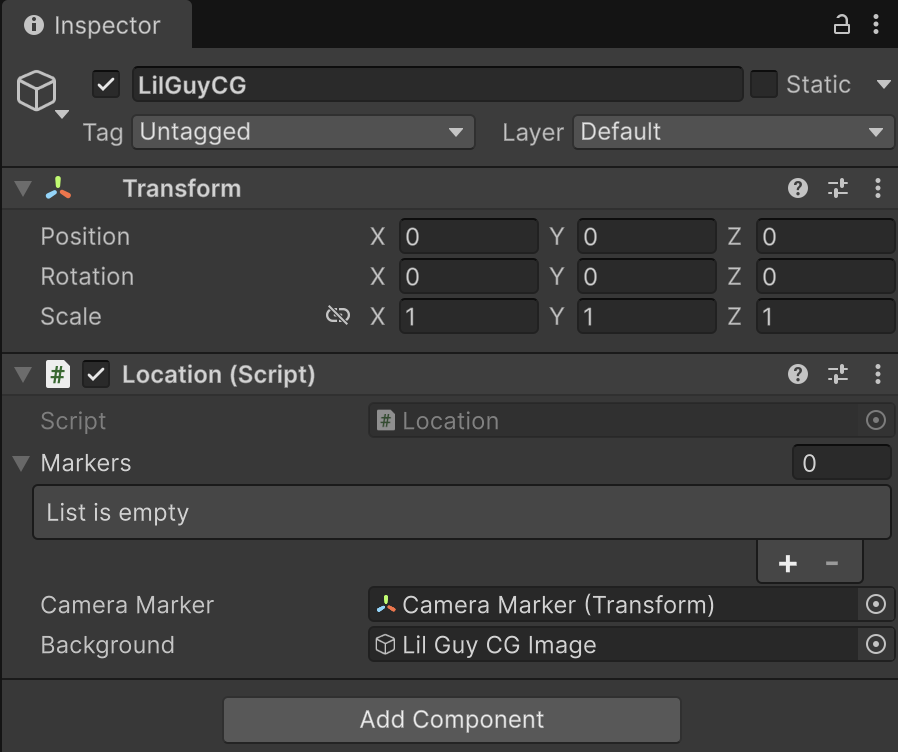
I also had to create a Location parent game object and multiple location child game objects in Unity for the camera command to work properly. I used the Location C# script sample from the Yarn Spinner team to make this work.
This allowed me to use the «camera» command directly in .yarn files so that I could seamlessly switch between environment art and CG art!
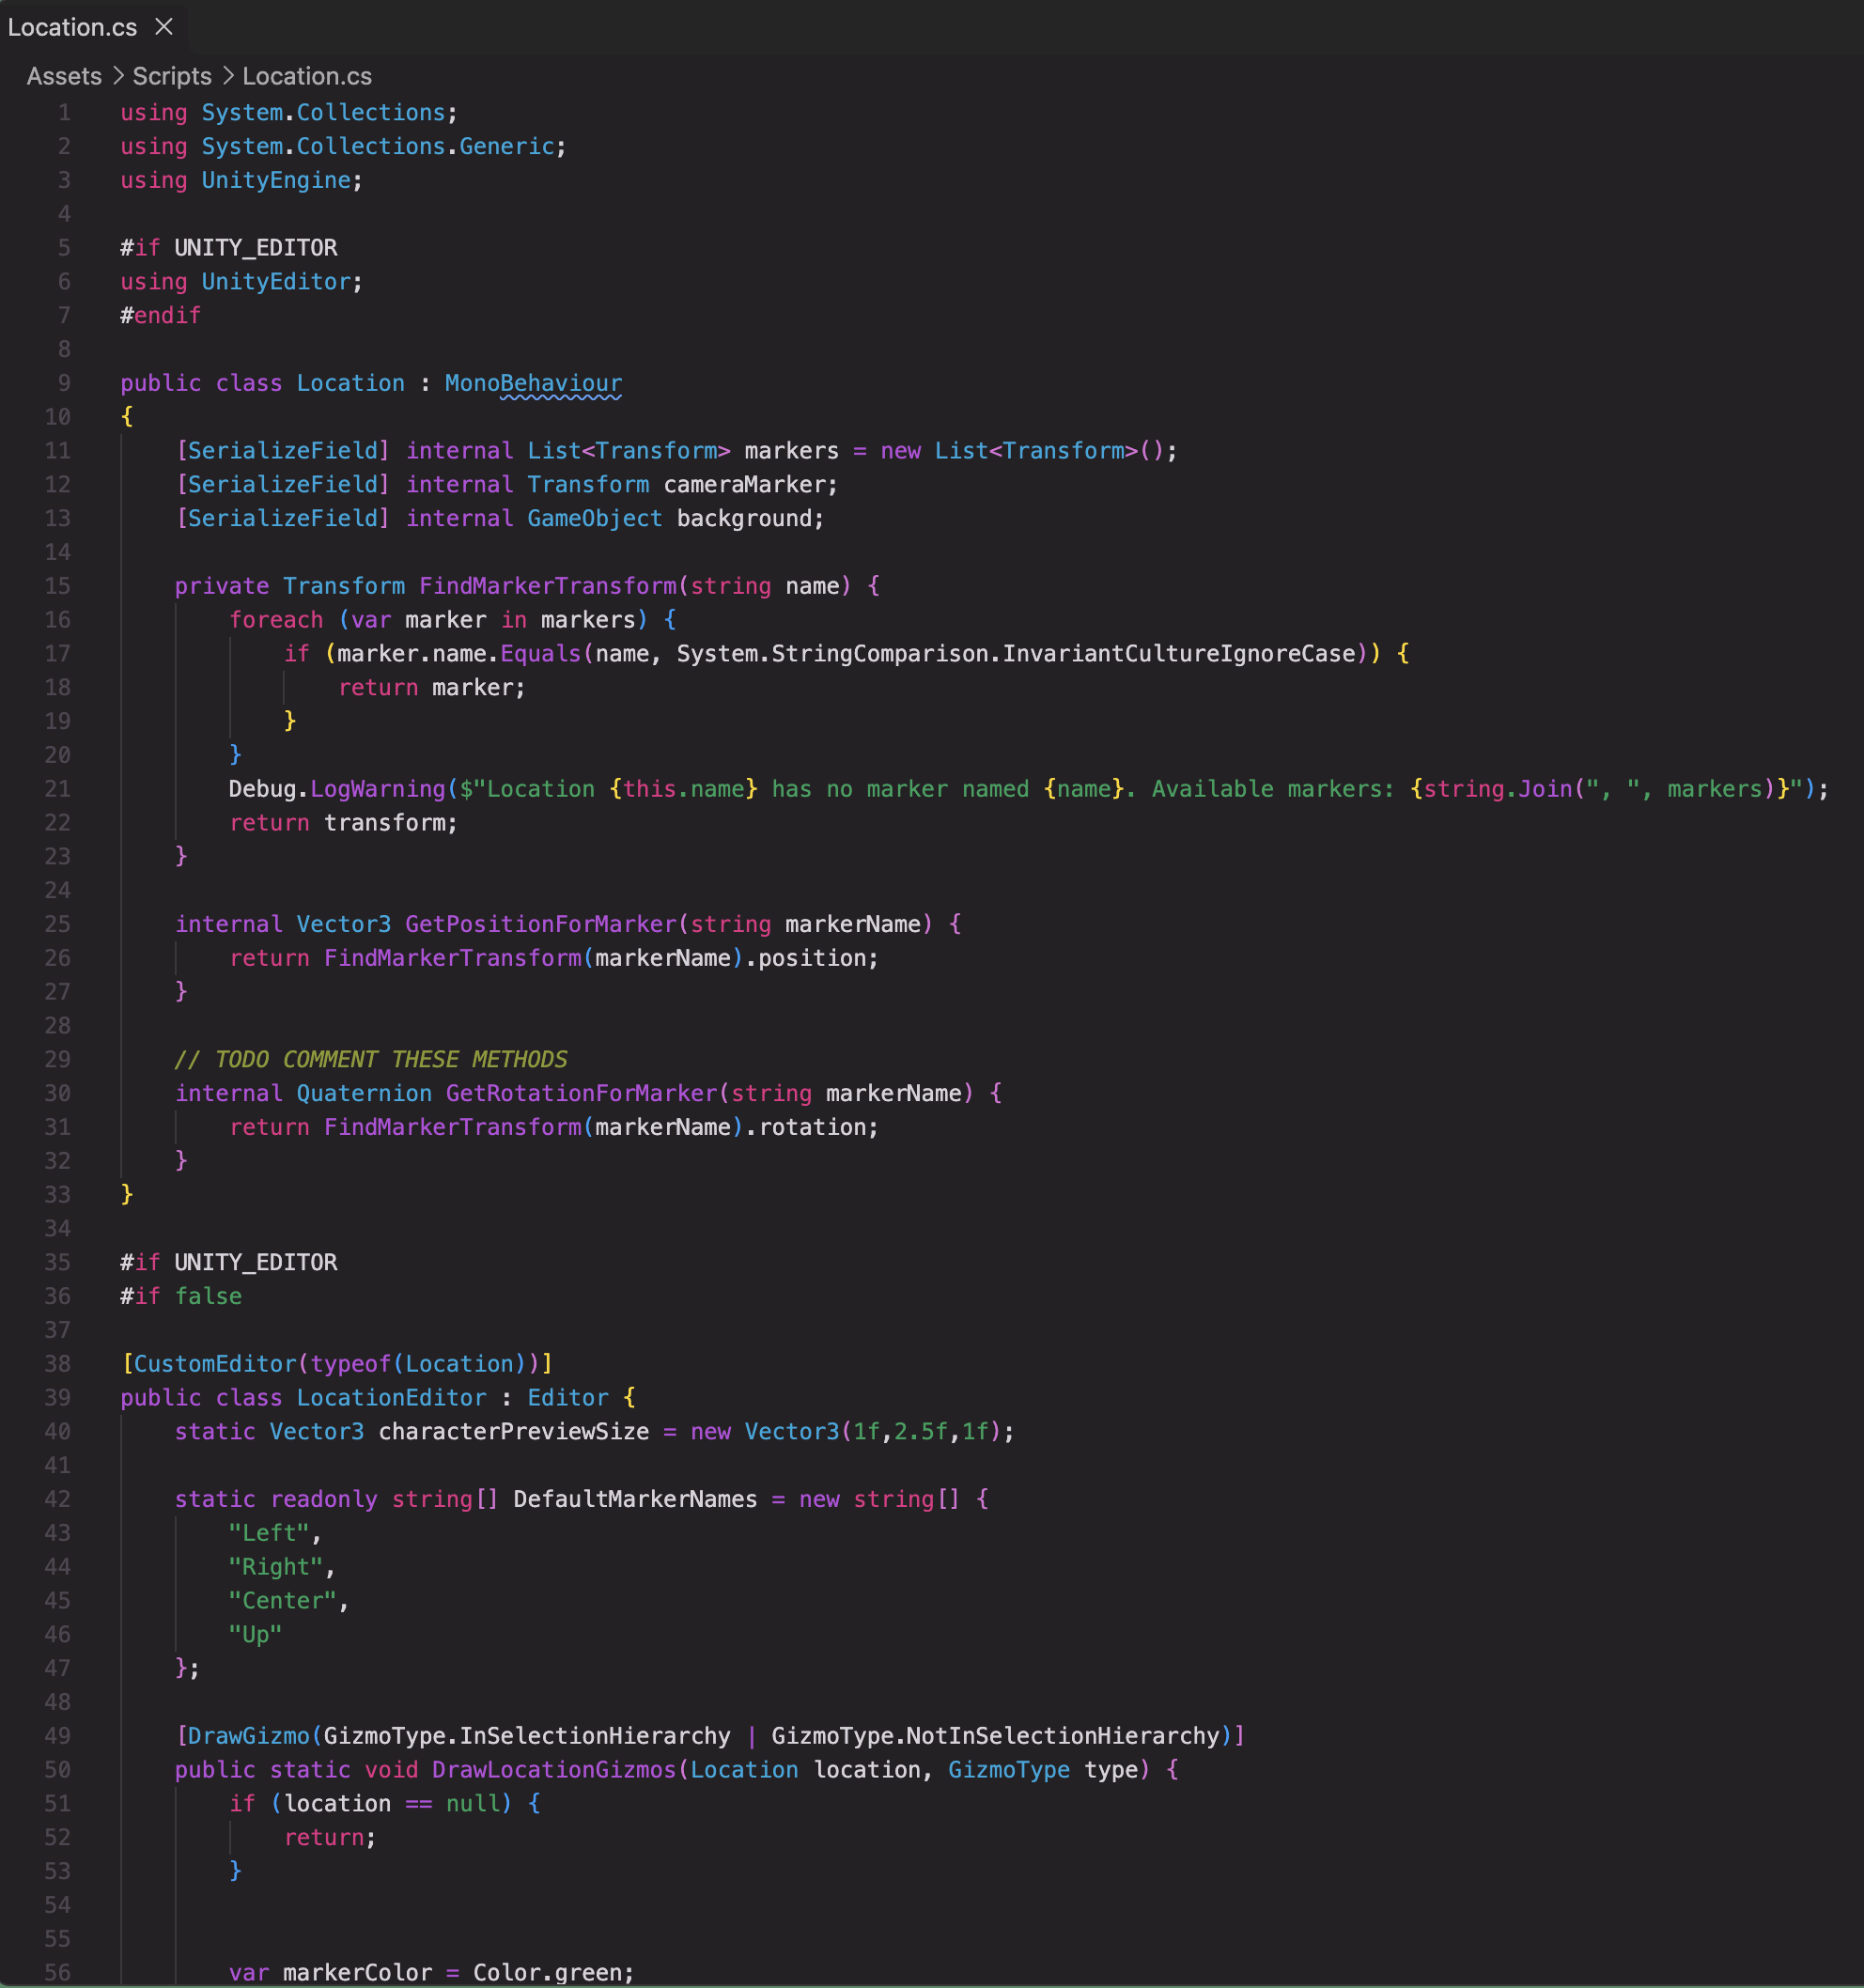
A «playSFX» and «playMusic» command
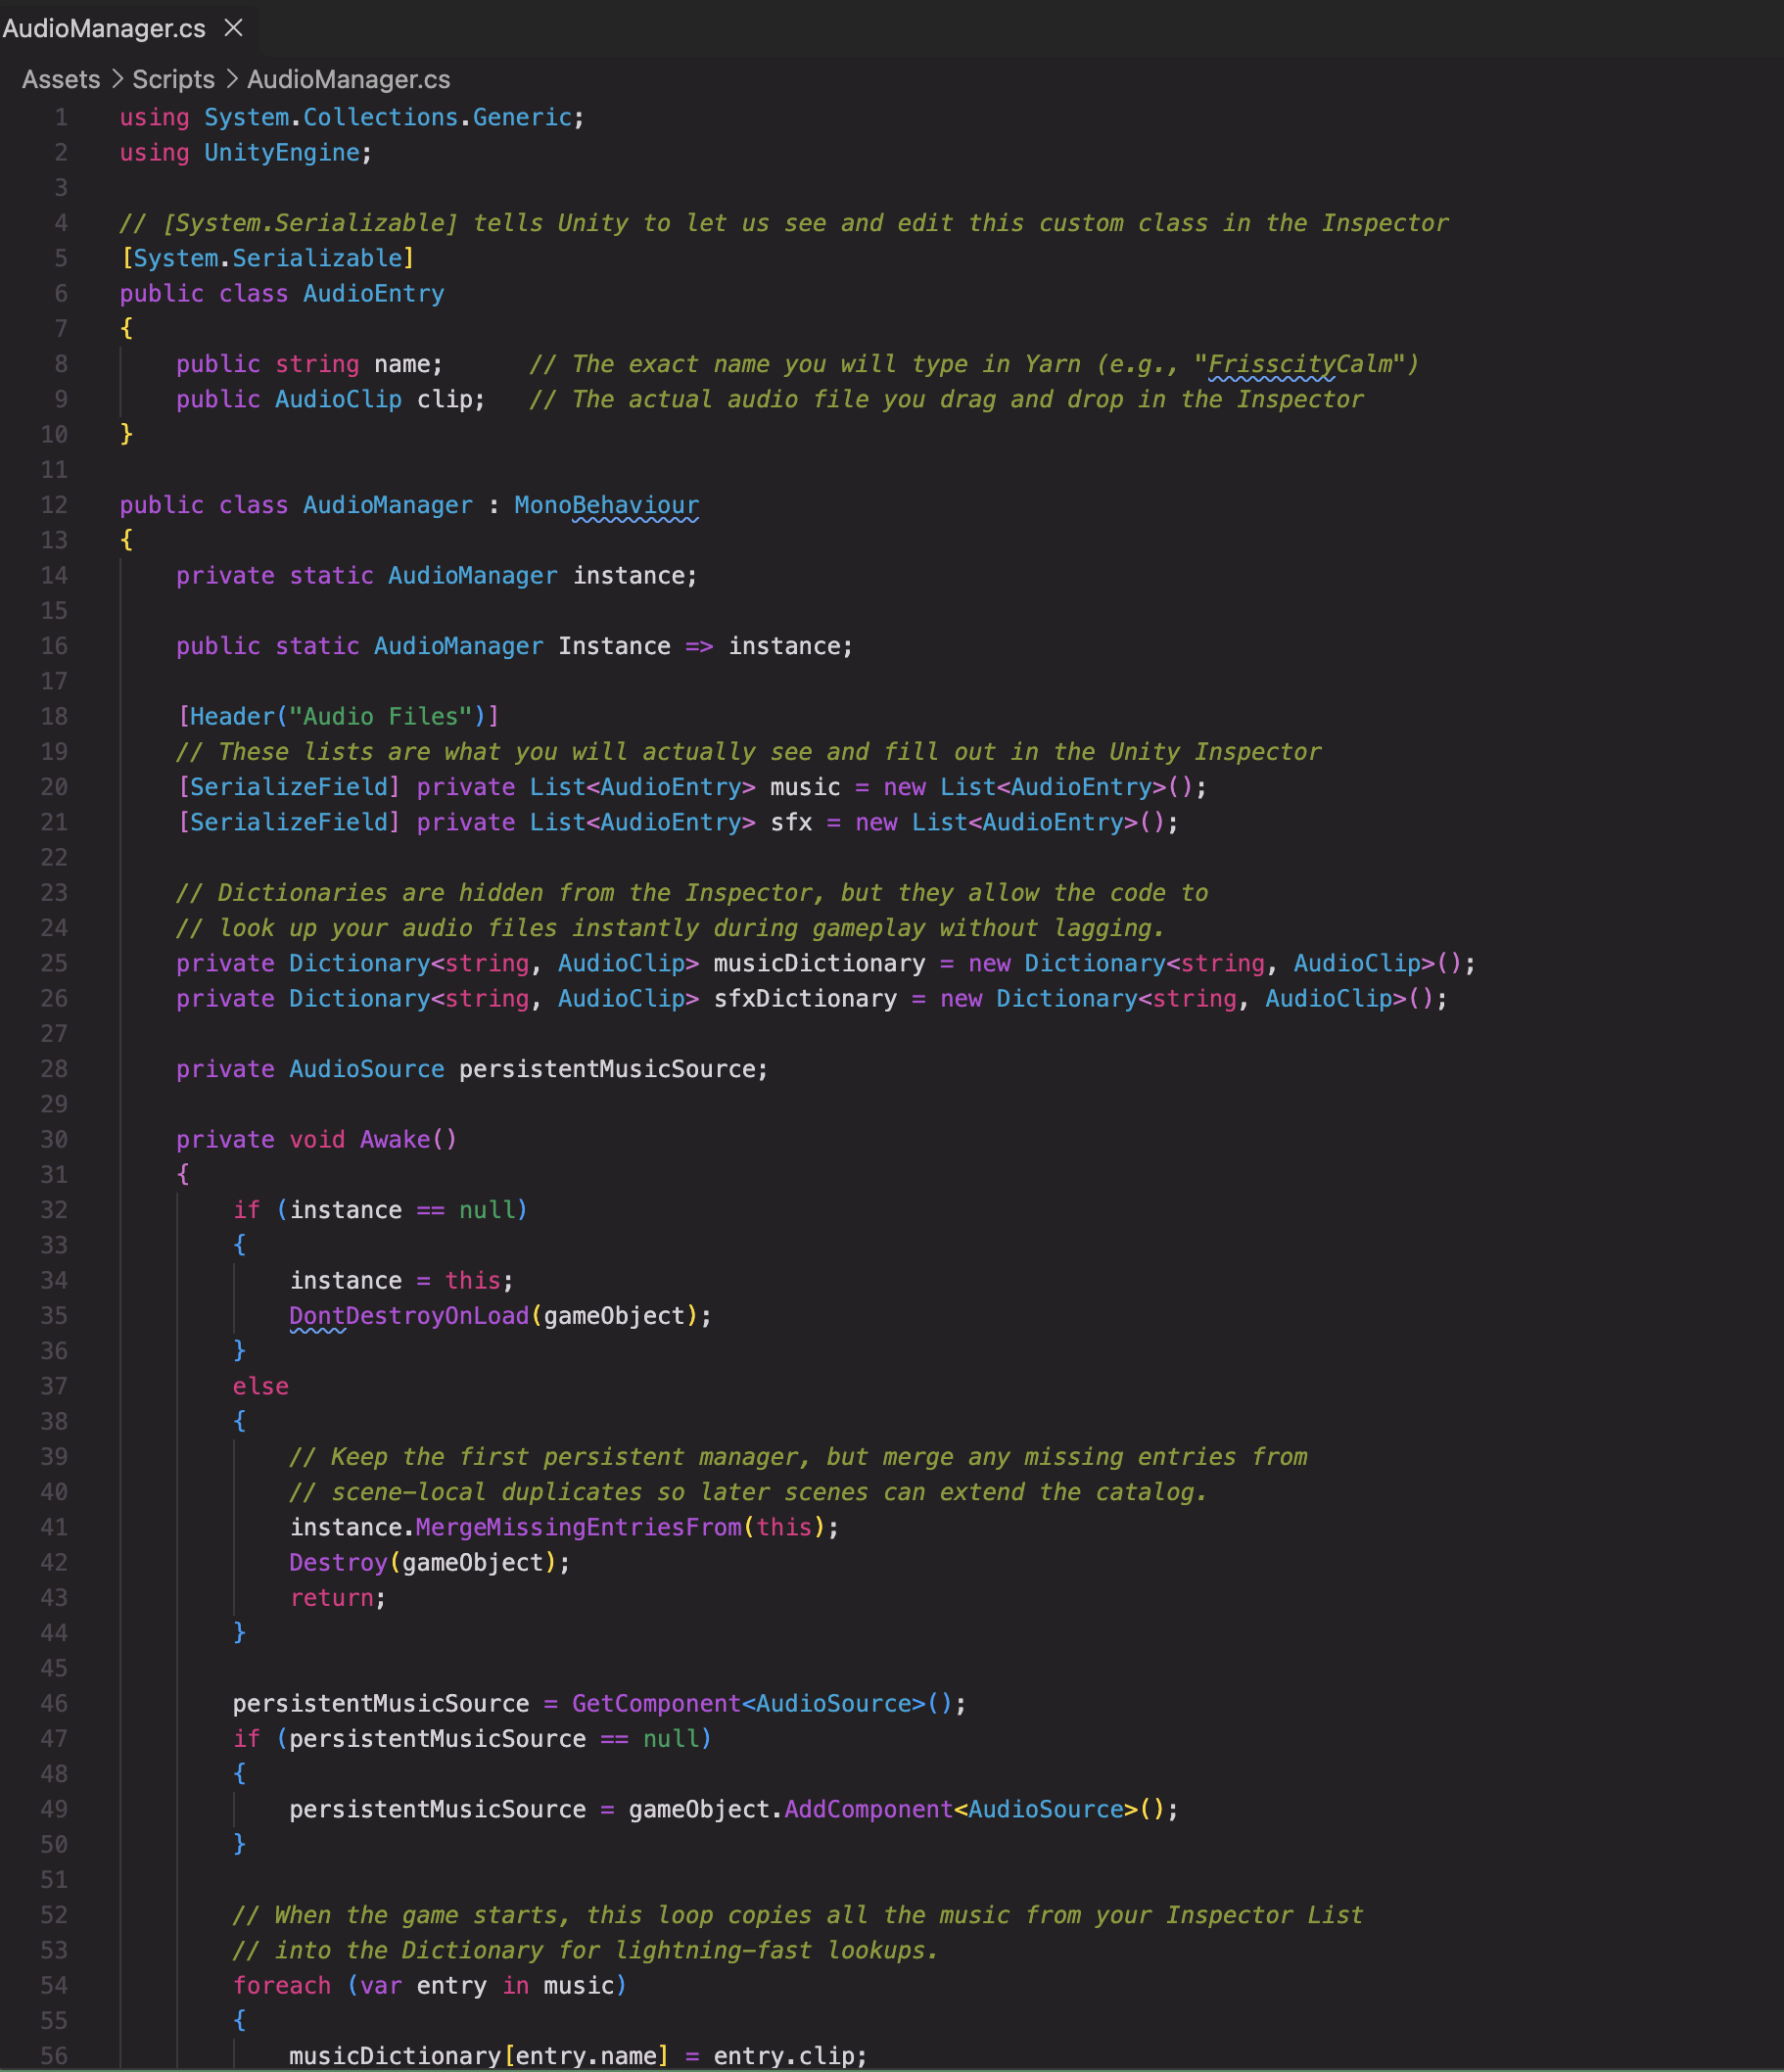
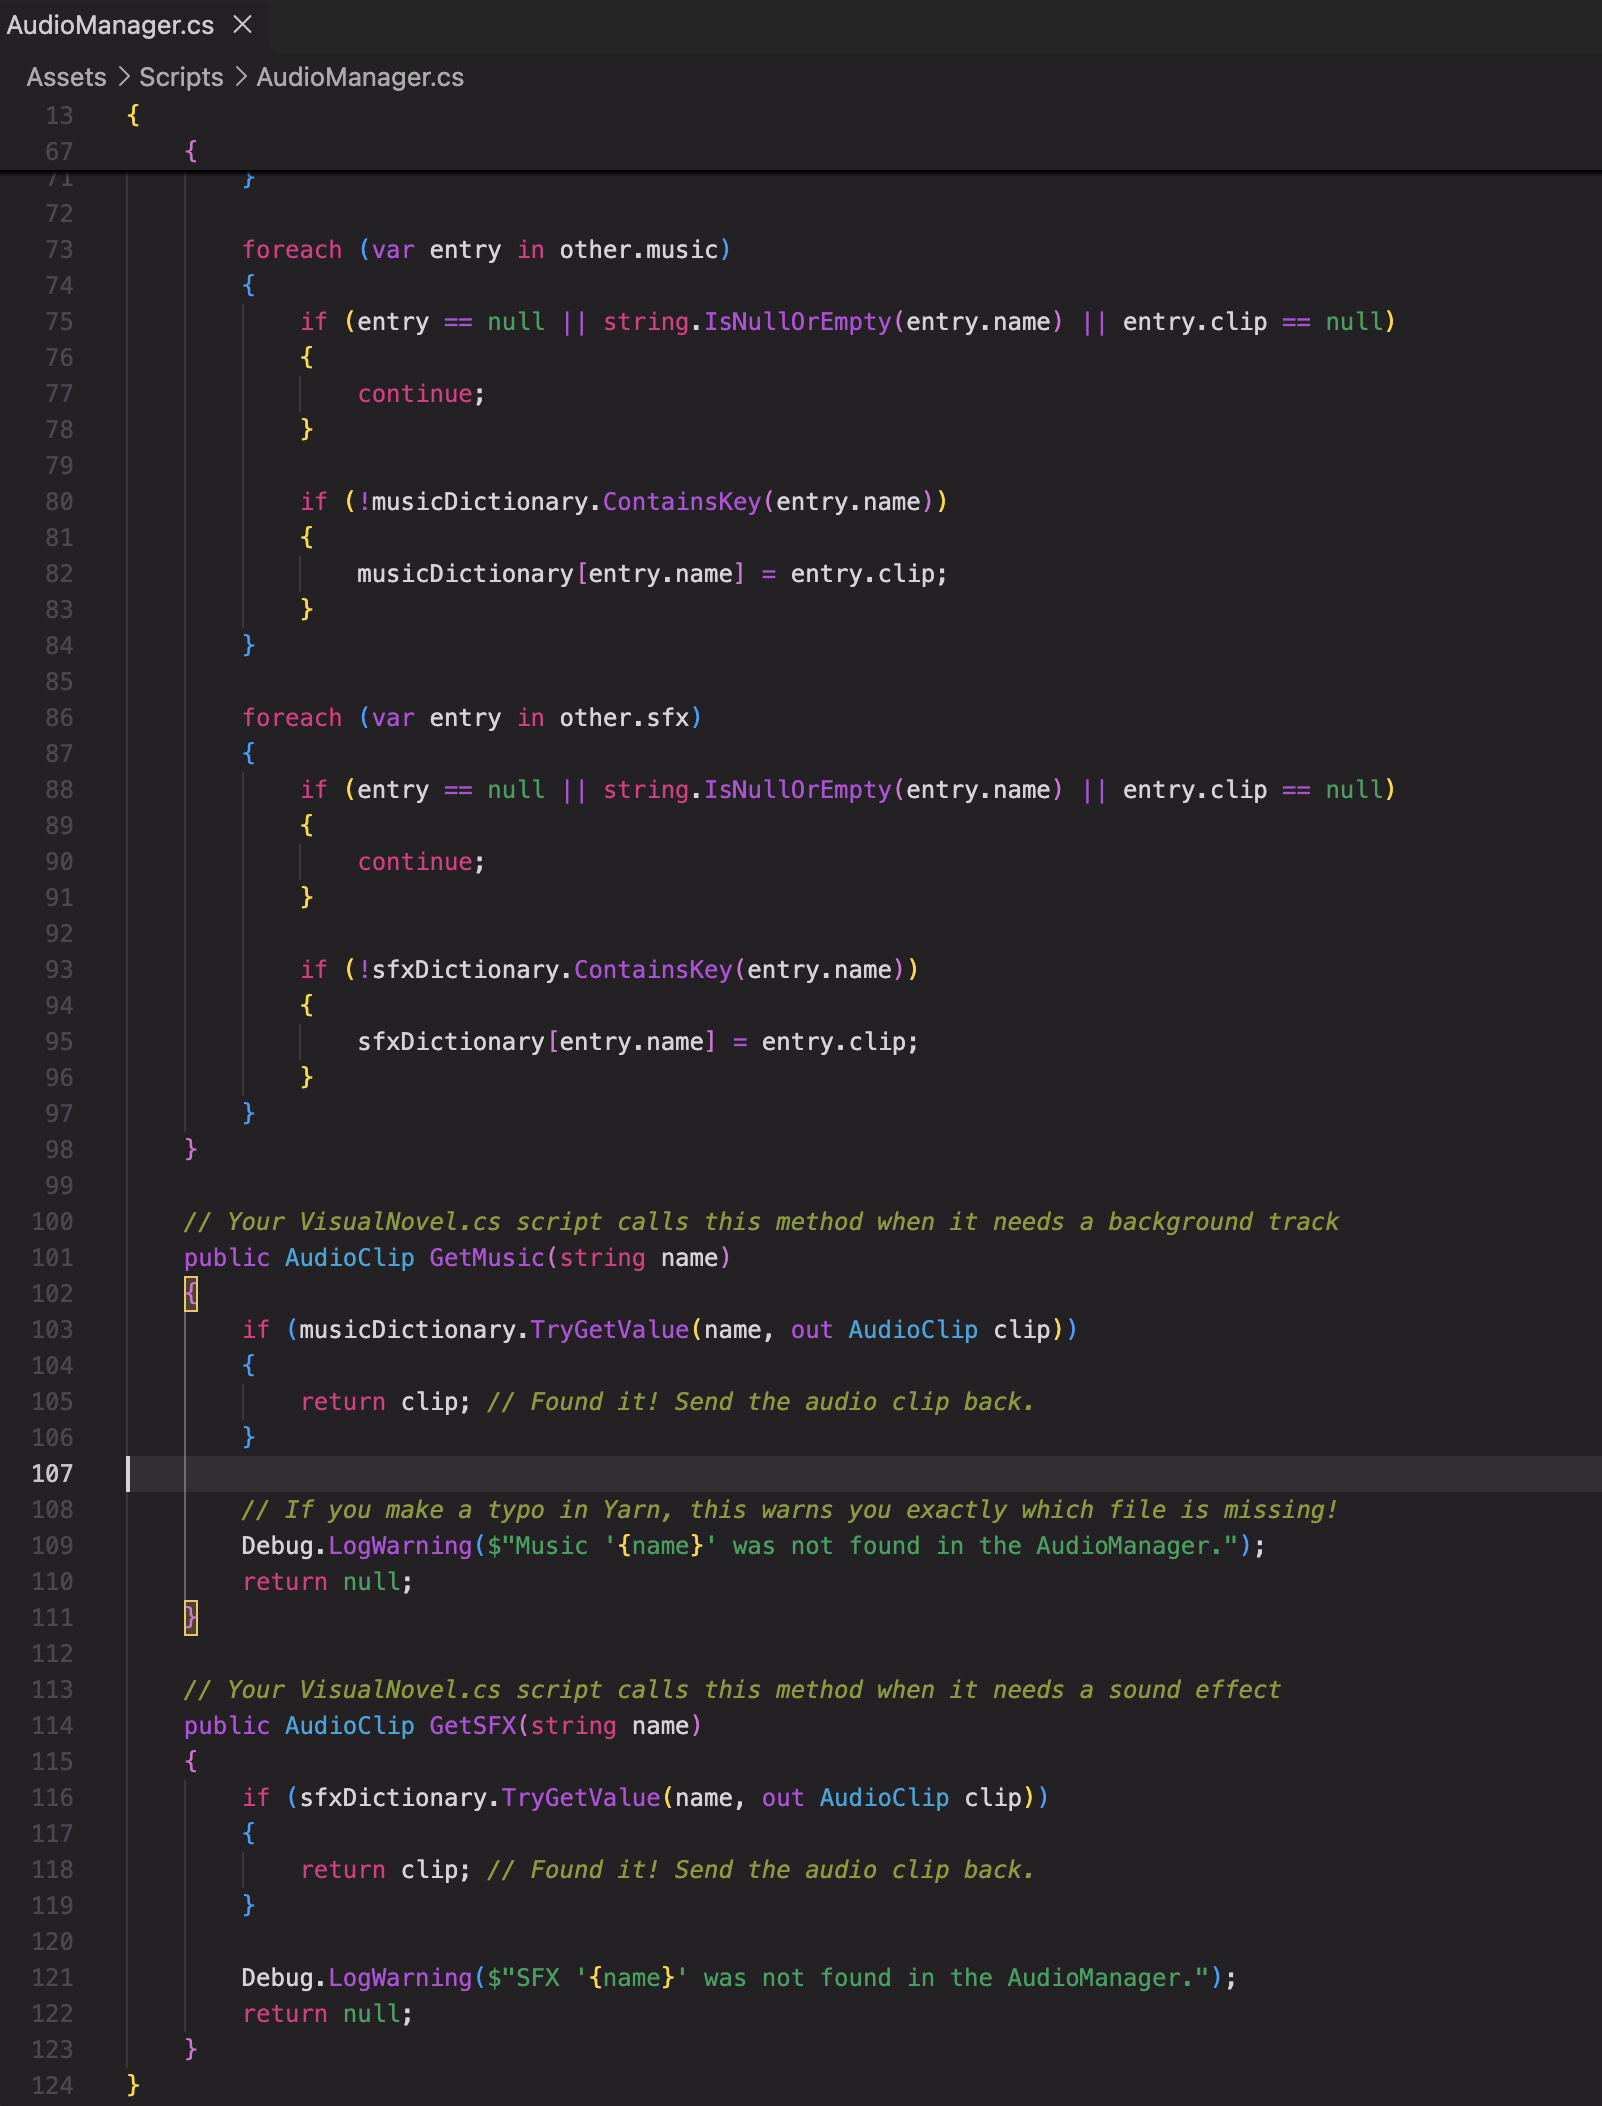
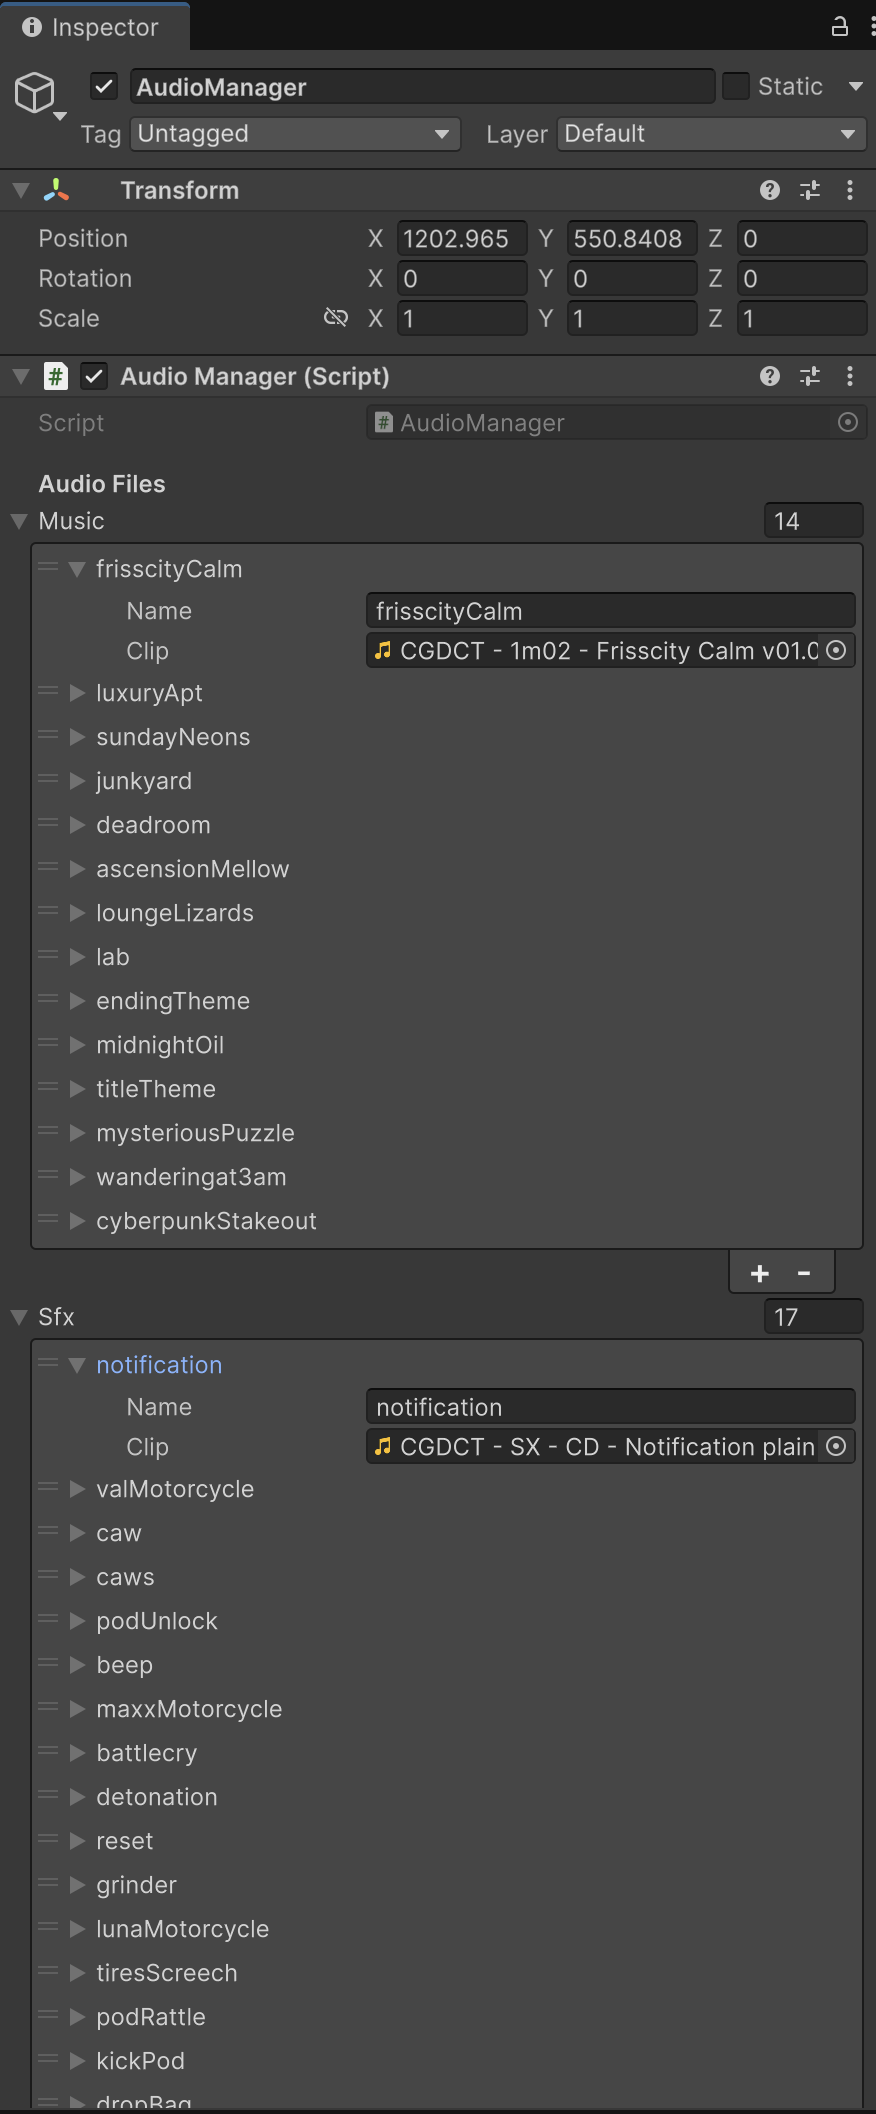
I created an “Audio Manager” C# script that allowed me to easily attach music tracks and sound effects to the script in Unity
I could use «playSFX» to trigger a sound effect directly in the .yarn file dialogue
I could use «playMusic» to cue up a new music track that one of our composers created for the game
I could also use «stop» to suddenly stop a music loop for dramatic effect, like when our game’s antagonist Maxx first appears
I’m really proud that I implemented dialogue into the engine and even created methods that helped deliver dialogue in the way that I wanted! (Is this what stage direction feels like? Maybe!)
Playtesting the Prototype Locally and With Friends and Family
After spending 2 extra months working on the game with just 3 devs, we were finally ready to test our game!
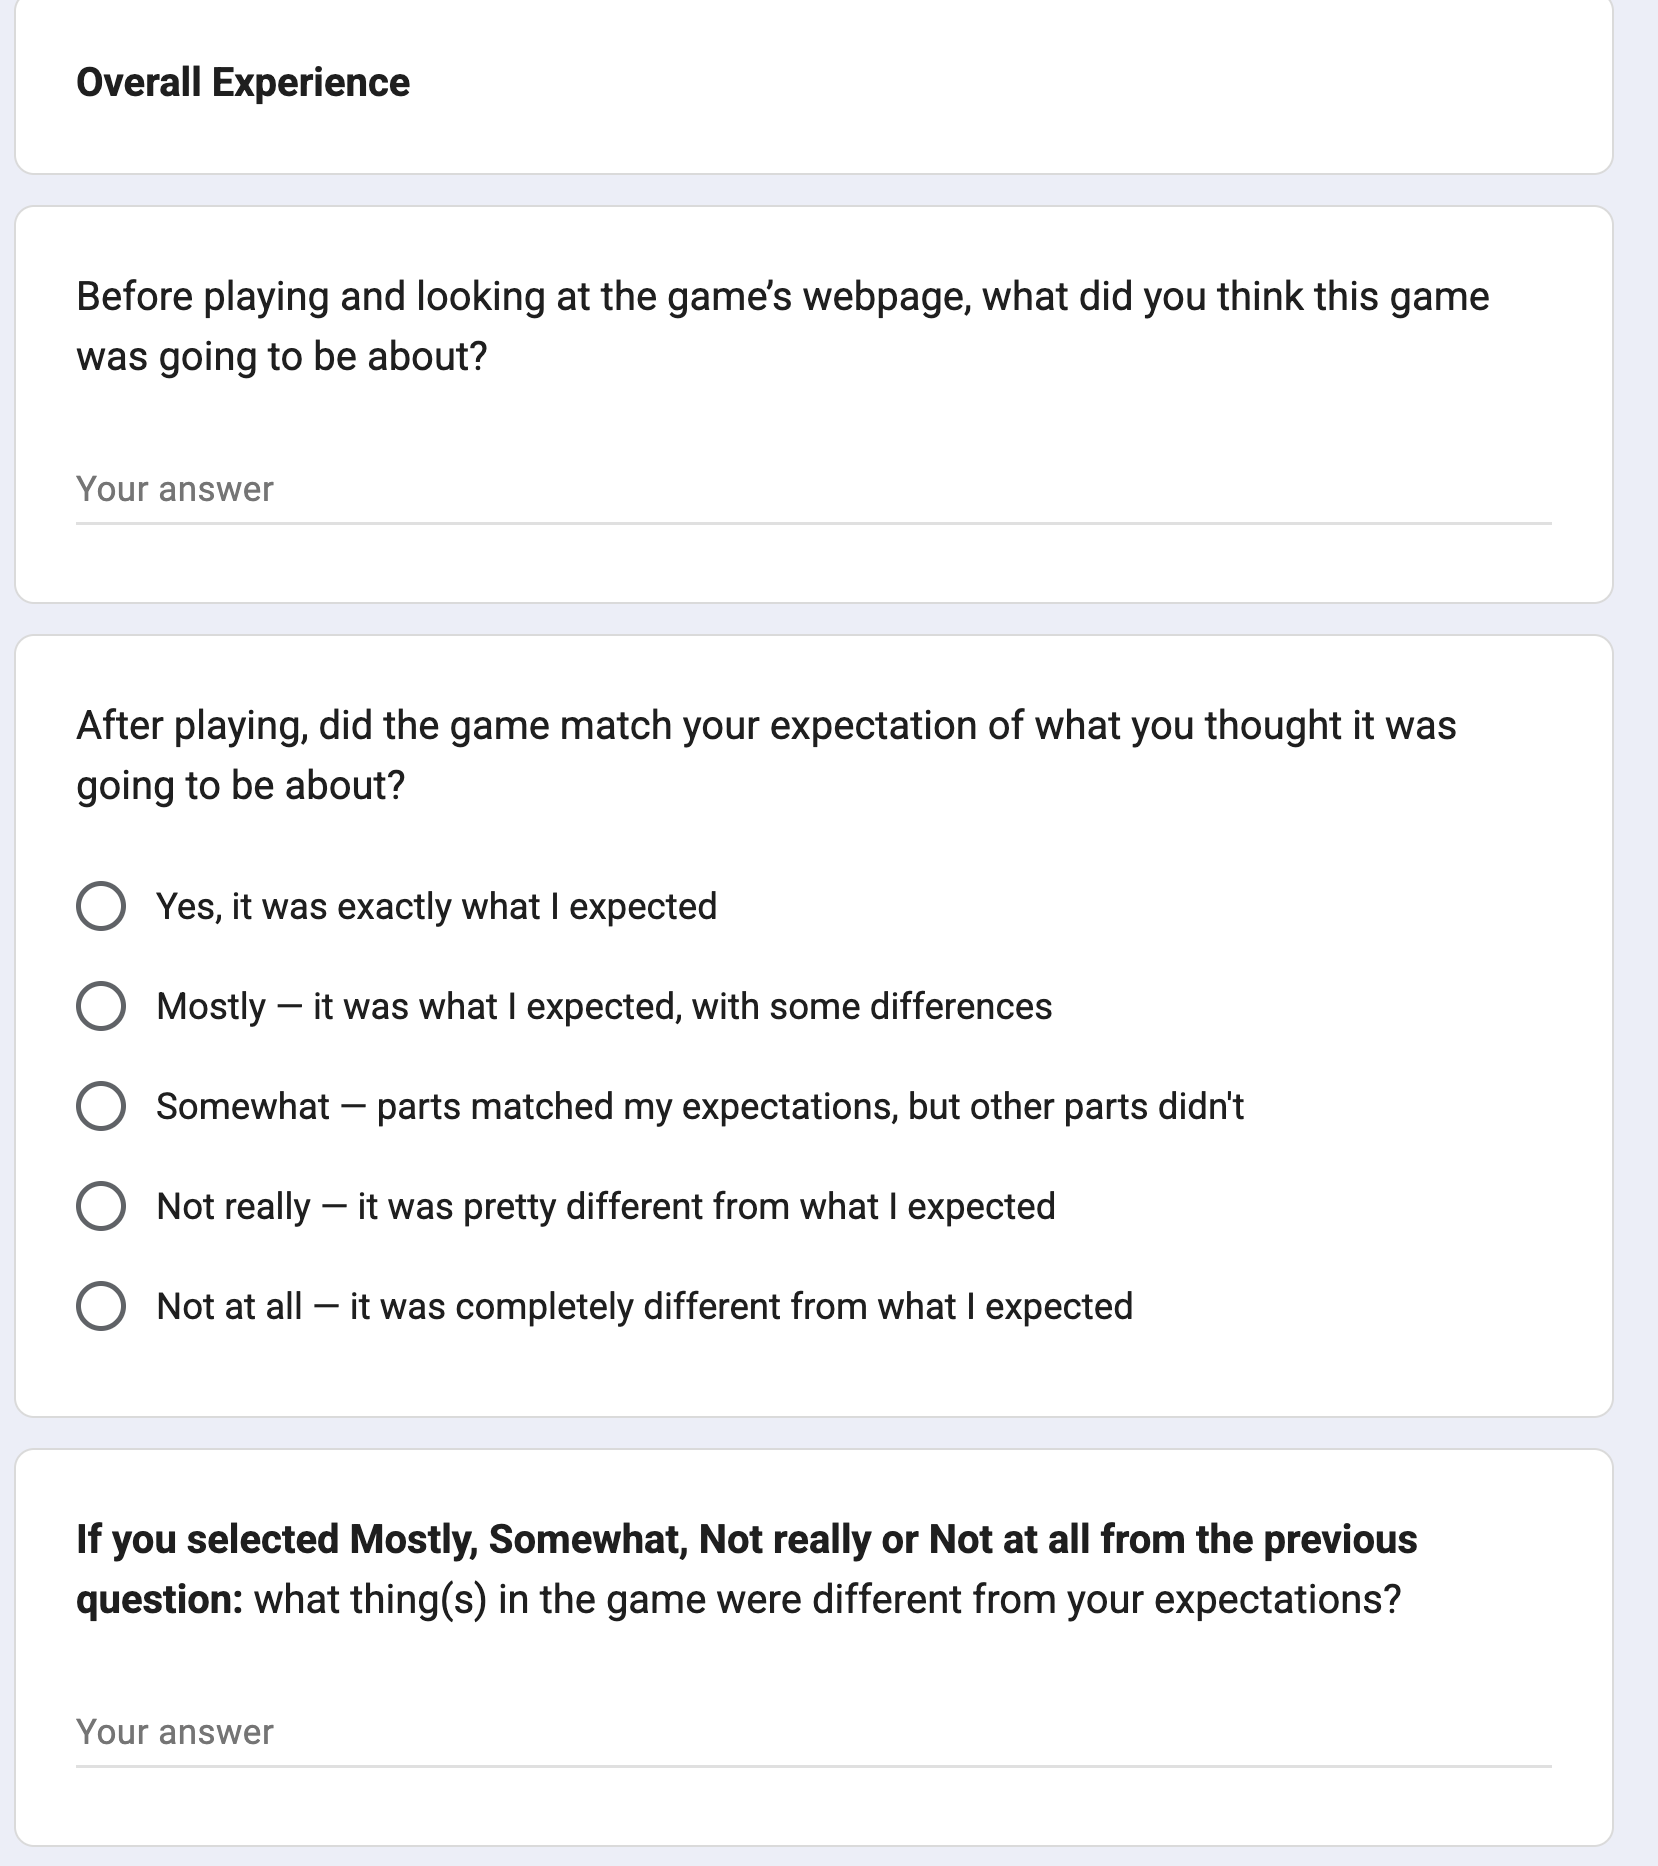
I contributed to a Google Survey and specifically included questions like: “After playing, did the game match your expectation?“ and “What thing(s) in the game were different from your expectations?“"
This helped us determine what was unique about our game, and also what wasn’t landing in our game’s branding, marketing, and descriptions.
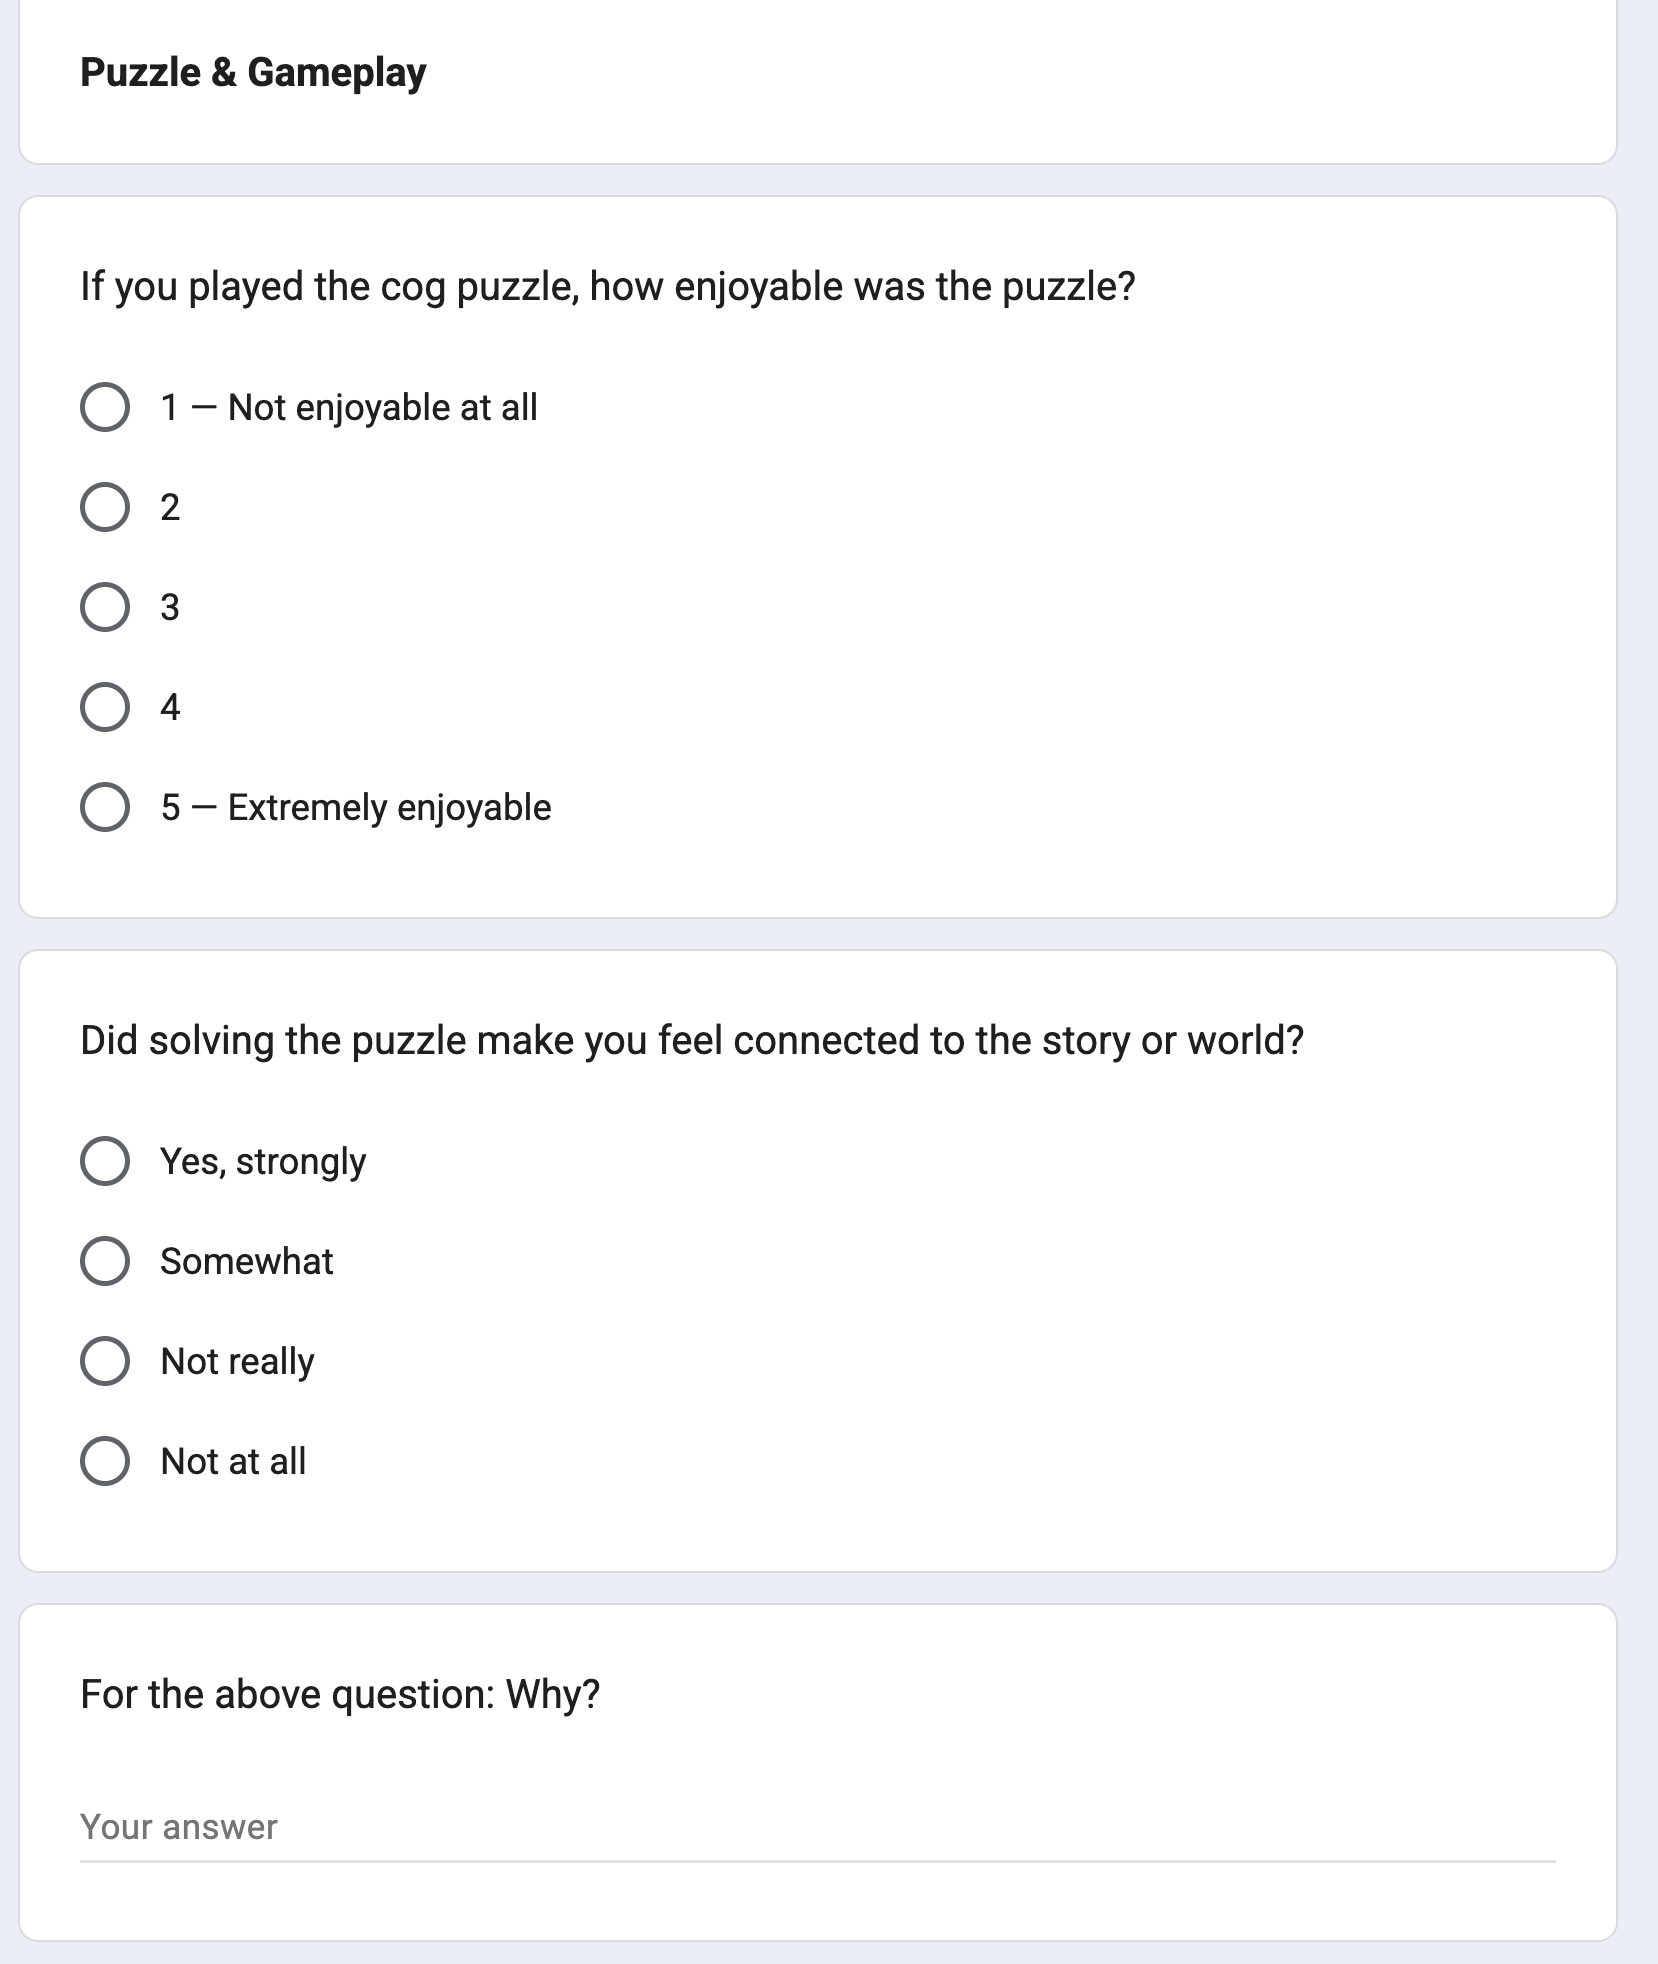
I also added a section about our puzzle to call attention to any bugs.
Though we originally were planning just to show it to friends and family, I decided I’d go to a local game dev meetup and showcase our game to collect feedback.
I thought it’d be super important to watch where players were actually getting stuck, and to track emotional cues in real-time, like when players were most engaged vs. not engaged.
I’m so glad I did—because it turns out many people were struggling with our puzzle! They could give me live feedback about where they were struggling and what they’d like fixed.
Our Google Survey received 15 responses across friends and family, producing over 68 pieces of feedback.
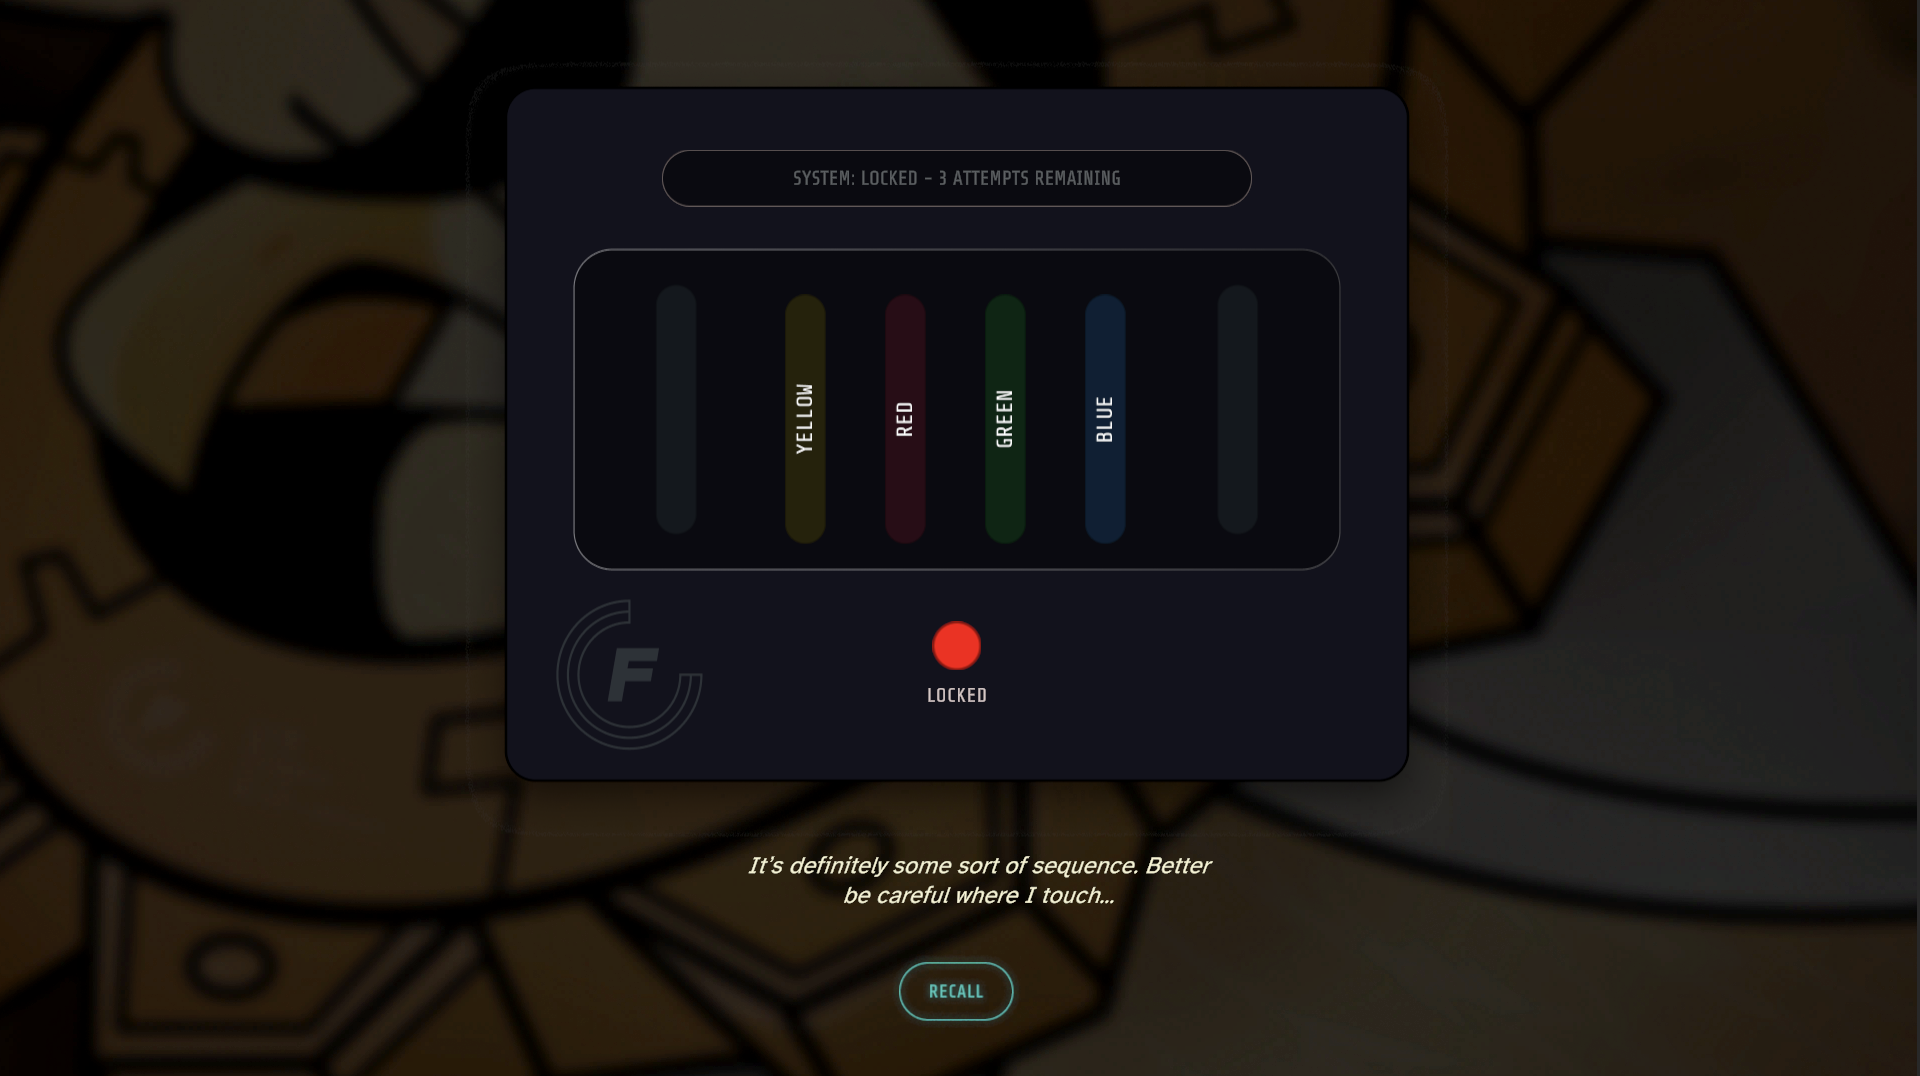
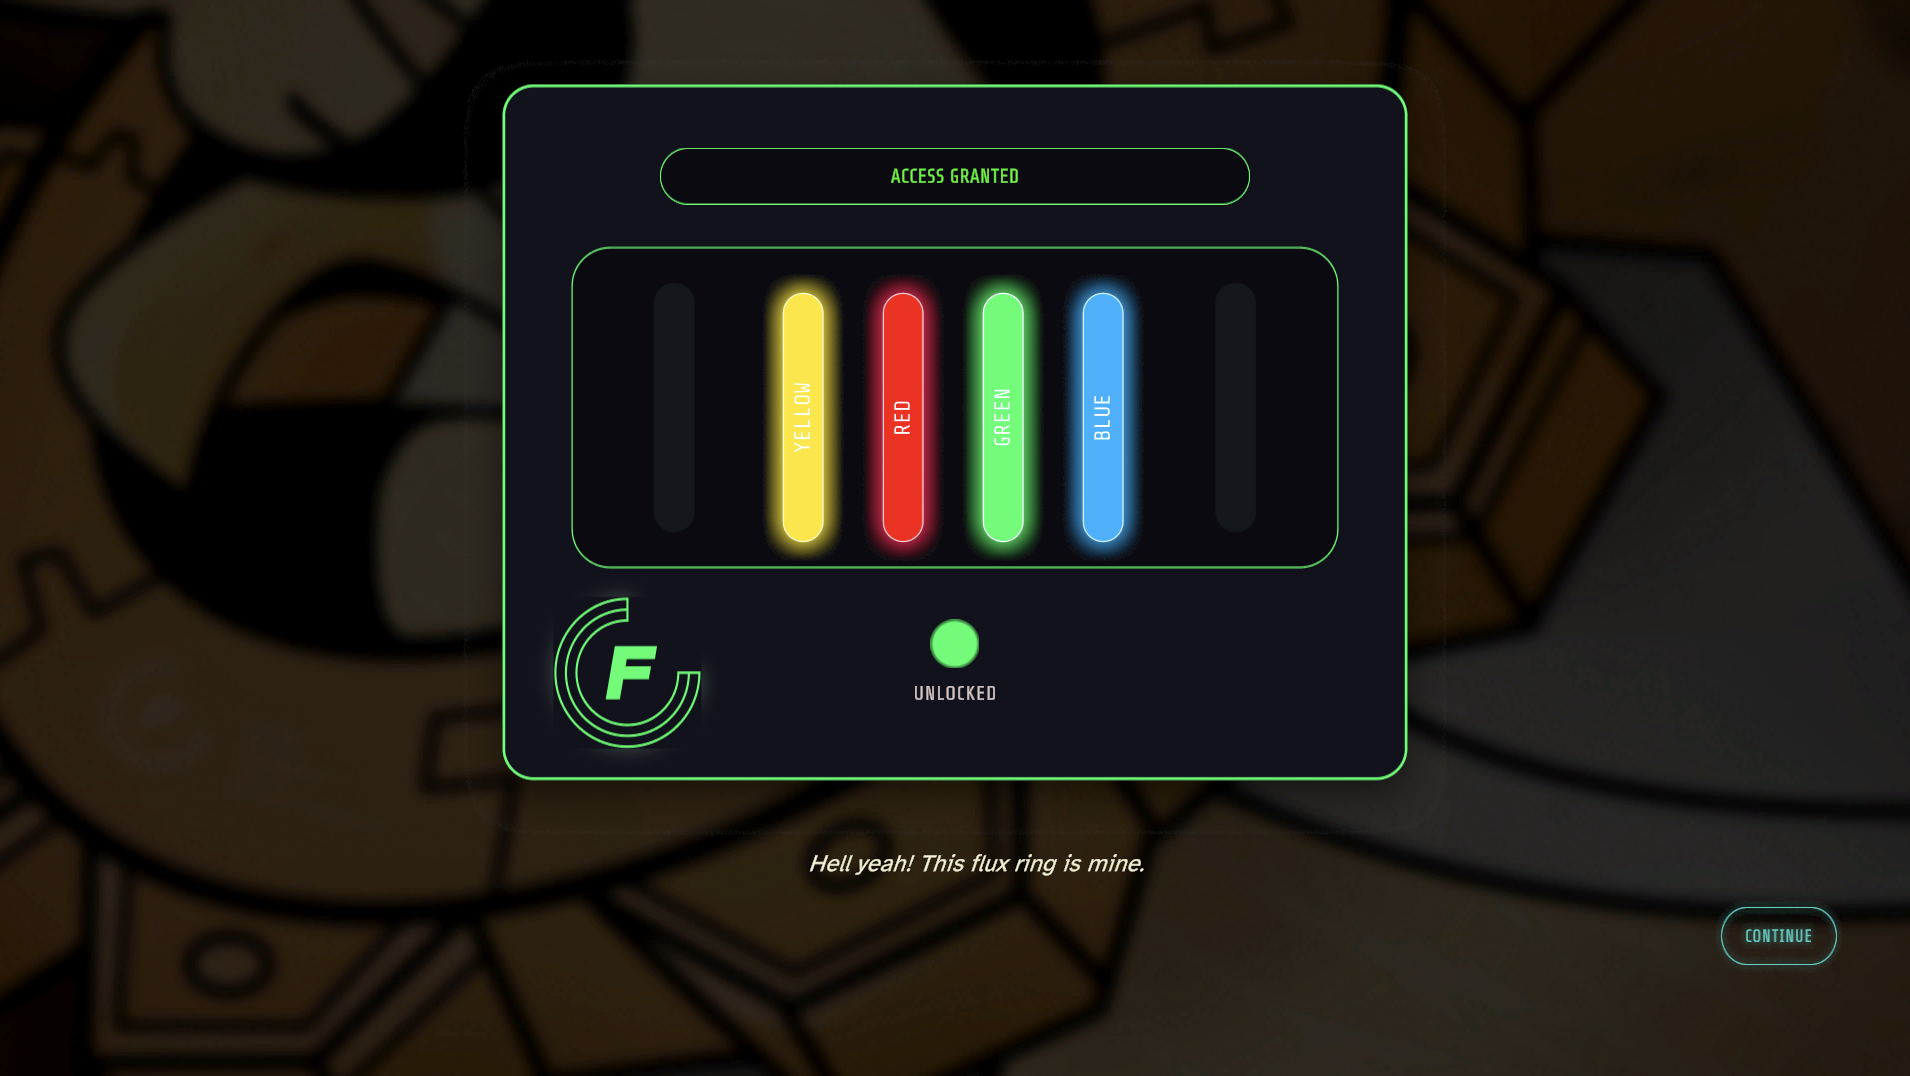
We were also able to get a playtester who was color blind, and they helped us make our puzzle more accessible by labeling the colors of the wires.
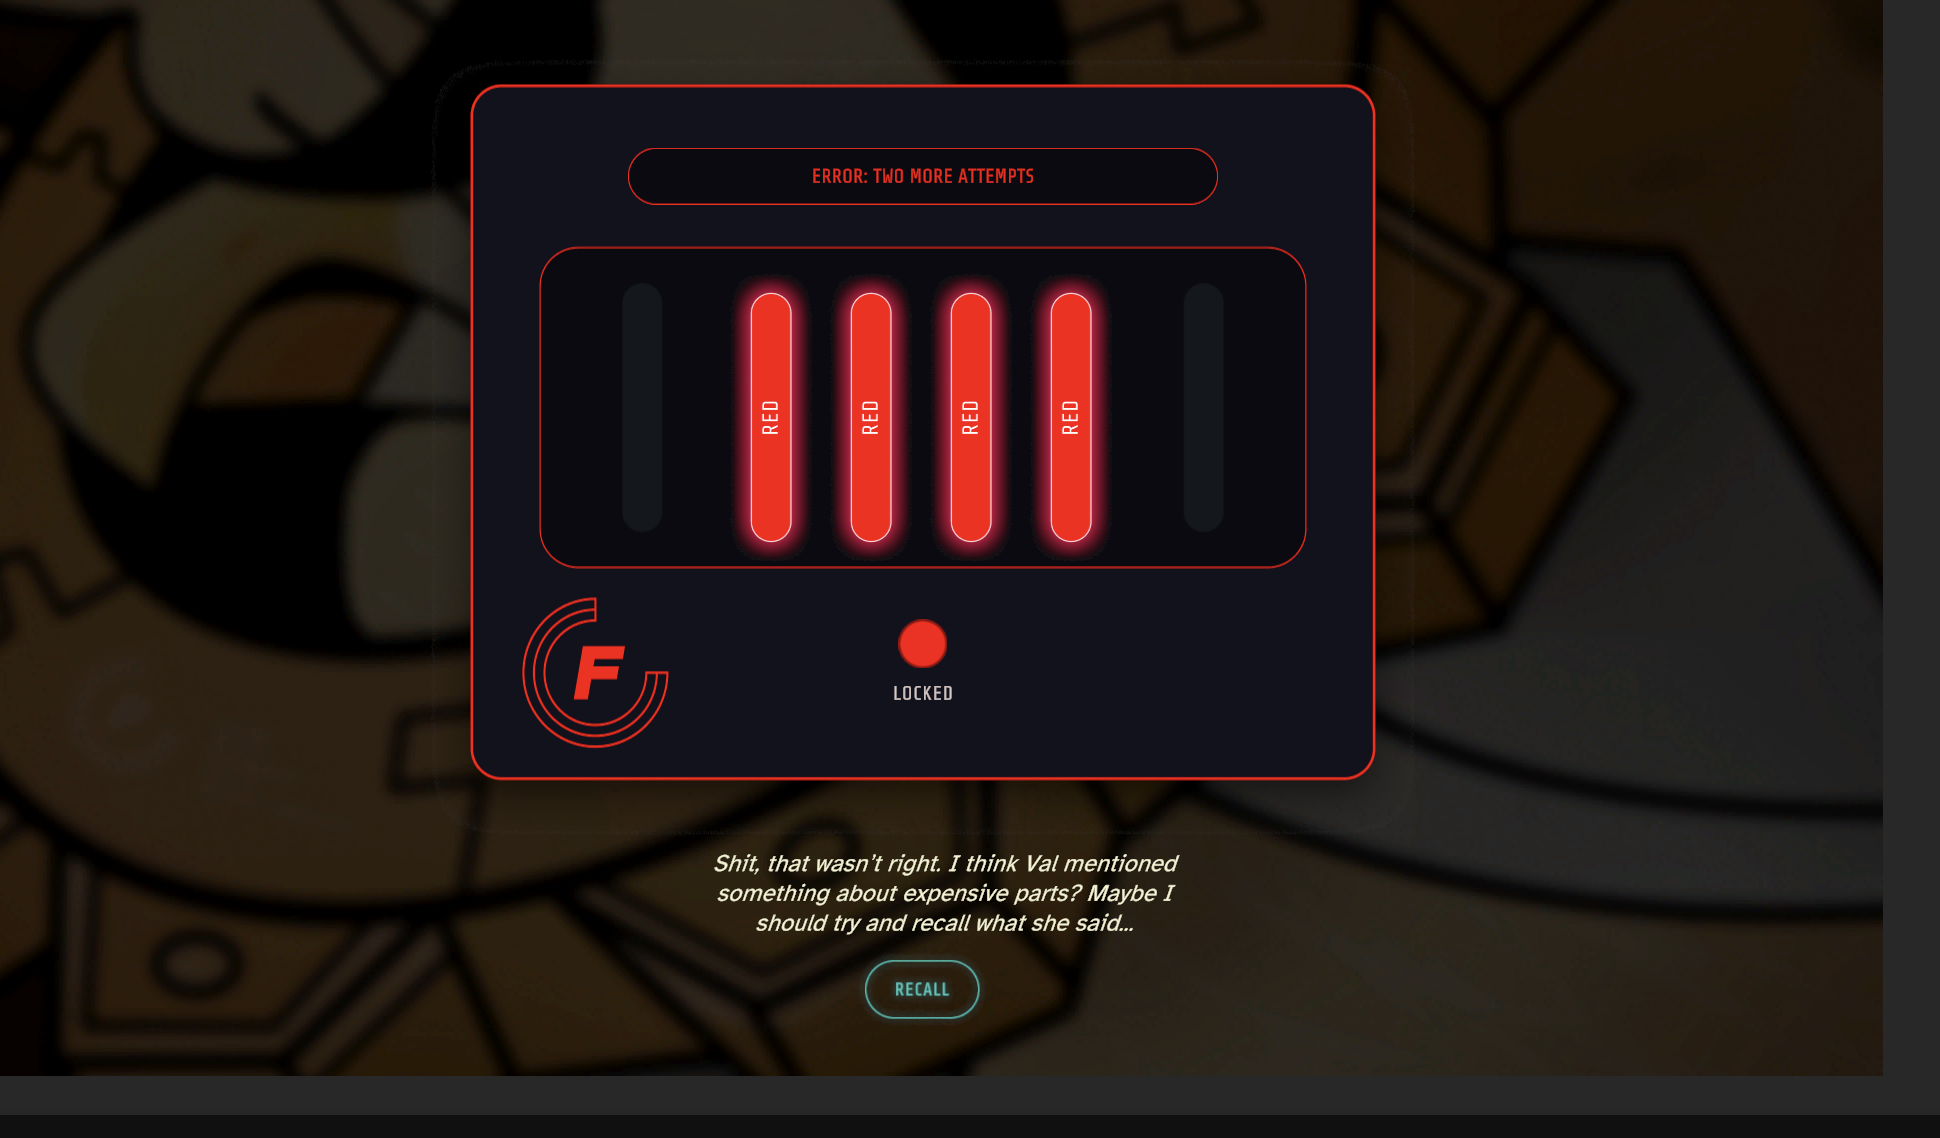
Improved Puzzle With Labels for the Colored Wires
I wrote the puzzle’s UX content, which included fail and win states, keeping parity between titles and status copy (ex. X attempts remaining), as well as the dialogue that Luna says aloud while she’s attempting to unlock the cog.
I also embedded hints into Luna’s musings. For example, when the player fails for the first time, she cues the player to ‘recall’ (which the button is also called) and use our game’s History feature to remember what Val had said about wires.
Narratively, this also helped me realize that we should connect the puzzle to a situation that actually happens in the story to boost the player’s memory and connection to the events
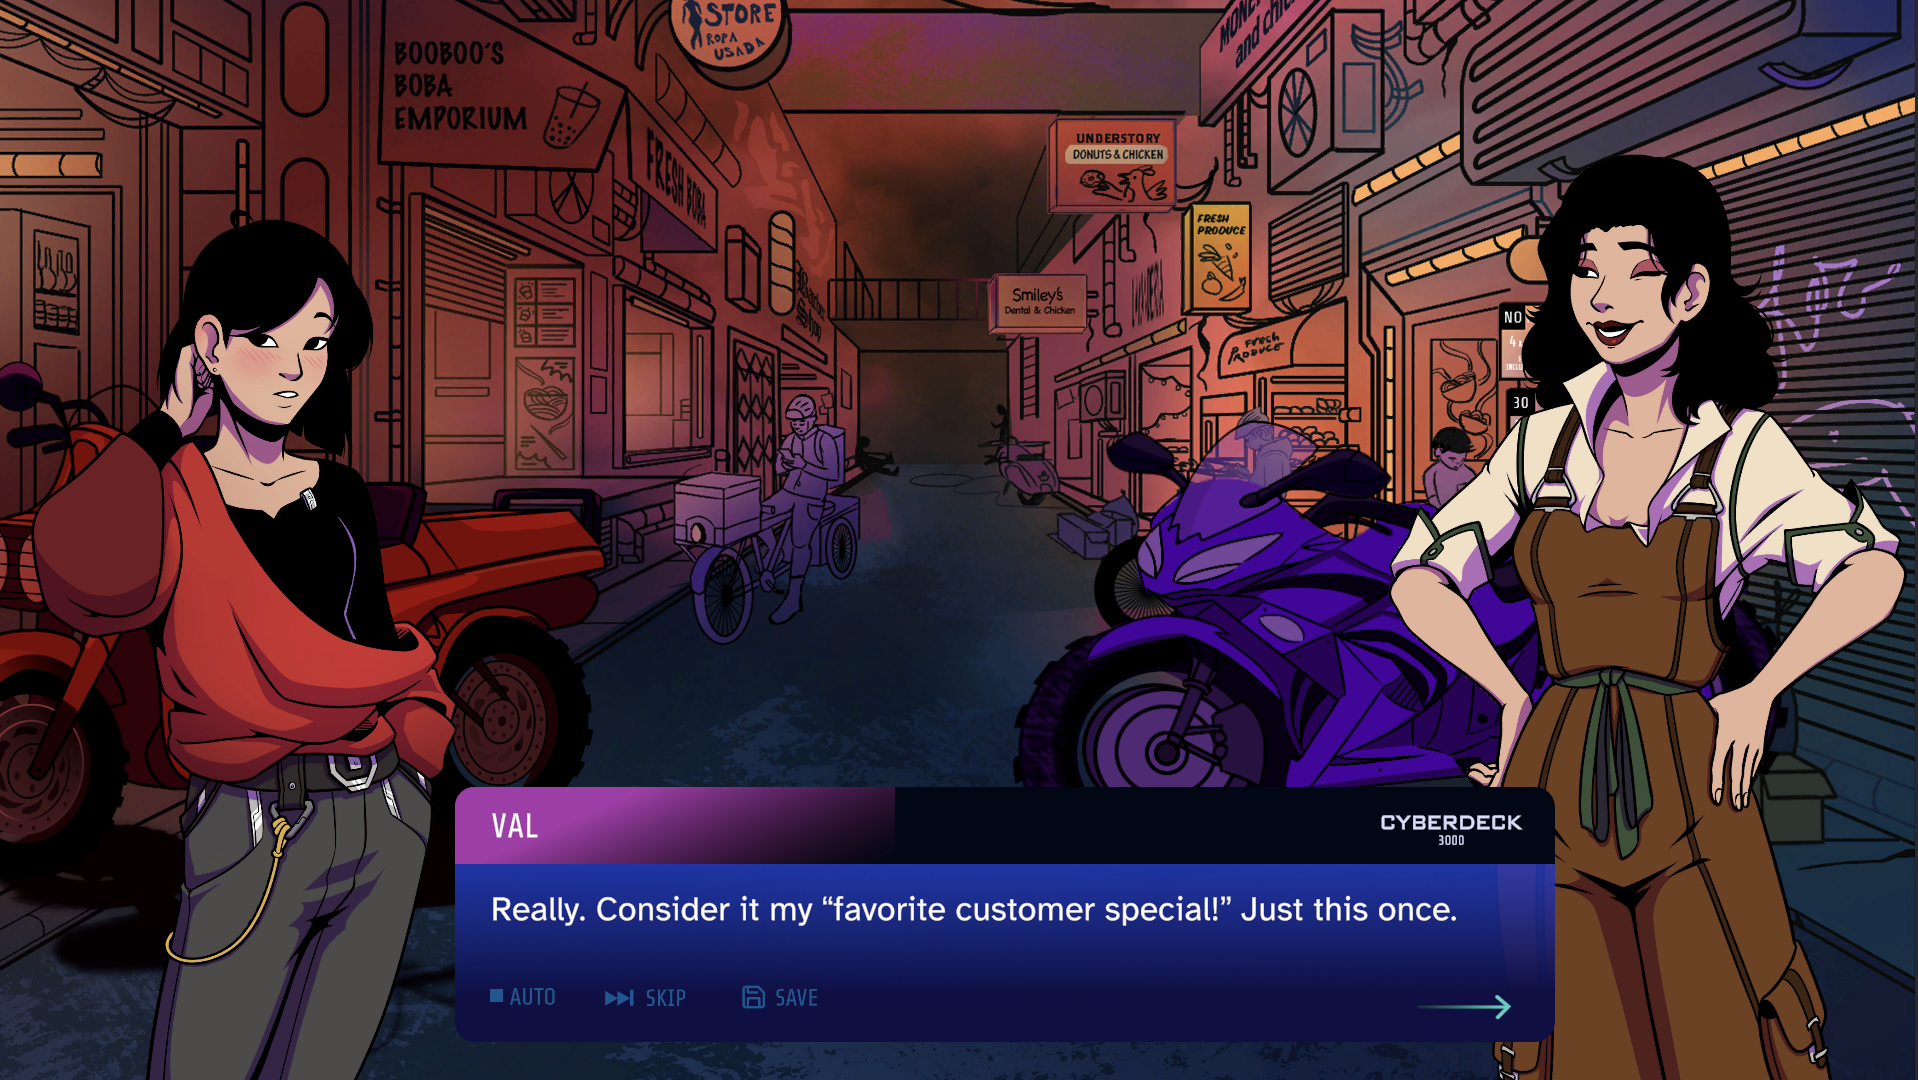
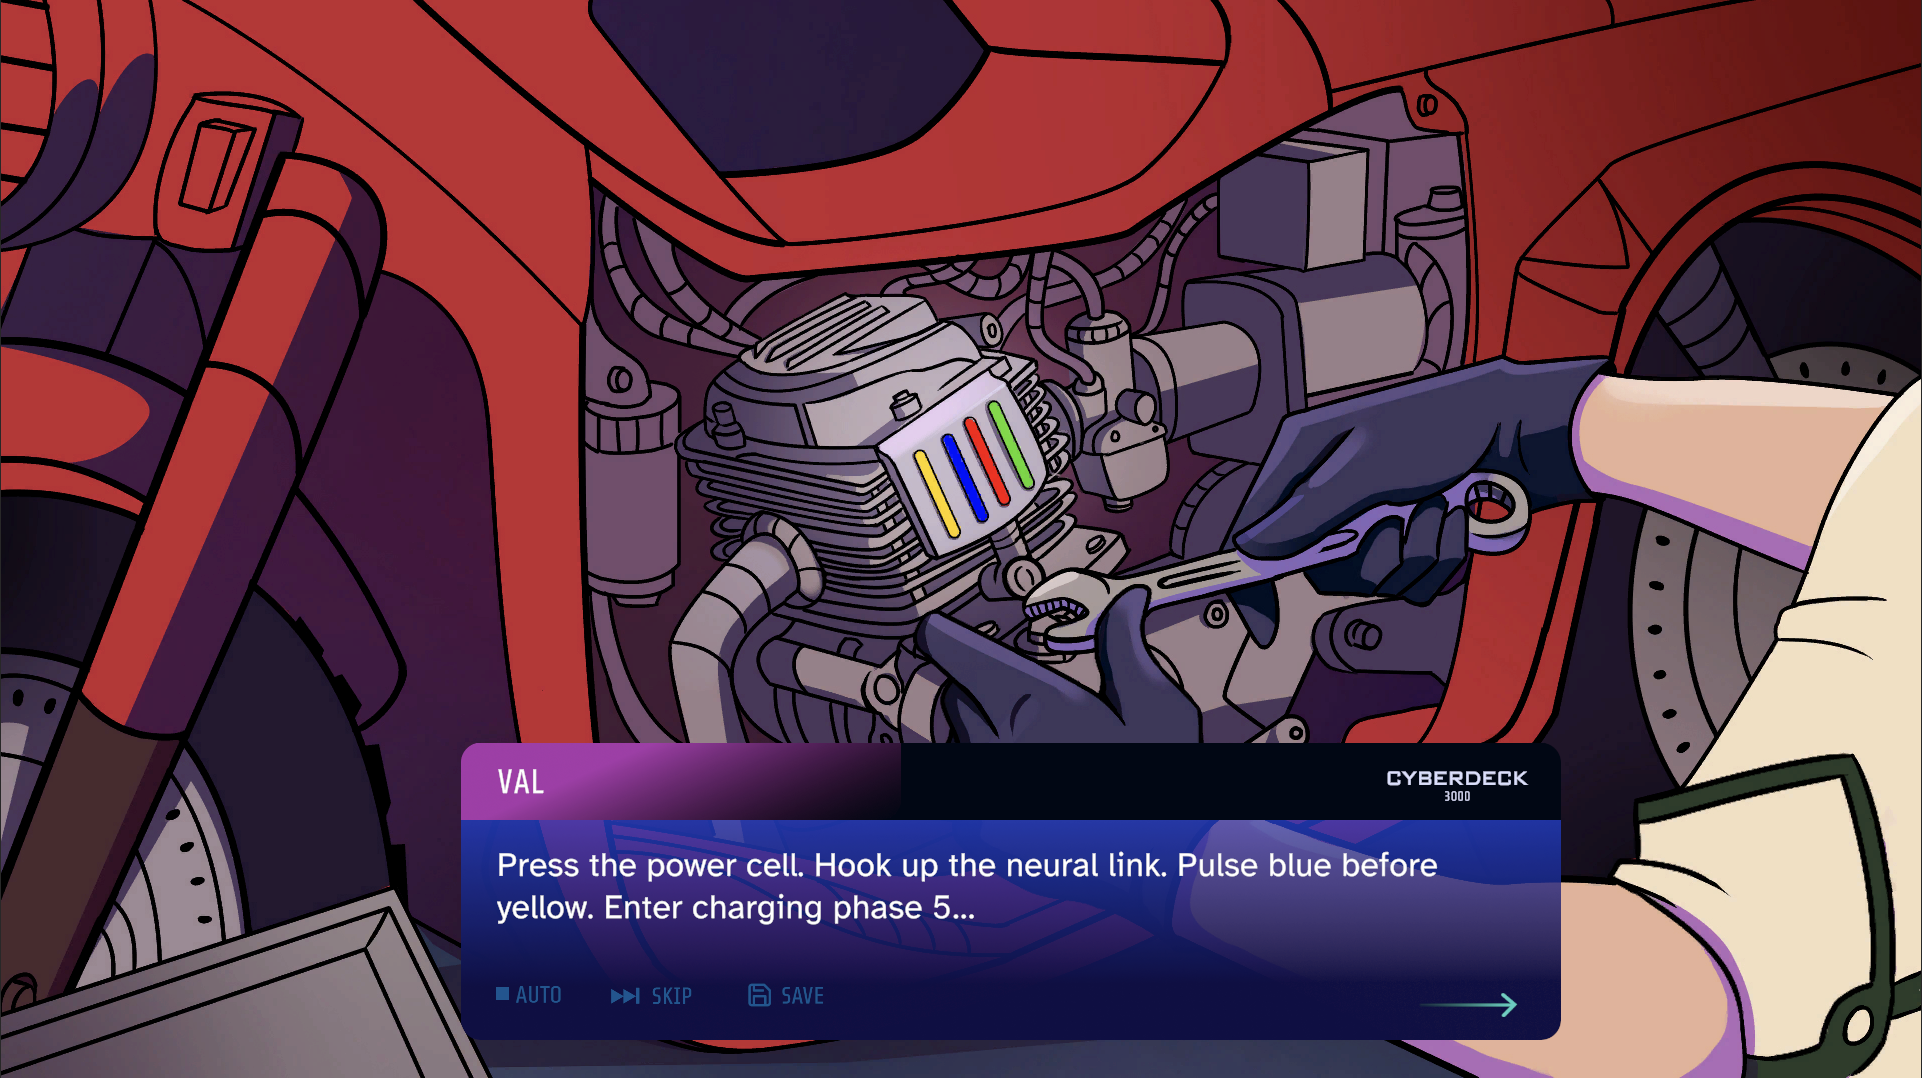
I had the idea: what if Luna’s bike breaks down and her gearhead crush Val swoops in to save the day and fix it for her?
That would:
Show vs. tell why Luna has a crush on Val by having Val swoop in and save the day by fixing her broken bike
Cue in the player to a future puzzle that had to do with wires. If the bike breaks down and we talk about wires, the wire puzzle would feel more familiar and resonant.
It would make the narrative clues for the puzzle that we were hiding in Val’s dialogue more relevant and believable.
This led to me re-working the first few scenes of the game with Val and I’m proud of how it turned out! I coordinated with Alyssa on the minimum amount of new art assets and sound effects we’d need for the new scene.
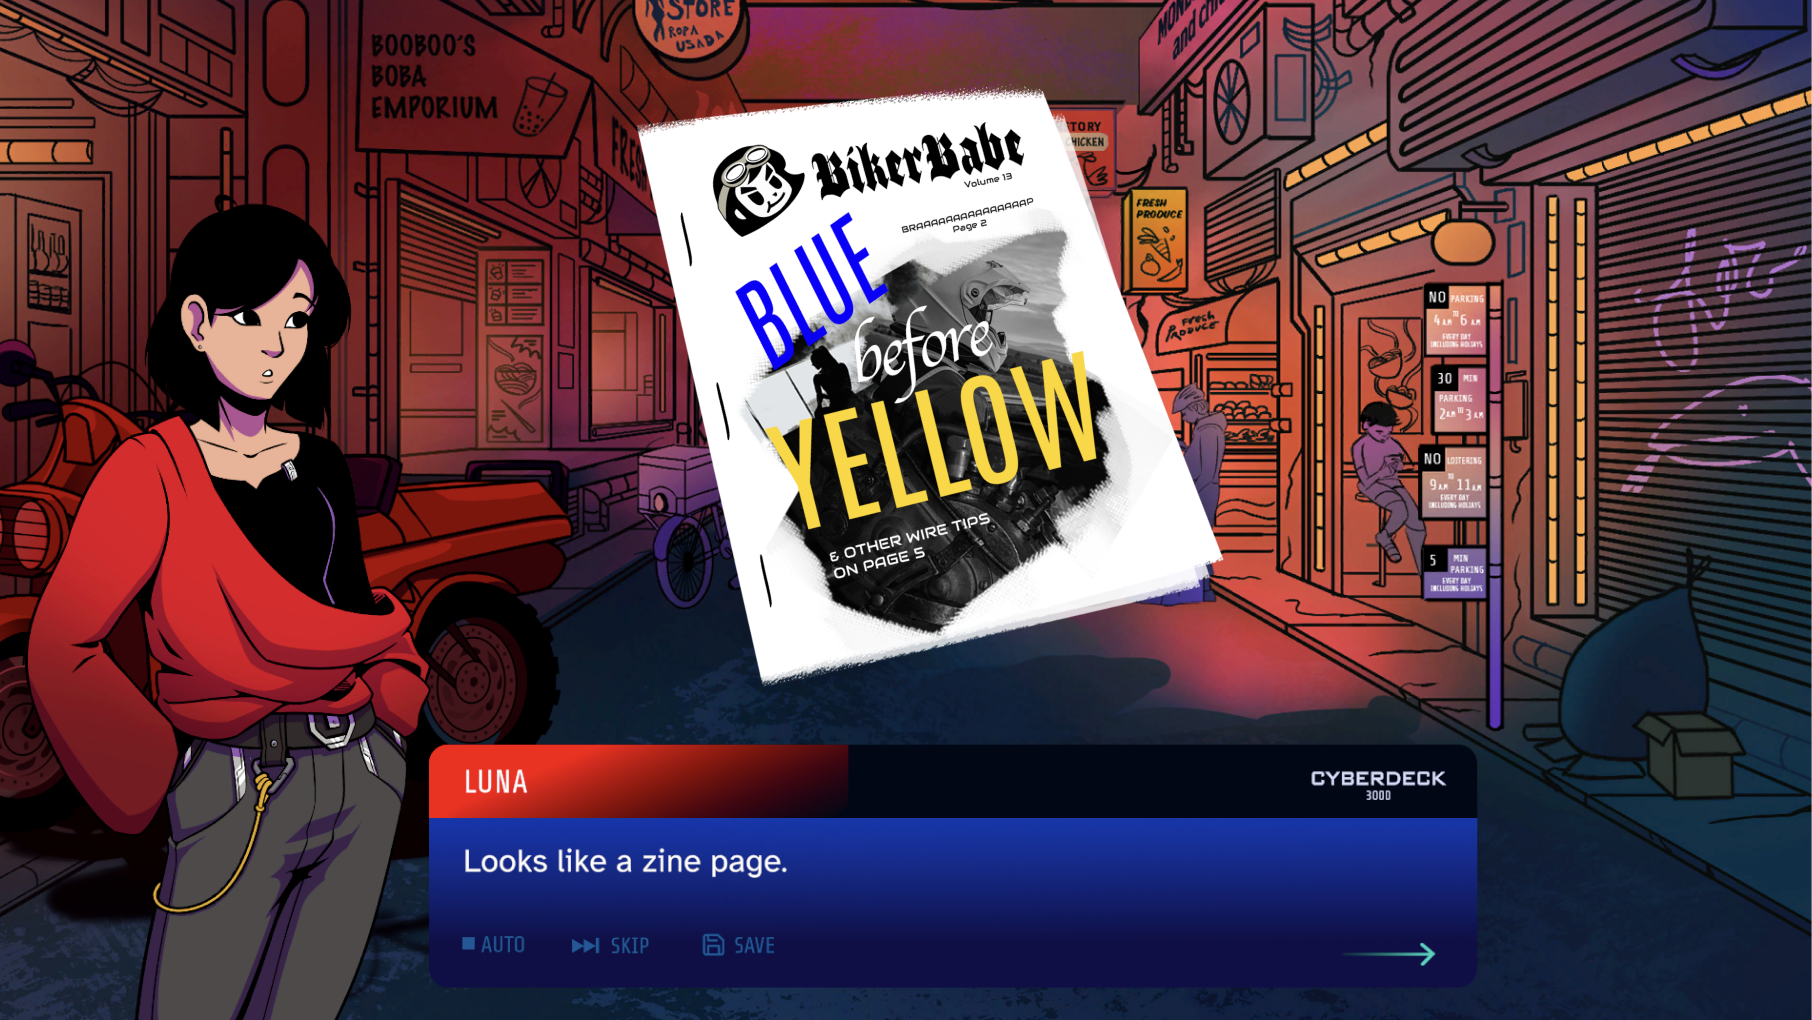
Playtesting feedback on the story also helped me tie up loose ends on quests
One playtester noted that the girls at the end of the story didn’t discuss Luna’s overdue rent—which was a central conflict and main stressor for Luna in the first few lines of the game!
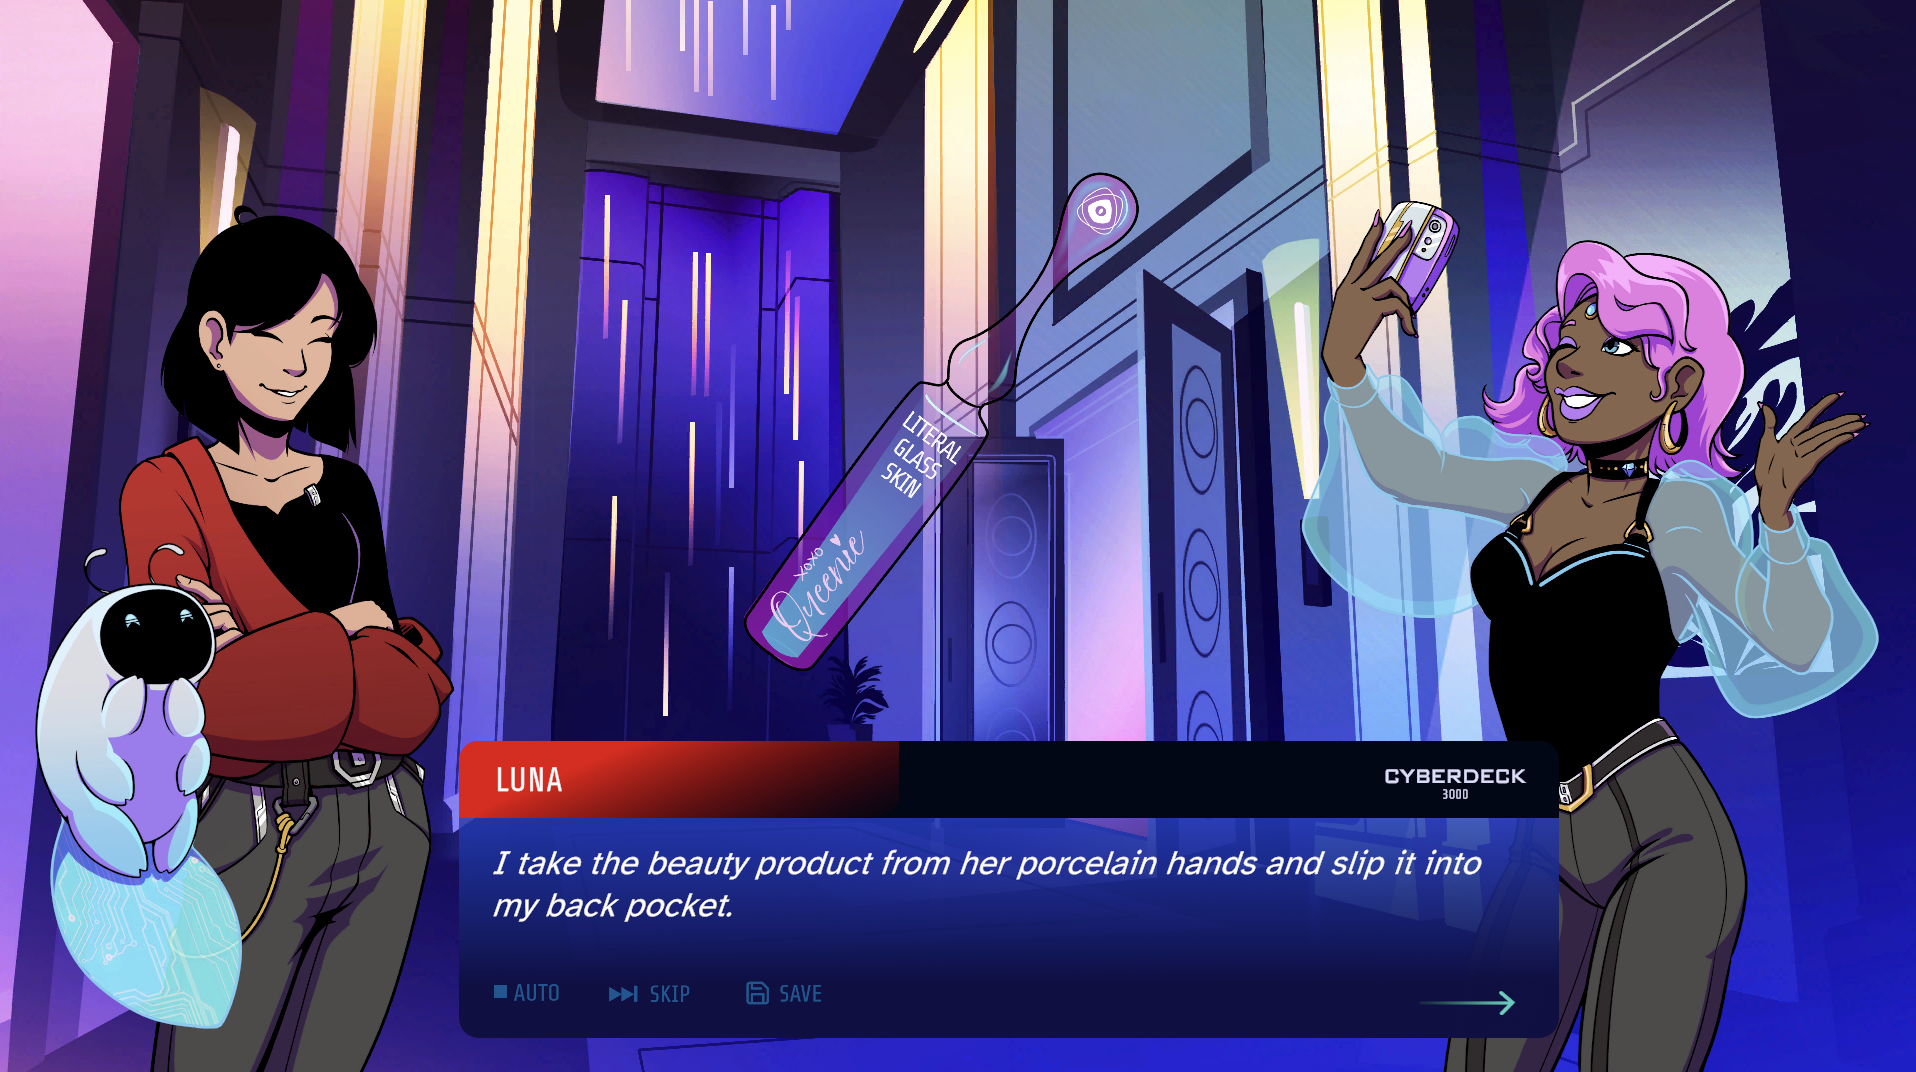
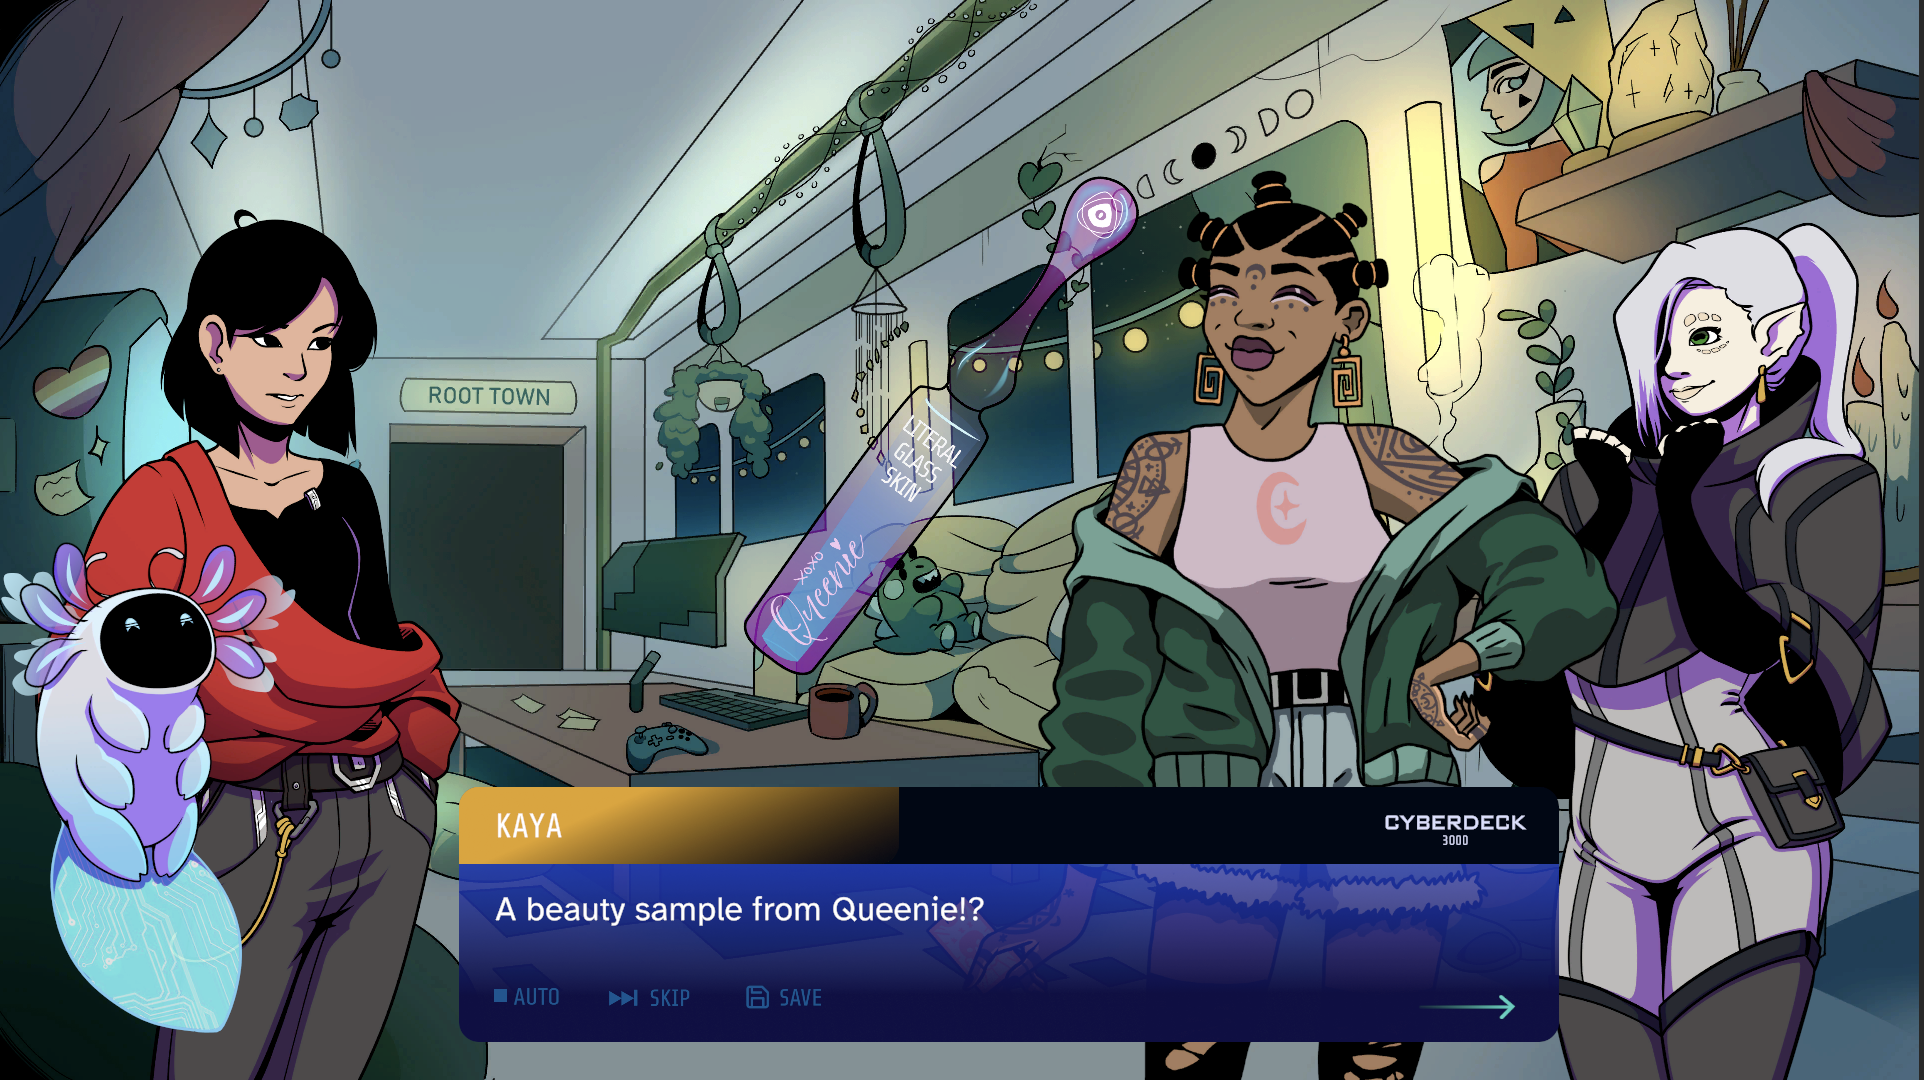
I reworked this by adding extra logic and dialogue at the end between Luna and Kaya. If the player made choices that really resonated with Queenie during her questline, then she will give the player a signed beauty item that triggers an extra scene between the player character and Kaya, who is Queenie’s #1 fan.
This resolves an early conflict between the two characters that was mentioned in the first few lines of the story.
Learnings and What I’d Do Next Time
Always scope your game smaller than you think you need to—especially for visual novels. Creating the asset trackers and a narrative flowchart made me realize (albeit too late) that my full story was impossible to finish in under two months. Even though I’d finalized Act 1’s branching narrative two weeks into the jam, I spent precious weeks outlining Acts 2 and 3 instead of writing dialogue. Three weeks in, I finally told the team we’d only deliver the first third of the story. (Everyone cheered.) Scope creep is real.
Always add buffer to timelines to plan for the unexpected. An environment artist had to drop out midway through the jam, which meant Alyssa had to quickly cover that gap. Luckily, another artist joined midway through the jam and helped create CGs, backgrounds, and even bring our Cybergull creature to life! They'd actually reached out to us after playing my game, Lifting Spirits. (Reputation travels.) But next time, I'd build ample buffer time into our schedule and prioritize must-have assets so we can adjust scope without derailing production.
Encourage over-communication rather than under-communication. It's easy to assume everyone is aligned on priorities, deadlines, and responsibilities, but miscommunication can lead to duplicated work or last-minute surprises. Next time, I'd establish regular check-ins, clearer task ownership, and constantly encourage a culture where teammates flag blockers or changes earlier rather than later.
Recruit more writers and/or editors to share the narrative workload. Narrative-heavy games require more than writing dialogue. They also need story planning, branching logic, continuity checks, and proofreading. Next time, I'd recruit additional writers or editors with clearly defined responsibilities so I can focus more on narrative direction and ensure the story feels cohesive.
Recruit a producer for any jam that’s 1 month or longer! Coordinating tasks, tracking progress, and managing dependencies took time away from my narrative work. I had to prioritize game writing—or else, a visual novel would not be written! Next time, I'd bring on a producer to manage timelines, keep the team aligned, and catch production risks before they become emergencies. Visual novels also have so many pieces, and a producer could’ve helped keep everyone on track and accountable for their tasks.
Push character designs further to emphasize the sci-fi setting. I’d like to push our visual designs further to augment our characters more with futuristic technology. More cybernetic enhancements and wearable tech can make the world feel more distinctly sci-fi.